
User Guide
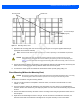
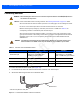
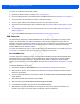
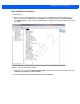
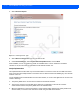
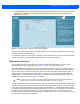
Table Of Contents
- Warranty
- Revision History
- About This Guide
- Quick Start
- Getting Started
- Installation and Communication
- Administrator Console
- Introduction
- Connecting to the Reader
- Administrator Console Login
- Reader Administrator Console
- Status
- Reader Statistics
- Configure Reader
- Read Tags
- Communication Settings
- System Time Management
- IPV6 IP Sec
- Change Password
- GPIO
- Applications
- Reader Profiles
- Firmware Version/Update
- Commit/Discard
- System Log
- Reader Diagnostics
- Shutdown
- Wi-Fi Configuration
- Application Development
- Firmware Upgrade
- Troubleshooting
- Technical Specifications
- Static IP Configuration
- RF Air Link Configuration
- Connecting Wi-Fi and Bluetooth Dongles
- Copying Files To and From the Reader
- Data Protection

3 - 6 FX7500 RFID Reader Integrator Guide
To connect to a network that is not POE capable:
1. Terminate the Ethernet cable according to Table A-2 on page A-4.
2. Connect the Ethernet cable to the FX7500 reader 10/100BaseT Ethernet port. See Figure 2-4 on page 2-4.
3. Connect the other end of the Ethernet cable to a POE power injector.
4. Connect a patch cable from the POE power injector to the host system LAN port.
5. Verify that the unit booted properly and is operational. See System Start-up/Boot LED Sequence on page
3-11.
6. On a networked computer, open an internet browser and connect to the reader. See Connecting to the
Reader on page 4-3.
7. Log in to the Administrator Console. See Administrator Console Login on page 4-6.
USB Connection
The USB client port supports (by default) a Network mode of operation. This enables a secondary network
interface as a virtual adapter over USB. The interfaces co-exist and if the Ethernet connection fails, the
application can switch to USB using a specific IP and can control the reader. To use the USB port for network
connection, install the USB RNDIS Driver on the Windows XP PC or follow the instructions to install the
Microsoft RNDIS driver for Windows 7 below.
To connect the FX7500 to the host PC, insert a USB cable into the USB client port on the reader. See Figure
2-4 on page 2-4. Connect the other end of the cable to a USB port on the host PC.
Zebra USB RNDIS Driver
To use the USB port for network connection, install the Zebra USB Remote Network Device (RNDIS) driver
and enable the driver on the FX7500. The Zebra RNDIS driver supports 32-bit version operating systems
Windows XP, Windows Vista, Windows 7, and Windows Server 2008. For Windows 7 32-bit and 64-bit
systems, it is recommend to use Microsoft RNDIS driver (see Microsoft RNDIS Driver for Windows 7 on page
3-7).
To install the RNDIS driver on the host.
1. Download the installer file Zebra RNDIS.msi from http://www.zebra.com/support to the host PC.
2. Select this file on the host PC to install the host side drivers for using the USB Remote Network Device
Interface on the FX7500.
3. Connect a USB cable between the host and the reader. The Welcome to the Found New Hardware Wizard
screen appears.
4. Select the No, not this time radio button and click Next.
5. Select the default option Install Software Automatically (Recommended).
6. In the Hardware Installation pop-up window, select Continue Anyway.
7. Select Finish to complete the installation. This assigns the host an auto-configured IP address. The
network is now ready to use and the reader’s IP address is fixed to 169.254.10.1.
Draft 2