
User Guide
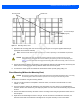
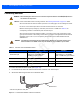
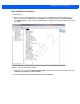
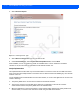
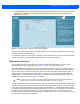
Table Of Contents
- Warranty
- Revision History
- About This Guide
- Quick Start
- Getting Started
- Installation and Communication
- Administrator Console
- Introduction
- Connecting to the Reader
- Administrator Console Login
- Reader Administrator Console
- Status
- Reader Statistics
- Configure Reader
- Read Tags
- Communication Settings
- System Time Management
- IPV6 IP Sec
- Change Password
- GPIO
- Applications
- Reader Profiles
- Firmware Version/Update
- Commit/Discard
- System Log
- Reader Diagnostics
- Shutdown
- Wi-Fi Configuration
- Application Development
- Firmware Upgrade
- Troubleshooting
- Technical Specifications
- Static IP Configuration
- RF Air Link Configuration
- Connecting Wi-Fi and Bluetooth Dongles
- Copying Files To and From the Reader
- Data Protection

3 - 8 FX7500 RFID Reader Integrator Guide
4. Select Network adapters.
Figure 3-4
Selecting Device Type
5. Select Microsoft Corporation from the manufacturer list.
6. Under Network Adapter, select Remote NDIS Compatible Device, and click Next.
After installation, the PC recognizes the reader as an RNDIS device. The PC obtains the IP address
169.254.10.102, and the reader is reachable at the IP address 169.254.10.1.
Sample Implementation
This implementation assumes that only one FX7500 reader is connected to a host PC via USB. This feature
does not function with multiple readers connected to the host. Zebra recommends disabling any other network
interface on the PC.
Use an application that uses RFID3 APIs such as Power Session, or use an LLRP application to connect to the
reader to read tags.
1. The primary RFID server connects to the FX7500 via the Ethernet interface.
2. The host PC connects to the FX7500 via the USB port. An application on the host PC monitors
communication between the primary RFID server and FX7500 reader.
3. When the application on the host PC detects a communication failure between the primary RFID server
and the reader, it connects to and controls the reader using the USB virtual interface.
Draft 2