
User's Manual


Setup and Deployment
13
MiSC Assembly
The MiSC hardware consists of commercial off-the-shelf components. The components are
pre-configured with a basic configuration that requires minimal site-specific changes.
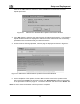
The SMC switch arrives configured as two virtual LANs. The upper row of Ethernet ports is for
the server subnet; the lower row of ports is for the wireless subnet.
Unpack the SMC switch and mount as desired (either in a rack or on a table top). Connect the
switch to a power source.
Unpack the Cisco router labeled “EdgeRTR” and connect to a power source. Plug interface
labeled “10BT Ethernet” into the Internet or the Network Operator’s private network. (The
network operator supplies this cable; it will be an Ethernet cable for connecting to a hub or
switch, or an Ethernet crossover cable if connecting to another router.) Plug interface labeled
“10/100 Ethernet” into the SMC switch on port 1.
Unpack the Cisco router labeled “CoreRTR” and connect to a power source. Plug interface
labeled “10BT Ethernet” into the SMC switch on port 12. Plug the interface labeled “10/100
Ethernet” into the SMC switch on port 24.
Unpack the Sun Blade/MeshManager server and monitor and connect to a power source. Plug
the network interface into any of the ports 2-11 on the SMC Switch.
Connect Network Operator supplied computer running Windows 2000. Plug the network
interface into any of the ports 2-11 on the SMC Switch.
Connect the IAPs to any of the ports 13-23 on the SMC switch.