Using the MC65 2 - 25 Table 2-6 MC65 Numeric Keypad Descriptions (Continued) Key Description Talk (Green Phone): press to display the phone keypad window or to dial a phone number (from the phone keypad window). When on a phone call, press to place the call on hold. Use this key in conjunction with the Blue key to instantly display the Start menu from any application without tapping the screen. This function is user programmable. Scan (yellow) Activates the scanner/imager in a scan enabled application.
- 26 MC65 User Guide Table 2-6 MC65 Numeric Keypad Descriptions (Continued) Key Description Backspace Produces a backspace. SHIFT Press and release the SHIFT key to activate the keypad alternate SHIFT functions. ar y A single press displays the following icon at the bottom of the screen, until a second key is pressed: Press the Orange key, then the Shift key to add a temporary shift (that applies only to the next key pressed) to the orange lock state.
Using the MC65 2 - 27 Table 2-7 Numeric Keypad Input Modes (Continued) Orange Key (Alpha Lowercase Mode) Numeric Mode Orange + Shift Keys (Alpha Uppercase Mode) Key Blue+ Key SHIFT + Key 1st Press 2nd Press 3rd Press 4th Press 1st Press Up Up Hilight Up Left Left Down Down Down Hilight Down Right Right Enter Action Action Action Action 3rd Press ar y Up 2nd Press 4th Press Action Note: An application can change the key functions.
2 - 28 MC65 User Guide ar y ok el im ok in Figure 2-34 AZERTY Keypad Configuration Pr Figure 2-35 QWERTZ Keypad Configuration
Using the MC65 2 - 29 Table 2-8 Alpha-numeric Keypad Descriptions Key Action Blue Key Press the Blue key once to activate this mode temporarily, followed by another key. This displays the following icon at the bottom of the screen, until a second key is pressed: Press the Blue key twice to lock this mode. This displays the following icon at the bottom ar y of the screen: Press the Blue key a third time to unlock.
2 - 30 MC65 User Guide Table 2-8 Alpha-numeric Keypad Descriptions (Continued) Key Action Soft Keys Accesses the command or menu above it on the screen. Shift Changes the state of the alpha characters from lowercase to uppercase. • Press the Shift key to activate this mode temporarily, followed by another key. This displays the following icon at the bottom of the screen, until a second key is ar y pressed: • Press the Shift key twice to lock this mode.
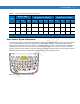
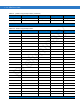
Using the MC65 2 - 31 Table 2-9 QWERTY Keypad Input Modes (Continued) Key Normal Shift + Key Orange + Key Blue + Key t T + t Y y Y _ y U u U - u I i I = i O o O “ o P p P A a A S s S D d D F f F G g H h J j L Backspace Shift Z X p # a 4 s 5 d 6 f in G ( g H ) h J / j k K : k l L ‘ l Backspace Backspace Backspace Backspace Shift Shift-Lock Shift Shift z Z 7 z x X 8 x c C 9 c Pr C áü el im K ar y T V v
2 - 32 MC65 User Guide Table 2-9 QWERTY Keypad Input Modes (Continued) Key Normal Shift + Key Orange + Key Blue + Key Backlight Backlight Backlight Backlight Backlight . (Period) . > . . Note: An application can change the key functions. The keypad may not function exactly as described.
Using the MC65 2 - 33 Table 2-10 AZERTY Keypad Input Modes (Continued) Key Normal Shift + Key Orange + Key Blue + Key v V % v B b B & b N n N ! n M m M ? m , , < @ Enter Enter Enter 0 0 ) TAB Tab Tab SPACE Space Space Backlight Backlight Backlight . (Period) . ar y V Enter 0 0 Back tab Tab Space Space Backlight Backlight in Enter > . . el im Note: An application can change the key functions. The keypad may not function exactly as described.
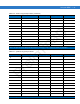
2 - 34 MC65 User Guide Table 2-11 QWERTZ Keypad Input Modes (Continued) Key Normal Shift + Key Orange + Key Blue + Key h H ) h J j J / j K k K : k L l L ‘ l Backspace Backspace Shift Shift Y y Y X x X C c C V v V B b N n M m ENTER 0 TAB SPACE Backlight y 8 x 9 c % v in B & b N ! n M ? m , < @ , Enter ENTER ENTER Enter 0 ) 0 0 Tab Tab Back tab Tab Space Space Space Space Backlight Backlight Backlight Backlight . > . .
ar y Using the MC65 2 - 35 Figure 2-36 MC65 PIM Keypad Table 2-12 MC65 PIM Keypad Descriptions Description This key is user programmable. To use a key as an application key (APP key) on the keyboard, create and install a new keyboard remap table. However, to remap the green phone key as APP keys through the registry, create an XML provisioning file that includes the following entry: el im Talk (Green Phone) in Key
2 - 36 MC65 User Guide Table 2-12 MC65 PIM Keypad Descriptions (Continued) Key Description Moves up one item. Scroll Down Moves up down item. Scroll Left Moves left one item. Scroll Right Moves right one item. Soft Keys Accesses the command or menu above it on the screen. in el im Enter ar y Scroll Up Executes a selected item or function. Use this key as an OK or close button.
Using the MC65 2 - 37 character, move the cursor to the right of the character then press the Orange key twice and then press the áü key until the special character replaces the original character. Table 2-13 lists the special characters you can generate. Table 2-13 Special Characters Special Characters Key A c C d D e E i I l L n N o O p P in a r R t u y z $ “ ) Pr ! S el im s T U Y Z / ( + .
2 - 38 MC65 User Guide Function Buttons The MC65’s buttons perform certain functions. ar y Scan/Action Button Action Button Scan/Action Button el im Power Button in Volume Up/Down Button Figure 2-37 Function Buttons • Power: Press the red Power button to turn the MC65 screen on and off. The MC65 is in suspend mode when the screen is off. For more information, see Powering On the MC65 on page 1-8. Also use the Power button to reset the MC65 by performing a warm or cold boot.
Using the MC65 2 - 39 Entering Data el im in ar y When entering data on the keypad, use either the single-hand method or the two-hand method as shown in Figure 2-38.
2 - 40 MC65 User Guide Data Capture The MC65 offers three types of data capture options: • Imaging • Digital camera. To perform data capture a scanning enabled application must be installed on the MC65. A sample scanning application can be downloaded from the Motorola Support site at http://support.symbol.com.
Using the MC65 2 - 41 Scanning Considerations Typically, scanning is a simple matter of aim, scan, and decode and a few quick trial efforts master it. However, consider the following to optimize scanning performance: • Range Any scanning device decodes well over a particular working range — minimum and maximum distances from the bar code. This range varies according to bar code density and scanning device optics.
2 - 42 MC65 User Guide Linear bar code PDF417 symbol Linear bar code Symbol Symbol View Finder (Aiming Pattern) Aiming Dot Correct Figure 2-40 Imager Aiming Pattern: Bar Code Centered Incorrect ar y Correct Correct Incorrect in Correct PDF417 symbol el im Figure 2-41 Imager Aiming Pattern: Bar Code Not Centered Figure 2-42 Pick List Mode with Multiple Bar Codes in Aiming Pattern 4. Release the scan button. Imager decoding usually occurs instantaneously.
Figure 2-43 Sample Scan Application with Preview Window ar y Using the MC65 2 - 43 Move the MC65 until the red aiming reticle is over the bar code to scan. 5. The Scan/Decode LED lights green and a beep sounds, by default, to indicate the bar code was decoded successfully. The camera decode feature is set by default to automatically decode the bar code when read.
2 - 44 MC65 User Guide Recording Video To record a video clip: 1. Tap Start > Programs > Pictures & Videos icon. 2. Tap Camera on the command bar. 3. Tap Menu > Video to set shooting mode to video. NOTE 4. ar y The available recording time displays on the screen. By default, the time limit for recording videos is set to 30 seconds. Press the Enter key to begin recording. Viewing Photos and Videos To view photos and video clips: in Recording stops when you press the Enter button again.
ar y Chapter 3 Using GPS Navigation in Introduction el im The MC65 includes Global Positioning System (GPS) technology using the SiRF III chipset. GPS technology is based on a worldwide system of GPS satellites orbiting the earth that continuously transmit digital radio signals. These radio signals contain data on the satellites’ locations and their exact clock time and are used to determine your location on the earth.
3-2 MC65 User Guide 4. Select 57600 from the Baud rate drop-down list. 5. Tap ok to close the Setting window. NOTE If an application error message appears indicating that the COM port cannot be opened, ensure that a free COM port is selected in the GPS hardware port drop-down list. Operation When using a GPS navigation application, ensure that the MC65 does not go into suspend mode. If the MC65 suspends then the power to the GPS radio is removed.
ar y Chapter 4 Using the Phone NOTE in Introduction Use this chapter if your MC65 is configured with the Window Mobile dialer. el im Use the MC65 to make phone calls, set up speed dials, keep track of calls, and send text messages. Your wireless service provider may also provide other services such as voice mail, call forwarding, and caller ID. Also use the integrated phone to connect to an ISP or work network in order to browse the Web and read e-mail.
4-2 MC65 User Guide Smart Dialing Smart Dialing makes it easy to dial a phone number. When you start entering numbers or characters, Smart Dialing automatically searches and sorts the contact entries on the SIM card, in Contacts, and the phone numbers in Call History (including incoming, outgoing, and missed calls). You can then select the desired number or contact from the filtered list to dial.
Using the Phone 4-3 Using Contacts Use Contacts to make a call without looking up or entering the phone number. To make a call from Contacts: Tap > Contacts. 2. From the contact list, tap and hold the contact name. 3. el im Figure 4-2 Contacts Menu in ar y 1. Tap Call Work, Call Home or Call Mobile. NOTE To make a call from an open contact, tap the number to call. See On-Device Help for more information about Contacts.
4-4 MC65 User Guide 4. Tap End or press the red phone key on the MC65 keypad to stop dialing or end the call. Making a Speed Dial Call Use Speed Dial to call someone saved in the speed dial directory. To make a speed dial call: Tap > Phone or press the green key. 2. From the Phone keypad, tap and hold the speed dial location number assigned to a contact. (To dial a one-digit speed dial location number, tap and hold the speed dial number.
Using the Phone 4-5 To end the call tap End or press the red key. Incoming Call Features • If you receive a call while in a call, tap Wait to place the call in call waiting. • You can use other programs on the MC65 during a call. To switch back to the Phone, tap Talk or tap > Phone. Tap End to end the call. • If a caller isn't in your contact list, create a contact during the call or from Call History by tapping Menu > ar y Save to Contacts.
4-6 MC65 User Guide • Headset Mode: Connect a Bluetooth headset or a wired headset to automatically switch audio to the headset. The MC65 defaults to handset mode. When a wired headset is plugged into the MC65 headset connector or a Bluetooth headset is configured for use with the MC65, the earpiece and speakerphone are muted and audio is heard through the headset. NOTE While using a Bluetooth headset during a call, the MC65 will not go into suspend mode.
Using the Phone 4-7 Adjusting Audio Volume Use the Volume Control Slider or the keypad keys to adjust the volume of the ringer when not in a call and the audio volume when in a call. ar y Phone Volume Slider in Figure 4-7 Phone Volume Slider To adjust the volume tap the Speaker icon in the Title bar. Move the slider up or down to adjust the volume. Muting a Call Adjust the conversation phone volume during a call.
4-8 MC65 User Guide Using Call History Use Call History to call someone who was recently called, or recently called in. Call History provides the time and duration of all incoming, outgoing, and missed calls. It also provides a summary of total calls and easy access to notes taken during a call. Table 4-1 lists the call history icons that appear in the Call History window. Table 4-1 Call History Icons Description ar y Icon This icon appears next to the contact information for all outgoing calls.
2. From the Phone keypad, tap Call History. 3. Tap Menu. ar y Using the Phone Figure 4-10 Call History - Tools Menu Select Call Timers... . el im in 4. Figure 4-11 Call History - Call Timers Tap Reset. (The All Calls: counter cannot be reset.) 6. Tap Pr 5. to exit the Call Timers window. Deleting All Call History Items 1. Tap > Phone or press the green key to display the Phone keypad. 2. From the Phone keypad, tap Call History. 3. Tap Menu.
ar y 4 - 10 MC65 User Guide Figure 4-12 Call History - Tools Menu Select Delete all calls. Figure 4-13 Call History - Delete All Dialog Tap Yes. 6. Tap ok to exit the Call History window. el im 5. in 4. Viewing Call Status Tap > Phone or press the green key to display the Phone keypad. 2. From the Phone keypad, tap Call History. 3. Tap an entry. The Call Status window appears. Pr 1.
Using the Phone 4 - 11 4. Tap ok and then ok to exit. Using the Call History Menu Use the Call History menu to dial voice mail, access the Activation Wizard, save to contacts, view a note, delete a listing, send an SMS, and make a call. > Phone or press the green key to display the Phone keypad. 2. From the Phone keypad, tap Call History. 3. Tap and hold an item in the list. ar y Tap el im in 1. Figure 4-15 Call History - Menu 4. Select an applicable item from the menu, as needed. 5.
Figure 4-16 Call Swapping - Hold Tap Hold on to place the first number on hold. 4. Enter the second number and tap Talk. el im in 3. ar y 4 - 12 MC65 User Guide Figure 4-17 Call Conferencing - Conferencing Tap Swap to move from one call to the other. 6. Tap End or press the red phone key on the MC65 keypad to end each call. Pr 5. Swapping Calls on CDMA To swap between two incoming phone calls: 1. Tap Answer to connect to the first call.
Figure 4-18 Answer a Call ar y Using the Phone 4 - 13 When a second call arrives, tap Answer. The first call is placed on hold. 3. Tap Talk to swap from one call to the other. el im in 2. Figure 4-19 Call Swapping Tap End or press the red phone key on the MC65 keypad to end active call. The remaining call re-connects, tap Answer to connect to the call. Pr 4. 5. Tap End or press the red phone key on the MC65 keypad to end the last call.
Figure 4-20 Conference Call - Hold ar y 4 - 14 MC65 User Guide Tap Hold to place the first call on hold. 4. Enter the second phone number and tap Talk. 5. After the call is answered, tap Menu > Conference to place the calls in conference mode. el im in 3. Figure 4-21 Creating a Conference Call Tap Hold to place the conference on hold. 7. Enter another phone number and tap Talk. 8. After the call is answered, tap Menu > Conference to place all the calls in conference mode. 9.
Using the Phone 4 - 15 Three-way Calling on CDMA NOTE Three-way Calling may not be available on all services. Please check with your service provider for availability. To create a three-way phone session with two people and you as the initiator: Tap > Phone or press the green phone key on the MC65’s keypad to display the Phone keypad. 2. Enter the first phone number and press Talk. 3. To call a second person, tap Keypad. Enter the second number and tap Talk. el im in ar y 1.
4 - 16 MC65 User Guide Establishing a GSM Data Connection NOTE Refer to the MC65 Series Enterprise Smartphone Integrator Guide for information on configuring a data connection. 7. Ensure a SIM card is installed in the MC65. 8. Configure a GPRS data connection. See MC65 Series Enterprise Smartphone Integrator Guide. 9. Tap the connectivity icon or at the top of the screen. el im in ar y , Figure 4-23 Connectivity Dialog Box 10. Tap Settings. 11. Tap Connections icon. 12.
ar y Using the Phone 4 - 17 Figure 4-25 Connecting Using GPRS 15. If the SIM card is protected with a Personal Identification Number (PIN), a dialog box pops up requesting the appropriate PIN to unlock the SIM card. In this case, enter the PIN and tap ok. Place emergency calls at any time, without entering a PIN or a SIM card. in NOTE 16. When a connection is established, launch Internet Explorer to browse the Internet or launch an applicable el im application.
4 - 18 MC65 User Guide Establishing an CDMA Data Connection NOTE Ensure that you have data service activated with your service provider. A data connection allows Internet access across a wireless network. Data connection is pre-packaged with service accounts. 1. Tap > Internet Explorer. 2. In the address bar, enter a URL for a web site. 3. Tap ar y To verify active data service: el im in to display the Connectivity dialog. The dialog box displays the data connection information.
Using the Phone 4 - 19 2. Tap Disconnect. NOTE Tapping Disconnect during an active data transfer (e.g., downloading a web page) automatically reconnects the connection. You cannot disconnect the connection until the data transfer is complete. Configuring a GSM Data Connection A data connection allows Internet access across a wireless network. To set up a new data connection: Acquire an Access Point Name (APN) from the service provider. 2. Tap ar y 1.
Figure 4-31 Connections Window - Access Point Name ar y 4 - 20 MC65 User Guide Enter the APN from the service provider in the Access point name: text box. 8. Tap Next. el im in 7. Figure 4-32 Connections Window - User Name & Password 9. Enter a username in the User name text box, if required by the service provider. Pr 10. Enter a password in the Password text box, if required by the service provider. 11. Enter a domain name in the Domain text box, if required by the service provider. 12.
Using the Phone 4 - 21 MC65 Settings Use the Phone Settings window to customize settings, such as the ring type and ring tone for incoming calls, security options, and other options depending on the type of service. Phone Use the Phone tab to customize ring type, ring tone, keypad tone. > Settings > Personal tab > Phone icon > Phone tab ar y Tap or el im in > Phone > Menu > Options > Phone tab.
4 - 22 MC65 User Guide Security Enabling a PIN Place emergency calls at any time, without requiring a PIN or a SIM card. Figure 4-34 Security Tab To require a PIN when using the phone: el im From the Security tab (Figure 4-34), select the Require PIN when phone is used check box under Security. Pr 1. in ar y NOTE Figure 4-35 Enter PIN 2. Use the touch keypad to enter a four to eight digit PIN. 3. Tap Enter to enable the PIN and return to the Phone tab.
Using the Phone 4 - 23 3. Tap Enter. 4. Use the touch keypad to enter a new four to eight digit PIN. 5. Tap Enter. 6. Reenter the new PIN for confirmation and tap Enter. 7. Tap ok to confirm the change. Disabling a PIN From the Security tab (Figure 4-34), deselect the Require PIN when phone is used check box. 2. Use the touch keypad to enter the current PIN. 3. Tap Enter. 4. Tap ok to confirm the change and exit settings. in Services ar y 1. 1.
ar y 4 - 24 MC65 User Guide Figure 4-37 Call Barring/Call Blocking Caller ID el im in Enable caller ID to reveal the identity of the person making an outgoing call. Select the Everyone radio button to always display the caller ID. Select the No one radio button to prevent the caller’s identity from appearing to others. Pr Figure 4-38 Caller ID Call Forwarding NOTE Call Forwarding may not be available on all networks. Check with your service provider for availability.
Using the Phone 4 - 25 • To forward incoming calls to a different phone number based on a specific situation, select one or more of the check boxes under Forward phone calls only if:. • No answer: enter the phone number to receive forwarded calls only when the phone cannot be answered. Then select a time period from the Forward after: drop-down list. Options are 5, 10, 15, 20, 25, and 30 seconds.
ar y 4 - 26 MC65 User Guide Figure 4-41 Voice Mail and Text Messages Fixed Dialing Select Fixed Dialing and tap Get Settings. el im 1. in Use Fixed Dialing to restrict the phone to dial only the phone number(s) or area code(s) specified in a Fixed Dialing list. Pr Figure 4-42 Fixed Dialing Window 2. Select the Enable fixed dialing check box. 3. To add a number to the list, tap Menu > Add. 4. Enter the phone number or area code to restrict and tap Done. 5.
Using the Phone 4 - 27 Phone Network Setup Activation Test Approximately four hours after activation is completed, test the service. Tap > Phone. el im Figure 4-43 Phone Window - Example in ar y 1. 2. Ensure the carrier name displays on the window. 3. Make a voice call to ensure activation was successful. If activation was not successful, contact the service provider.
4 - 28 MC65 User Guide NITZ The ability to enable/disable network time synchronization provides the user flexibility on time zone changes. If you enable network time synchronization, users can turn this feature on or turn it off and set up user notifications for time changes. This feature is inaccessible by the user. > Settings > Clock & Alarms > Time Zone tab.
ar y Chapter 5 Using Bluetooth in Introduction el im Bluetooth-equipped devices can communicate without wires, using frequency-hopping spread spectrum (FHSS) radio frequency (RF) to transmit and receive data in the 2.4 GHz Industry Scientific and Medical (ISM) band (802.15.1). Bluetooth wireless technology is specifically designed for short-range (30 feet/10 meters) communication and low power consumption. MC65s with Bluetooth capabilities can exchange information (e.g.
5-2 MC65 User Guide Security The current Bluetooth specification defines security at the link level. Application-level security is not specified. This allows application developers to define security mechanisms tailored to their specific need. Link-level security occurs between devices, not users, while application-level security can be implemented on a per-user basis.
Using Bluetooth 5-3 Bluetooth Configuration MC65MC65MC65The services supported by the Microsoft Bluetooth stack. • OBEX Object Push Services • Hands-Free Audio Gateway Services • Serial Port Services • PBAP Services The COM ports available for the Microsoft Bluetooth stack. • COM5 Bluetooth Power States Cold Boot in • COM9 ar y • Personal Area Networking Services Warm Boot el im Performing a cold boot on the MC65 turns off Bluetooth after initialization (which takes a few moments).
5-4 MC65 User Guide Using Microsoft Bluetooth Stack Table 5-1 Miscellaneous tab Data Item Description Select the connection type to highlight when connected. In the Wizard Mode, the only options are Favorites or None. In the Explorer Mode the options are None, Tree View Only, List View Only, or Tree and List View. Apply Text Style Select the text style to apply to the connection text. Apply Text Color Select the text color to apply to the connection text.
Using Bluetooth 1. 5-5 Tap Wireless Manager and then tap the Bluetooth bar or Tap Start > Setting > Connections > Bluetooth icon > Mode tab. 2. Un-check the Turn On Bluetooth checkbox. 3. Tap ok. Discovering Bluetooth Device(s) To find Bluetooth devices in the area: ar y The MC65 can receive information from discovered devices without bonding. However, once bonded, the MC65 and a bonded device exchange information automatically when you turn the Bluetooth radio on.
Figure 5-4 Select a Bluetooth Device 7. Tap Next. The Enter Passcode window appears. If Smart-pairing is configured and the device is requesting one of the pre-defined PINs, the Enter Passcode window does not appear. el im in NOTE ar y MC65 User Guide Figure 5-5 Enter Passcode Pr 5-6 8. Enter the Passcode on the other device. The device is added to the Bluetooth list.
5-7 ar y Using Bluetooth Figure 5-6 Bluetooth Connection Confirmation You are prompted to enter a passcode. If the device has a specific passcode, enter it in the Passcode field and tap Next. If the device does not have a specific passcode, enter one in the Passcode field and tap Next. The Bluetooth radio tries to connect with the device. If you created a passcode, you will be prompted by the other device to enter the same passcode. Enter the created passcode to establish a paired connection.
MC65 User Guide Use the OBEX Push Service to send files and contacts to another Bluetooth device. To transfer files between the MC65 and another Bluetooth enabled device: Ensure that Bluetooth is enabled and discoverable on both devices. 2. Ensure that the two devices are within 30 feet (10 meters) of one another. 3. Tap Start > Programs > File Explorer. 4. Navigate to the file to transfer. 5. Tap and hold on the filename until the pop-up menu appears.
Using Bluetooth Tap and hold on the contact until the pop-up menu appears. ar y 5. 5-9 Figure 5-9 Contact Window Select Send Contact > Beam. The MC65 searches for Bluetooth devices in the area. 7. Tap Tap to send next to the Bluetooth device to send the file to. The MC65 communicates with the device and send the contact. When completed, Tap to send changes to Done. Internet Sharing in 6.
5 - 10 MC65 User Guide 9. To end dial-up networking, on the MC65 tap Disconnect. Hands-free Services To connect to a Bluetooth headset: NOTE Newer Bluetooth headsets are device dependant and remember the last device they connected to. If problems occur while connecting to the headset, place the headset in discovery mode. Refer to the headset user manual for more information. ar y Only WAN audio is routed to the headset. System audio is still emitted through the MC65 speaker.
Using Bluetooth 5 - 11 1. Ensure that Bluetooth is enabled and discoverable on both devices. 2. Ensure that the two devices are within 30 feet (10 meters) of one another. 3. Tap Start > Settings > Connections tab > Bluetooth icon > Devices tab. 4. Tap Add new device. The MC65 begins searching for discoverable Bluetooth devices in the area. 5. Select a device from the list. 6. Tap Next. The Enter Passcode window appears.