Compact Flash (802.11b) and Bluetooth Co-located Radio Modules The following section only applies when the CF (Compact Flash) WLAN module ( FCC ID: H9PLA4137) and Bluetooth module (FCC ID: I28MD-BTC2TY4) are installed in a QL 220 Plus or 420 Plus printer. This co-located radio configuration has demonstrated compliance to FCC regulations. The FCC ID numbers are on the serial number label on the back of the printer and can be read with the module installed.
office use in all EU and EFTA member states, except in France where restrictive use applies. The use of this frequency band in France is subject to restrictions. You may only use channels 10 and 11 (2457 and 2462 MHz) on French territory, except in those French departments as listed in the table below where channels 1-13 (24122472 MHz) may be used. For more information see http://www.anfr.fr/ and/or http://www.art-telecom.
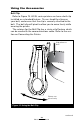
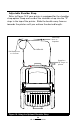
Using the Accessories Belt Clip Refer to Figure 15. All QL series printers are have a belt clip installed as a standard feature. To use: hook the clip over your belt, and ensure that the clip is securely attached to the belt. The belt clip will pivot to allow you to move freely while wearing the printer. The retainer for the Belt Clip has a strain relief feature which can be used with the communications cable. Refer to the section on Connecting the Printer.
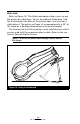
Kickstand Refer to Figure 16 . The Kickstand option allows users to use the printer on a desktop. To use the optional Kickstand: Flip the Kickstand on the back of the printer open until you feel a slight detent. The printer will now sit at approximately a 30º to 45° angle on a desktop depending on the printer model. The retainer for the Kickstand has strain relief features which can be used with the communications cable. Refer to the section on Connecting the Printer.
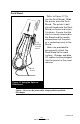
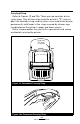
Desk Stand Hook Belt Clip over the Stand Refer to Figure 17. To use the Desk Stand: Slide the printer onto the Desk Stand. The printer’s belt clip will hook onto the Desk Stand as shown and retain it in place. Ensure that the clip is securely attached to the Stand and the media compartment of the printer is seated securely in the Stand. Holes are provided to permanently attach the Desk Stand to the work surface. Charger and data I/O cables may be plugged into the printer in the usual manner.
Adjustable Shoulder Strap Refer to Figure 18 if your printer is equipped for the shoulder strap option. Snap each end of the shoulder strap into the “D” rings in the top of the printer. Slide the buckle away from or towards the printer until you achieve the desired length.
Carrying Strap Refer to Figures 19 and 19a. There are two varieties of carrying strap. One of them clips onto the printer’s “D” rings as does the shoulder strap, and the other is secured to the printer permanently with loops in the strap secured by sleeves captured between the printer’s upper and lower covers. Either strap provides the user with a convenient and secure method of carrying the printer.
Preventive Maintenance Extending Battery Life • Never expose the battery to direct sunlight or temperatures over 104° F (40° C). • Do not charge the battery when the temperature exceeds 113° F (45° C). • Always use a Zebra charger designed specifically for Lithium-Ion batteries. Use of any other kind of charger may damage the battery. • Use the correct media for your printing requirements. An authorized Zebra re-seller can help you determine the optimum media for your application.
General Cleaning Instructions Caution • To avoid possible personal injury or damage to the printer, never insert any pointed or sharp objects into the printer. Always turn the printer off before performing any cleaning procedures. Use care when working near the tear bar. The edges are very sharp. Caution • The printhead can be very hot after prolonged printing. Allow it to cool off before attempting any cleaning procedures.
QL 220 Cleaning Area Method Interval Printhead (Figure 20) Use the supplied cleaning pen or 70% isopropyl alcohol on a cotton swab to clean the print elements from end to end (the print elements are located in the thin gray line on the printhead). Platen Roller (Figure 20) Rotate the platen roller and clean it thoroughly with the cleaning pen or 70% isopropyl alcohol and a cotton swab. Linerless Platen Roller (Figure 20a) Units with linerless platens: Rotate platen & clean bearing points only.
Label Presence Sensor Peeler Rollers Tear Bar Printhead Elements Peeler Bar Gap Sensor Bar Sensor Platen surface Figure 20: Cleaning the QL 220 Bearing Points Linerless Platens only Support Disks, Inner surfaces on both sides. Scraper Linerless units only Platen surface Avoid using alcohol on linerless platen surface Linerless units only.
QL 320 Cleaning Area Printhead (Figure 21) Platen Roller (Figure 21) Method Interval Use the supplied cleaning pen or 70% isopropyl alcohol on a cotton swab to clean the print elements from end to end (the print elements are located in the thin gray line on the printhead). Rotate the platen roller and clean it thoroughly with the cleaning pen or 70% isopropyl alcohol and a cotton swab. Units with linerless platens: Rotate platen & clean bearing points only.
Peeler Bar Rollers Label Presence Sensor Located under “EZ-Peel” Peeler Tear Bar Printhead Elements Bearing Points Linerless Platens only Gap Sensor Peeler Bar or Scraper Scraper used on units with linerless platens Bar Sensor Platen surface Avoid using alcohol on linerless platen surface Media Disks, Inner surfaces on both sides. Units with linerless platens only.
QL 420 Cleaning Area Printhead (Figure 22) Platen Roller (Figure 22) Method Interval Use the supplied cleaning pen or 70% isopropyl alcohol on a cotton swab to clean the print elements from end to end (the print elements are located in the thin gray line on the printhead). Rotate the platen roller and clean it thoroughly with the cleaning pen or 70% isopropyl alcohol and a cotton swab.
Label Presence Sensor Peeler Bar Rollers Tear Bar Printhead Elements Bearing Points Linerless Platens only Gap Sensor Peeler Bar or Scraper Edge Guides, Inner surfaces on both sides. Scraper used on units with linerless platens Media Roller Units with linerless platens only.
Troubleshooting Standard Control Panel If the printer is not functioning properly, refer to the chart below to find the state of the two LEDs on the Control Panel. Then refer to the Troubleshooting topic referenced in the chart to resolve the problem. Green LED Yellow LED Indication Ref.
Troubleshooting Topics 1. No power • Check that battery is installed properly. • Recharge or replace battery as necessary. Always dispose of batteries properly. Refer to Appendix D for more information on proper battery disposal. 2. Media does not feed: • Be sure print head is closed and latched. • Check spindle holding media for any binding. • If unit is equipped with label presence sensor: Ensure most recently printed label is removed. Also ensure label sensor is not blocked. 3.
Refer to Appendix D for more information on proper battery disposal. 8. Yellow error light or flashing: • No application or application corrupted: reload program. • If using wireless communications: flashing indicator is normal while data is being transmitted or received. 9. Yellow error light always on, or flashing: • Check that media is loaded and that the print head is closed and securely latched. 10. Skips labels: • Check media for top of form sense mark or label gap.
Troubleshooting Tests Printing a Configuration Label To print out a listing of the printer’s current configuration follow these steps: 1. Turn the printer off. Load the media compartment with journal media (media with no black bars printed on the back) 2. Press and hold the Feed Button. 3. Press and release the Power button and keep the Feed button pressed. When printing starts, release the Feed button. Refer to Figures 23 and 24 for sample configuration printouts.
To terminate the Communications Diagnostics Mode and return the printer to normal operations: 1. Turn the printer OFF. 2. Wait 5 seconds. 3. Turn the printer ON. Calling Technical Support If the printer fails to print the configuration label, or you encounter problems not covered in the Troubleshooting Guide, contact Zebra Technical Support. Technical Support addresses and phone numbers for your area can be found in Appendix D of this manual.
Print Head Test End of First Report Unit Serial Number Application Number Report appears only on units with wireless options installed. Units with no wireless options will print an empty line and This example has a Bluetooth™ module installed. (Refer to page 32 for more details.
Peripherals installed: In this example the LCD display option is not installed. Flash Memory Size Maximum Label Size Resident Fonts Pre-scaled font (.
Print Head Test Identifies Printer as a QL Plus series End of First Report Unit Serial Number Application Number Report appears only on units with wireless options installed. Units with no wireless options will print an empty line and resume This unit has a 802.11b radio option installed.
Peripherals installed: In this example the LCD display option is installed.
Files Loaded in Printer Memory (will include Pre-scaled or Scalable Fonts) EPL and ZPL emulation is standard on QL Plus series Figure 24b: QL Plus Configuration Label Example (continued) 71 QL Series User Guide
Specifications Note.- Printer specifications are subject to change without notice. Printing Specifications QL 220/220 Plus Print Width QL 320/320 Plus QL 420/420 Plus Up to 1.89 in. (48 mm) Up to 2.9 in. (71.2 mm) Up to 4.09 in. (103.8 mm) Print Speed 3” per second (76.2 mm/second) 4” per second (101.6 mm/second) 3” per second (76.2 mm/second) Distance from Print Element to Top of Form .445 in. (11.3 mm) 89 dots .571 in. (14.5 mm) 116 dots .571 in. (14.
Label Specifications QL 220/220 Plus QL 320/ 320 Plus QL 420/420 Plus Label or Tag Width .75 in. to 2.12 in. (16 to 53.8 mm) 1.5 in. to 3.1 in. (38.1 to 78.4 mm) 2 in. to 4.1 in. (50.8 to 104.1 mm) Max. Label/ Tag Length (w/std. memory) 20 in. (508 mm) 16 in. (406.4 mm) 20 in. (508 mm) Inter-label Gap. 0.08 in. to 0.16 in. (.12 in. preferred) (2 mm to 4 mm [3 mm preferred]) Label Thickness .0025 in to .0065 in (.064 mm to .165 mm) Tag Thickness Max. Label Roll dia. Label Inner Core .0060 in.
Font and Bar Code Specifications for QL Series Fonts Available Linear Bar Codes Available Five resident scalable and rotatable fonts available from 12-48 pt. Downloadable pre-scaled fonts via Label Vista software.
Communications Ports RS-232C Pin# Signal Name Type Description 1 RXD input Receive Data 2 TXD output Transmit Data 3 CTS input 4 RTS output 5 GND 6 NC 7 DSR input 8 DTR output Clear To Send from host Request To Send set high when printer is ready to accept a command or data Ground No Connect Data Set Ready low to high transition turns printer on, high to low transition turns printer off (if enabled) Data Terminal Ready set high when printer is on.
USB (QL Plus Series only) Signal Pin# Name 1 VBUS Type - Description 2 USB - bi-directional I/O signals 3 USB + bi-directional I/O signals 4 USB_ID - 5 Return USB Bus Power Identifies A/B connector Ground 1 5 Figure 26: USB Communications Port (QL Plus Series only) Physical, Environmental and Electrical Specifications Weight w/ battery,excluding media & wireless options. Temperature Relative Humidity Battery QL 220/220 Plus QL 320/320 Plus QL 420/420 Plus 1.1 lbs. (.50 kg. ) 1.
3.61” 91.7 mm 2.96” 75.2 mm 7.52” 191.0 mm 7.15” 181.6 mm 3.57” 90.
3.18” [80.7 mm] 8.27” [210 mm] 4.67” [118.7 mm] 3.9” [100.2 mm] 8.16” [207.4 mm] 1.56”* [39.7 mm]* 2.80”* [71.1 mm]* (3x) #8-32* 1.18”* [30.0 mm]* Figure 28: QL 320/ QL 320 Plus Overall Dimensions 1. QL 320 Plus is illustrated. Dimensions with an asterisk (*) are for QL 320 Plus only; all other dimensions are identical for both QL 320 models. 2. Belt Clip must be removed to use all three mounting holes on the bottom of the QL 320 Plus.
8.2 “ [208 mm] 3.0” [76.2 mm] 6.1” [154.9 mm] 3.5” [89 mm] .38” [9.65 mm] 4.7” [119.3 mm] 1.63” [41.4 mm] 7.8” [198.0 mm] 1.26” [32.0 mm] .79” [20.0 mm] 3.05” [77.5 mm] 4.98” [126.5 mm] 3.83” [97.3 mm] 2.26” [57.4 mm] (4x) #8-32 3.53” [89.7 mm] 3.57” [90.7 mm] .74” [18.
QL Series Accessories Description QL 220/ 220 Plus QL 320/ 320 Plus QL 420/ 420 Plus Adjustable shoulder strap • • • Carrying Strap • • • Protective soft case • • • Extra battery packs • • • Desk Stand • • • Kickstand • • • • Handi-Mount articulated arm and mounting plate • Model MM Q4 Vehicular Mount w/ external fanfold media storage Model RCLI-DC Mobile Chargers DC-DC run/charge units (input ranges from 12 to 60 VDC) • • • Model RCLI-AC ChargerAC run/charge unit (100 to
Appendix A Interface Cables RS232 Cables Part Number ´BL11757-000; 8-Pin DIN to 9-Pin DB PC Cable (For Use With a Personal Computer) This part is also available as a coiled cable under Part Number BL15063-1. Pin 9 PC Signals (TXD) (RXD) (RTS) Pin 1 (CTS) (GND) DB-9 Pin (DTR) Female Plug (DSR) (to P.C.
QL Series User Guide Appendices 82 RT5900 Series 6400 242X 064021 243X RT1700 Series NORAND/INTERMEC RT1100/1700 Series 8’ /Coiled 12’/Coiled 8’ /Coiled 8’ /Coiled 8’ /Coiled 8’ /Coiled 6’/Straight 6’/Straight 6’/Straight 8’/coiled 12’/coiled BL11537-1 BL11537-2 BL13309-1 BL12804-1 BL13298-1 BL12803-1 BL11757-000 BL11757-000 BL11757-000 BL11537-1 BL11537-2 6’/straight 6’/straight 8’/coiled 1’/ straight BL16302-00 BL16830-00 BL16900-00 BL16713-1 6’/Straight 6’/Straight 6’/Straight 8’/Coiled BL11
QL Series User Guide Appendices 83 PDT3800, 6800 PPT2700, 2800 PDT3100, 3200 3500,6100 PDT3100, 3200, 3500 6100 SPT1700, 1800 SYMBOL/TELXON FMT 1000, 3000 PDT3300 Series PSC Falcon 310,315 320, 325 PT2000, TopGun Falcon 510,515, 625,665 502X 6110 6640,665x, 248x 5055 Terminal BL11757-000 BL11391-000 BL12093-2 CL16894-1 BL12093-1 BL10293-2 BL15483-1 BL15483-3 BL15482-1 CL16694-1 BL12093-1 BL12093-2 CL16894-1 CL16894-2 CC11371-3 CC11371-14 CC11371-15 BL12093 CL16894-1 BL13285-1 BL11757-000 BL11757-
QL Series User Guide Appendices 84 UNITECH PT-500, 700, 805, 815 PDT8100 LRT/LDT3800 & 6800 Series LRT/LDT3800 & 6800 Series PTC960X PTC960L, 960SL 960RL, 960M, 1134 2134, 2234 PTC 510, 610, 710 860, 912 PTC 860IM, 870IM PTC1124, 2124 PTC1184 PTC1194 VRC 3900 VRC4000,5000 VRC 69XX VRV7900,8900 TEKLOGIC 7025 7030 7035 8255, 8260 8510 Terminal 8’ /Coiled n/a 8’/Coiled 8’ /Coiled 6’ /Straight 6’/Straight 8’/ Coiled 6’/Straight 8’/Coiled 6’/Straight 10’/Straight 6’ straight BL11122-1 CC17711-1 CP74005
Appendix B Media Supplies To insure maximum printer life and consistent print quality and performance for your individual application, it is recommended that only media produced by Zebra be used. Advantages include: • Consistent quality and reliability of media products. • Large range of stocked and standard formats. • In-house custom format design service. • Large production capacity which services the needs of many large and small media consumers including major retail chains world wide.
Appendix C Maintenance Supplies In addition to using quality media provided by Zebra, it is recommended that the printer be cleaned as prescribed in the maintenance section. The following items are available for this purpose: • Cleaning Pen (10 pack), Reorder No. AN11209-1 • Cleaning Kit with Cleaning Pen, and Cotton Swabs, Reorder No.
Appendix D Product Support When calling with a specific problem regarding your printer, please have the following information on hand: • Model number/type (e.g. QL 420) • Unit serial number • Product Configuration Code (PCC) Serial Number Barcode Serial Number Label PCC Barcode PCC Label QL320 PLUS QL320 Serial Number Barcode PCC Barcode QL 220/220 PLUS QL 420/420 PLUS For product support, contact Zebra Technologies at: www.zebra.
Appendix D Battery Disposal The EPA certified RBRC® Battery Recycling Seal on the Lithium-Ion (Li-Ion) battery supplied with your printer indicates Zebra Technologies Corporation is voluntarily participating in an industry program to collect and recycle these batteries at the end of their useful life, when taken out of service in the United States or Canada.
Appendix E Using zebra.com The following details using the search functions on Zebra’s Web site www.zebra.com for finding specific documents . Finding Manuals: http://www.zebra.com/id/zebra/na/en/index/resource_ library/manuals.html Select printer model (e.g. QL 420) Select language Select manual type Click on“SUBMIT” Example: FInd the Mobile Printer WIreless Configuation Guide.
Finding the Label Vista Download page: http://www.zebra.com/id/zebra/na/en/index/drivers_downloads.html At the resulting window select your printer model from the pull-down menu in the “Utilities” section.
Index RS232 Connector signals 75 with a cable 28 USB Connector signals 76 with a cable 28 with a cable 28 A Accessories Belt clip 49 Carrying Strap 53 Desk Stand 51 Kickstand 50 list of 80 Shoulder Strap 52 using 49 Communications diagnostics 65 Configuration label, printing 65 D Damage, shipping 8 Declaration of Conformity B Battery, charging 13 Battery, installing 12 Battery life, tips for extending 54 Bluetooth™ Networking Overview 32 Bluetooth Device Address (BDA) 32 C Charger, battery 802.
R Radio options. See Wireless communications Regulatory Information Bluetooth radio (ZBR3 & QL+ZBR4) 35 CF WLAN & Bluetooth Co-located radios 47 CF WLAN radio 37 PCMCIA WLAN radio, QL 320 41,45 PCMCIA WLAN radio, QL 420 43 Zebra 802.11b Radio 39 Zebra 802.
Patent Numbers This product and/or its use may be covered by one or more of the following US patents and corresponding international patents worldwide D275,286 D347,021 D389,178 D430,199 D433,702 3,964,673 4,019,676 4,044,946 4,360,798 4,369,361 4,387,297 4,460,120 4,496,831 4,593,186 4,607,156 4,673,805 4,736,095 4,758,717 4,816,660 4,845,350 4,896,026 4,897,532 4,923,281 4,933,538 4,992,717 5,015,833 5,017,765 5,021,641 5,029,183 5,047,617 5,103,461 5,113,445 5,140,144 5,132,709 5,142,550 5,149,950 5,15