EZ320™ Mobile Printer P1027984-001 January, 2011
Table of Contents Proprietary Statements.............................................................................................4 Document Conventions............................................................................................6 Introduction to the EZ320........................................................................................7 Unpacking and Inspection................................................................ 7 Reporting Damage.........................................
Maintenance Supplies..................................................................................45 Appendix C.................................................................................................................46 Media Supplies.............................................................................................46 EZ320 Media.................................................................................................46 Appendix D................................................
Proprietary Statements This manual contains proprietary information of Zebra Technologies Corporation. It is intended solely for the information and use of parties operating and maintaining the equipment described herein. Such proprietary information may not be used, reproduced, or disclosed to any other parties for any other purpose without the expressed written permission of Zebra Technologies Corporation.
Copyrights The copyrights in this manual and the label print engine described therein are owned by Zebra Technologies Corporation. Unauthorized reproduction of this manual or the software in the label print engine may result in imprisonment of up to one year and fines of up to $10,000 (17 U.S.C.506). Copyright violators may be subject to civil liability. This product may contain ZPL®, ZPL II®, and ZebraLink tm programs; Element Energy Equalizer ® Circuit; E3®; and AGFA fonts. Software © ZIH Corp.
Document Conventions The following conventions are used throughout this document to convey certain information: If you are viewing this guide online, click the underlined text to jump to a related Web site. Click on italic text (not underlined) to jump to that location in this manual. Cautions, Important, and Note Caution • Warns you of the potential for electrostatic discharge. Caution • Warns you of a potential electric shock situation.
Introduction to the EZ320 Thank you for choosing our Zebra® EZ320™ Mobile Printer. This rugged printer is sure to become a productive and efficient addition to your workplace thanks to its innovative design. Because it is made by Zebra Technologies, you’re assured of world-class support for all of your bar code printers, software, and supplies. • This user’s guide gives you the information you will need to operate the EZ320 printer. • The EZ320 printer uses the CPCL programming language.
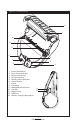
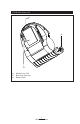
Figure 1: EZ320 Overview 11 7 10 8 9 2 5 1 6 3 1. 2. 3. 4. 5. 6. 7. 8. 9. 10. 11. 12. 13.
EZ320 Overview (cont.) 15 14 16 14. 15. 16.
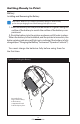
Getting Ready to Print Battery Installing and Removing the Battery Important • Batteries are shipped partially charged. Remove any protective packaging from new battery packs prior to use. 1. Insert the battery into the printer as shown in Figure 2 using the outline of the battery to match the outline of the battery compartment. 2. Rock the battery into the printer as shown until it locks in place.
Figure 3: Removing the Battery Press in on the locking clip to disengage the battery. Lift up on the battery in the direction shown and remove from the battery compartment.
When the battery is first installed, the printer power and charge indicators should indicate the battery is not fully charged (see “Charging the Battery” below and “Operator Controls”). You must charge the battery fully before using the printer for the first time. Charging the Battery Preparing the Power Supply Before charging the battery for the first time, you must prepare the Power Supply. Refer to Figure 4 below: Figure 4: Preparing the Power Supply 1. Remove the power supply from its box.
Figure 5: Charging the Battery EZ320 Charger Power Supply p/n AT17947-1 100-240 VAC 50-60 Hz 0.6A Input; 12 VDC 1.25 A output Plug into AC receptacle Charger Jack 12 VDC Charging the battery Refer to Figure 5. 1. Plug the Charger Power Supply into the appropriate A.C. wall receptacle. Then insert the charge cable into the printer’s charger jack. 2.
EZ320 Single Bay Charger The Single Bay Charger is a charging system for use with the lithium-ion battery used in the EZ320 printer. The charger uses a 2 blade AC connector on the back of the charger that plugs into the wall outlet and will fully charge the battery in an average time of 2.5 hours. Charging Status Indicators The Single Bay Charger features two LED indicators, one green and one amber, which provide battery status to the user as described in the table below.
Battery Safety Caution • Avoid accidental short circuiting of any battery. Allowing battery terminals to contact conductive material will create a short circuit which could cause burns and other injuries or could start a fire. Important • Always dispose of used batteries properly. Refer to Appendix D for more battery recycling information.
Loading the Media (80 mm) 1. Open the Media Cover (see Figure 7) • Firmly squeeze the Media Cover Tabs on either end of the Media Cover with your thumb and index finger. Pull up to open the Media Cover to reveal the media compartment. 2. Load the media (see Figure 8) • Insert the roll of media into the media compartment. Ensure that the media pulls off the core in the direction shown in Figure 8. 3.
Figure 8: Installing Media Media Roll Note direction media pulls off the roll. Figure 9: Closing the Media Cover 2 Media Cover Ensure both sides of the media cover are securely latched when closed.
60 mm Roll of Media The EZ320 printer also supports a 60 mm roll of media which requires the installation of two plastic media spacers. The media spacers are available through optional kit p/n P1031604. Contact Zebra Technologies for more information. Media Black Bar Sensor The EZ320 media black bar sensor default position for standard 80mm media is located on the right side of the media compartment when looking at the printer from the front (as shown below).
Operator Controls EZ320 printer controls are detailed in Figure 11 on the following page. The printer has two control buttons and four multipurpose indicators. The Power Button turns the printer on and off. The Feed Button advances a length of media until it is released. The Green/Amber indicator to the left of the Power Button indicates the status of the printer’s built-in charger: • The indicator is off indicates the battery is not being charged. • If the indicator is amber the battery is being charged.
• One LED lit represents 33% charge. This LED will be closest to the minus sign on the battery status icon and will blink and beep to alert the user of a low battery condition. Figure 11: EZ320 Printer Controls Bluetooth Indicator (Blue) Solid blue indicates connected. Rapid blinking blue indicates data is being transferred. Power Button Press until power/battery lights turn on, then release. (Power on takes approx. 0.75 sec.) Press again to turn unit off. Feed Button Press to advance the media.
Verify the Printer Is Working Before you connect the printer to your computer or portable data terminal, make sure that the printer is in proper working order. You can do this by printing a configuration label using the “two key reset” method. If you can’t get this label to print, refer to “Troubleshooting”. Printing a Configuration Label 1. Turn the printer off. Load the media compartment with journal media (media with no black bars printed on the back) 2. Press and hold the Feed Button. 3.
Cable Communication Caution • The printer should be turned off before connecting or disconnecting the communications cable. The mini USB Type B connector on the cable plugs into the printer. The connectors are keyed to assure correct alignment; do not try to force the cable if it does not plug in. The standard USB Type A end of the cable must be plugged into the USB port on a computer as shown in Figure 12.
Wireless Communications with Bluetooth™ Bluetooth is a worldwide standard for the exchange of data between two devices via radio frequencies. Bluetooth radios are relatively low powered to help prevent interference with other devices running at similar radio frequencies. The range of a Bluetooth device is approximately 10 meters (32 feet). Both the printer and the device it communicates with must follow the Bluetooth standard.
• Security Mode 3 is the more secure method supported, also called link level-enforced security. A device initiates security procedures before a physical link is fully established. Security Mode 3 mandates authentication and encryption for all connections to and from the device. In Security Mode 3, the printer is not discoverable. • Security Mode 4 is supported only by Bluetooth v2.1 + EDR. The EZ320 printer complies with Bluetooth v2.0 so it does not support Security Mode 4.
Carrying the Printer Belt Strap Refer to Figure 13 below for instructions on how to secure the belt strap to the printer and belt. Figure 13: Using the Belt Strap 1) Insert the non-looped end of the belt strap through the slot in the bottom front of the printer. 2) Secure the non-looped end to other end of the belt strap using the two Velcro pads. 3) Slide the looped end of the strap over the belt as shown. Belt 4) The printer should hang freely from the belt as shown.