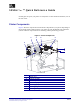
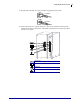
05SLPlus™ Quick Reference Guide Use this guide to operate your printer on a daily basis. For more detailed information, refer to the User Guide. Printer Components Figure 1 shows the components inside the media compartment of your printer. Depending on printer model and the installed options, your printer may look slightly different. Familiarize yourself with these components before continuing with the printer setup procedure.
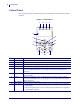
Control Panel Control Panel The control panel (Figure 2) indicates the printer’s operating status and controls basic printer operation. Figure 2 • Control Panel 1 2 3 4 5 9 6 10 7 11 8 12 1 2 3 4 5 6 Power light PAUSE light Error light Data light Display PLUS (+) 7 PREVIOUS 8 MINUS (-) 9 10 SETUP/EXIT NEXT/SAVE P1056467-001 13 14 On when the printer is on. On when the printer is paused. Blinks when the printer needs attention. Blinks quickly when the printer is receiving data.
Control Panel 11 CALIBRATE 12 13 14 PAUSE FEED CANCEL 9/28/12 Calibrates the printer for the following: • Media length • Media type (continuous or non-continuous) • Print method (direct thermal or thermal transfer) • Sensor values Starts or stops printer operation when pressed. Forces the printer to feed one blank label each time the button is pressed. Cancels print jobs when the printer is paused.
Preparing the Printer for Use Preparing the Printer for Use After you have familiarized yourself with the printer components, prepare the printer for use. Caution • When you are loading media or ribbon, remove all jewelry that could come into contact with the printhead or other printer parts. Caution • Before touching the printhead assembly, discharge any built-up static electricity by touching the metal printer frame or by using an anti-static wriststrap and mat.
Preparing the Printer for Use 5. Plug the male end of the A/C power cord into an appropriate power outlet. 115 V AC 230 V AC 6. Connect the printer to a computer using one or more of the available connections. The standard connections are shown here. A ZebraNet wireless print server option may also be present on your printer.
Preparing the Printer for Use 7. Raise the media door. 8. Load media into the printer (see Load Media on page 9). 9. When using thermal transfer media, load ribbon into the printer (see Load Ribbon on page 15). Direct thermal media does not use ribbon. 10. Close the media door.
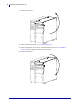
Preparing the Printer for Use 11. Turn on (I) the printer. The printer boots up and performs a self-test. PRINTER READY displays when the printer is ready to print. 12. To verify that the media and ribbon are loaded correctly, print a printer configuration label. a. On the control panel, press SETUP/EXIT. 1 b.
Preparing the Printer for Use c. Press PLUS (+) to select PRINT. If the media and ribbon are loaded correctly, a printer configuration label prints. A sample label is shown here. d. To exit Setup mode, press SETUP/EXIT, and then press NEXT/SAVE. 13. To test the connection between your printer and your computer, use a label design package to create a sample label and send it to the printer. Zebra recommends ZebraDesigner Pro. You can download this software from http://www.zebra.
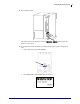
Load Media Load Media Use the instructions in this section to load roll media in Tear-Off mode (Figure 3). For instructions for loading fanfold media or for loading in different print modes, refer to the User Guide. Caution • When you are loading media or ribbon, remove all jewelry that could come into contact with the printhead or other printer parts. Figure 3 • Tear-Off Mode Media Path To load roll media in Tear-Off mode, complete these steps: 1.
Load Media 2. Pull out the media supply guide as far as it goes. 3. Place the roll of media on the media supply hanger. Push the roll as far back as it will go. 4. Slide in the media supply guide until it touches the edge of the roll. 5. Caution • The printhead may be hot and could cause severe burns. Allow the printhead to cool. Open the printhead assembly by rotating the printhead-open lever (1) counter-clockwise.
Load Media 6. Loosen the thumb screw (not visible from this angle) that is located on the bottom of the outer media guide (1). 1 7. Slide the outer media guide (1) all the way out.
Load Media 8. If your printer includes a media dancer assembly (1), thread the media under the media dancer assembly roller. For all printers, thread the media under the media guide roller (2) and then the upper media sensor (3). Important • Make sure that you thread the media under these components. If you thread the media over them, the media obstructs the ribbon sensor and causes a false RIBBON OUT error. 3 2 1 9.
Load Media 10. Align the media with the inner media guide (1). Slide in the outer media guide (2) until it just touches the edge of the media. 1 2 11. Tighten the thumb screw (not visible from this angle) that is located on the bottom of the outer media guide (1).
Load Media 12. Push down the printhead assembly (1), and then rotate the printhead-open lever (2) clockwise until it locks into place.
Load Ribbon Load Ribbon Use the instructions in this section to load ribbon for use with thermal transfer labels. For direct thermal labels, do not load ribbon in the printer. Remove used ribbon from the ribbon take-up spindle each time you change the roll of ribbon (see Remove Used Ribbon on page 20). Caution • When you are loading media or ribbon, remove all jewelry that could come into contact with the printhead or other printer parts.
Load Ribbon 4. Place the roll of ribbon on the ribbon supply spindle. Push the roll back as far as it will go. 5. A ribbon leader makes ribbon loading and unloading easier. Does your roll of ribbon have paper or something else attached to the end to serve as a ribbon leader? If… Then… Yes Continue with the next step. No a. Tear off a strip of media (labels and liner) about 6–12 in. (150–305 mm) long from the roll. b. Peel a label from the media strip. c.
Load Ribbon 7. Thread the ribbon over the media dancer assembly (1) and under the ribbon guide roller (2). 1 2 8. Push the ribbon leader forward until it passes under the printhead assembly (1), over the snap plate (2), and then over the platen roller (3).
Load Ribbon 9. Bring the ribbon leader over the upper ribbon roller (1) and then toward the ribbon take-up spindle (2). 1 2 10. Wind the ribbon leader and attached ribbon counterclockwise around the ribbon take-up spindle. 11. Rotate the spindle counterclockwise several turns to wind the ribbon and remove any slack.
Load Ribbon 12. Push down the printhead assembly (1), and then rotate the printhead-open lever (2) clockwise until it locks into place.
Load Ribbon Remove Used Ribbon Remove used ribbon from the ribbon take-up spindle each time you change the roll of ribbon. To remove used ribbon, complete these steps: 1. Has the ribbon run out? If the ribbon... Then Ran out Continue with the next step. Did not run out Cut or break the ribbon before the ribbon take-up spindle. 2. While holding the ribbon take-up spindle, turn the ribbon release knob clockwise until it stops.