MC93XX Mobile Computer Quick Start Guide MN-003413-01 Rev.
MC93XX Quick Start Guide Copyright ZEBRA and the stylized Zebra head are trademarks of Zebra Technologies Corporation, registered in many jurisdictions worldwide. All other trademarks are the property of their respective owners. ©2019 Zebra Technologies Corporation and/or its affiliates. All rights reserved. COPYRIGHTS & TRADEMARKS: For complete copyright and trademark information, go to www.zebra.com/copyright. WARRANTY: For complete warranty information, go to www.zebra.com/warranty.
MC93XX Quick Start Guide Provide Documentation Feedback If you have comments, questions, or suggestions about this guide, send an email to EVM-Techdocs@zebra.com. Configurations MC93XX used in this guide refers to the MC93XX-G mobile computer with scan trigger. This guide applies to the following Model Numbers: MC930B, MC930P. Unpacking Carefully remove all protective material from the device and save the shipping container for later storage and shipping.
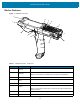
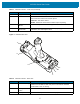
MC93XX Quick Start Guide Device Features Figure 1 MC93XX Front View 1 12 2 11 10 9 3 4 8 5 7 6 Table 1 MC93XX Features - Front View Number Item Function 1 Ambient Light Sensor Controls display and keyboard backlight. 2 Front Facing Camera Use to take photos and videos. NOTE: The front camera is available only on the premium configurations. 3 Display Displays all information needed to operate the device. 4 Speaker Side Port Provides audio output for video and music playback.
MC93XX Quick Start Guide Table 1 MC93XX Features - Front View (continued) Number Item Function 9 Keypad Use to enter data and navigate on screen functions. 10 Power Button Press and hold to turn on the device. Press to turn on or off the screen. Press and hold to select one of these options: Power off - Turn off the device. Restart - Restart the device when software stops responding. 11 Center Scan Button Initiates data capture when a scan application is enabled.
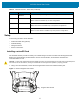
MC93XX Quick Start Guide Table 2 MC93XX Features - Back View (continued) Number Item Function 16 Scanner Exit Window Provides data capture using the scanner/imager. 17 Camera Flash Provides illumination for the camera. NOTE: Camera is available only on some configurations. 18 NFC Antenna Provides communication with other NFC-enabled devices. NOTE: NFC antenna is available only on the premium configurations. 19 Rear Camera Takes photos and videos.
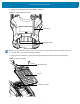
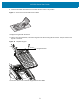
MC93XX Quick Start Guide 2. Slide the keypad latches toward the bottom of the device. Figure 4 Release Keypad Latches Screwdriver Keypad Latches NOTE: If the keypad latches are hard to move, use a screwdriver to gently slide them towards the bottom of the device. 3. Turn the device over so that the keypad is visible. 4. Using a Torx T8 screwdriver, remove the two keypad assembly screws from the top of the keypad.
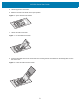
MC93XX Quick Start Guide 5. Lift the keypad from the device. 6. Slide the microSD card holder to the Open position. Figure 6 Open microSD Card Holder 7. Lift the microSD card holder. Figure 7 Lift microSD Card Holder 8. Insert the microSD card into the card holder door ensuring that the card slides into the holding tabs on each side of the door.
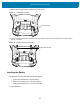
MC93XX Quick Start Guide 9. Close the microSD card holder door and slide the door to the Lock position. Figure 9 Close and Lock microSD Card in Holder 10.Align the keypad with the device. 11.Using a Torx T8 screwdriver, secure the keypad to the device using the two screws. Torque screws to 5.8 kgf-cm or 5.0 lbf-in. Figure 10 Replace Keypad Keypad Screws 12.Turn the device over so that the keypad latches are visible.
MC93XX Quick Start Guide 13.Slide both the keypad latches toward the top of the device. Figure 11 Slide Keypad Latches Keypad Latches 14.Using a Torx T8 screwdriver, replace the two keypad latch screws inside the battery slot and torque to 5.8 kgf-cm or 5.0 lbf-in.
MC93XX Quick Start Guide 1. Align the battery with the battery slot. Figure 13 Inserting the Battery 2. Push the battery into the battery slot. 3. Press the battery in firmly. Ensure that both battery release buttons on the sides of the device return to the home position. Figure 14 Press Battery In 4. Press the Power button to turn on the device.
MC93XX Quick Start Guide Charging the Device Use one of the following accessories to charge the battery.
MC93XX Quick Start Guide Table 4 LED Charge Indicators (continued) Status Indications Solid Green • Fast Blinking Red Charging error. For example: 2 blinks/second • Temperature is too low or too high. • Charging has gone on too long without completion (typically eight hours). • Battery is charging and battery is at the end of useful life. • Charging complete and battery is at the end of useful life. Solid Red Battery charging is complete.
MC93XX Quick Start Guide Figure 15 Charging the Spare Battery Spare Battery Spare Battery Charging Well Spare Battery Charging LED 3. Gently press down on the battery to ensure proper contact. The Spare Battery Charging LEDs on the front of the cradle indicates the spare battery charging status. The following table specifies charging indicators. Table 5 Charging/Notification LED Charging Indicators State Off Indication • The battery is not charging.
MC93XX Quick Start Guide device or cradle may for small periods of time alternately enable and disable battery charging to keep the battery at acceptable temperatures. The device and cradle indicates when charging is disabled due to abnormal temperatures via its LED.
MC93XX Quick Start Guide 1-Slot USB Charge Cradle with Spare Battery Charger The 1-Slot USB Charge Cradle with spare battery: • Provides 9 VDC power to operate the mobile computer and charge the battery. • Provides 4.2 VDC power to charge the spare battery. • Provides a USB port for data communication between the mobile computer and a host computer or other USB devices, for example, a printer. • Synchronizes information between the mobile computer and a host computer.
MC93XX Quick Start Guide 4-Slot Charge Only ShareCradle The 4-Slot Charge Only ShareCradle: • Provides 9 VDC power to operating the mobile computer and charge the battery. • Simultaneously charges up to four mobile computers.
MC93XX Quick Start Guide 4-Slot Spare Battery Charger The 4-Slot Spare Battery Charger: • Charges up to four spare batteries. • Provides 4.2 VDC power to charge the spare battery.
MC93XX Quick Start Guide 16-Slot Spare Battery Charger The 16-Slot Spare Battery Charger: • Charges up to 16 spare batteries. • Provides 4.2 VDC power to charge the spare battery.
MC93XX Quick Start Guide USB Charge/Com Snap-on Cup The USB Charge/Com Snap-on Cup: • Provides 5 VDC power to operate the device and to charge the battery. • Provides power and/or communication with the host computer over USB to the device.
MC93XX Quick Start Guide MC9XXX Charge Only Adapter Use the Charge Only Adapter for backwards compatibility with the MC9XXX cradles and the MC93XX mobile computer. • Charge Only Adapter supports terminal charging only for the MC9XXX Single Slot Cradle and 4-Slot Cradle. • Charge Only Adapter provides charge only and no communication when used with the MC9XXX cradles.
MC93XX Quick Start Guide Charge Only Adapter Installation To install the Charge Only Adapter: 1. Clean the MC9XXX cradle and contacts surface as specified with an alcohol wipe, using a back and forth motion with your finger. For more information about cleaning, refer to the MC93XX Mobile Computer User Guide. Figure 23 Clean MC9XXX Cradle Contacts and Surfaces Clean Cradle Contacts and Surface 2. Peel and remove the adhesive from the back of the adapter.
MC93XX Quick Start Guide Figure 25 Insert Adapter into Cradle 4. Insert the device into the cradle.
MC93XX Quick Start Guide Scanning The MC93XX offers the following data capture options: • SE4750-SR 1D/22D imager • SE4850-ER 1D/2D imager • SE965 1D laser scanner Refer to the MC93XX Mobile Computer User Guide for additional scanning options. Barcode Capture with Imager To capture barcode data: 1. Ensure that an application is open on the device and a text field is in focus (text cursor in text field). 2. Point the top of the device at a barcode. 3. Press and hold the Scan button or trigger.
MC93XX Quick Start Guide 3. Point the scan exit window at a bar code. 4. Press and hold the Scan button or trigger. The red scan line turns on to assist in aiming. Ensure that the scan line crosses every bar and space of the barcode. The Scan LEDs light green and a beep sounds, by default, to indicate the barcode was decoded successfully. Figure 29 Laser Scanner Aiming Pattern 5. Release the Scan button or trigger. The captured data appears in the text field.
MC93XX Quick Start Guide Ergonomic Considerations Taking breaks and task rotation are recommended. Optimum Body Posture Figure 30 Optimum Uright Body Posture Alternate left and right hand.
MC93XX Quick Start Guide Optimize Body Posture for Scanning Figure 31 Low and High Scanning Use a ladder.
MC93XX Quick Start Guide Avoid Extreme Wrist Angles Figure 33 Avoid Extreme Wrist Angles 28
www.zebra.