User's Guide
Proprietary Statement This manual contains proprietary information of Zebra Technologies Corporation. It is intended solely for the information and use of parties operating and maintaining the equipment described herein. Such proprietary information may not be used, reproduced, or disclosed to any other parties for any other purpose without the expressed written permission of Zebra Technologies Corporation.
Contents Introduction ................................................ 7 Unpacking and Inspection ................................................. 7 Reporting Damage .............................................................. 7 Getting Ready to Print ................................. 9 Battery ................................................................................. 9 Installing the Battery .................................................................... 9 Charging the Battery...............
Extending Battery Life ...................................................... 31 Battery Disposal ........................................................................ 32 Troubleshooting ........................................ 33 Help! The LEDs are On/Off/Flashing) .............................. 33 Resolutions: ...................................................................... 33 Print Quality Problems ............................................................... 34 Troubleshooting Tests .......
PA/PT400 & PA/PT 403 User’s Guide
Introduction Thank you for choosing our Zebra Mobile Printer. The PA/PT 400 and PA/PT403 printers are sure to become productive and efficient additions to your workplace. • This user’s guide gives you all the information you’ll need to operate your printer. • There are two basic types of printers in the 400 series: the PA type which uses direct thermal technology, and the PT type which uses a thermal transfer film to print.
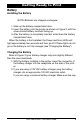
Battery Compartment Door Silver-colored Battery Contacts Battery FIGURE 2 8 PA/PT400 & PA/PT 403 User’s Guide
Getting Ready to Print Battery Installing the Battery NOTE: Batteries are shipped uncharged. 1. Slide up the battery compartment door. 2. Insert the battery into the printer as shown in Figure 2, with the silver-colored battery contacts facing up. 3. After the battery is completely inserted, slide down the battery compartment door. When the battery is first installed, the Power and Error LEDs will light approximately two seconds and then go off.
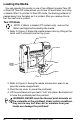
Loading the Media You can operate this printer in one of two different modes: Tear-Off or Peel-Off. Tear-Off mode allows you to tear off each label (or a strip of labels) after it is printed. In Peel-Off mode, the backing material is peeled away from the label as it is printed. After you remove this label, the next one is printed. Tear-Off Mode NOTE. If ribbon is loaded (PT models only), remove the ribbon cartridge before loading the media. 1. Refer to Figure 4.
5. Refer to Figures 5 and 6. Thread the media into the printer until it extends approximately 1” (25.4 mm) past the printhead. 6. Separate and hold open the media hangers. 7. Place the media roll onto the media hangers, making sure it is tightly wound. 8. Release the media hangers so the media locks into the correct position. Make sure the media is threaded under both media guides.
9. Refer to Figure 7. If it’s not already in place, install the tear bar in the media access door. Gently lift the tab on the bar to move it over the protrusion on the door. Make sure the lip of the bar (inset, Figure 7) faces out of the printer. If you’re using direct thermal media, continue on with step 10. However, if you’re using thermal transfer media, you must also install a ribbon cartridge. Proceed to “Loading the Ribbon “ in this chapter. Tab Protrusion Lip FIGURE 7 10.
Peel-Off Mode NOTES.- Your authorized Zebra reseller can recommend the correct ribbon and peel-off media for your application. If ribbon is loaded (PT series only), remove the ribbon cartridge before loading the media. 1. Refer to Figure 4. Raise the media access door by lifting at the notch until it unhooks from the top cover. 2. Refer to Figure 5. Swing the media access door open to expose the media compartment. 3. Pivot the top cover to reveal the printhead. 4.
NOTE.- When not in use, the tear bar may be stored on the inside of the media access door. Refer to Figure 9. With the lip of the bar facing the inside of the door, simply align the notches of the bar with the tabs on the door. Press and slide the bar toward the door’s hinged end. Door Tab Door Tab Tear Bar Notch Tear Bar Notch FIGURE 9 If you’re using direct thermal media, continue on with step 10.
13. Push in the bottom of the media access door to close. 14. Turn on the printer or press the Feed button if the printer is already on. NOTES. To ensure optimal print quality, make sure that the backing material is flush against the peel bar (as shown in Figure 10). If it starts to “loop “ away from the peel bar, gently pull down on the backing material With certain types of media, it may be necessary to reduce the print speed to 1.5 “ (38. 1mm) per second to produce consistent peel operation.
Fanfold Media (optional vibration mount required) NOTE. If ribbon is loaded (PTseries only), remove the ribbon cartridge before loading the media. 1. Raise the media access door by lifting at the notch until it unhooks from the top cover (refer to Figure 4). 2. Swing the media access door open to expose the media compartment (refer to Figure 5). 3. Pivot the top cover to reveal the printhead. 4. Lift the printhead until you feel it “lock” into place.
9. Swing up the media access door. Thread the fanfold media through the slot beneath the notch on the media access door (refer to Figure 12). 10. Swing open the media access door. Continue to insert the media into the printer and under the plastic media core until it appears beneath the printNotch head. Make sure the media is threaded under both media guides. Fanfold If you’re using direct Media thermal media, conSlot tinue on with step 11.
Loading the Ribbon (PT400 and 403 only) 1. If the printhead is not already open, lift it until you feel it “lock” into place. WARNING: NEVER touch the thermal print elements on the underside of the printhead. Under certain conditions, they can be very hot! Also, dirt or moisture from your hands can damage the printhead! 2. Hold the ribbon cartridge as shown in Figure 14. The placement arrows should be visible and pointing toward the back of the printer. 3.
4. Slide the ribbon cartridge past the printhead (refer to Figure 15). It will automatically move into the correct operating position. 5. Close the printhead (refer to Figure 16) and the top cover. Swing up the media access door, ensuring that the media is properly extending out of the printer (see Figure 8 for TearOff, or Figure 10 for Peel-Off). 6. Lift to hook the top of the media access door over the top cover. Push in the bottom of the media access door to close. 7.
Operator Controls Refer to Figure 17. Power Button • Press to turn on the printer. • To turn off the printer, press and hold until the Power LED flashes once. (Holding the button for approximately two seconds acts as a safeguard. That way, no data will be lost if the button is accidentally pressed or bumped.) CAUTION. The power should be turned off before connecting or disconnecting the communications cable. Feed Button • Forces the printer to feed one blank label.
Indicator LEDs Refer to Figures 17 and 18. Power LED (Green) • “On” during normal printer operation. • Functions as a printer operational/battery status indicator (see “Help! The LEDs are On/Off/Flashing!” in Troubleshooting). Error LED (Orange) • “Off’ during normal printer operation. • Functions as a printer operational status indicator (see “Help! The LEDs are On/Off/Flashing!” in “Troubleshooting”). Battery Charging LED (Yellow) • Functions as a battery charging status indicator.
PA/PT400 & PA/PT 403 User’s Guide
Computer Communications Ports Adapter Cable Null Modem Cable Ferrite Communications Cable PA/PT400 & PA/PT 403 User’s Guide 23
Communicating with the Printer Setting the Communication Parameters When using the printer’s serial port to transfer data, you will need to make sure that the printer and the computer have identical communication parameter settings. To initialize the communication parameters for the printer: Press and hold the Feed button until the Error LED flashes once, then twice, then three times. Release the button.
Adjusting the Print Darkness The relative darkness setting is software controlled. Follow the instructions in your label preparation software user’s manual. Adjusting the Printhead Pressure Adjust printhead pressure if print darkness is inconsistent across the label. NOTE: In general, use a higher setting for wide labels and lower setting for narrow labels. There are four printhead pressure settings (see Figure 22).
Adjusting the Strap Hand/Shoulder Strap To lengthen the strap: Refer to Figure 23. 1. With the printer in front of you, unwrap the padded handle by lifting up the loose end of the handle. 2. Unlatch the buckle by squeezing both sides of the fastener. 3. Let the loose end of the strap fall to the side. 4. Pull up the handle.
To shorten the strap: Refer to Figure 24. 1. Pull the buckle until the strap is taut. 2. Latch by inserting the fastener into the buckle. 3. Wrap and secure the padded handle around the strap. Buckle Fastener Handle Adjustable Shoulder Strap Refer to Figure 25. Slide the two buckles toward either the printer or shoulder pad until you achieve the desired length.
Calibration Auto Calibration NOTE., The printer will not auto calibrate when you are using pre-printed labels or pre-printed label backing. If you are using this type of media, see “Manual Calibration. ‘ By default, this printer automatically sets the sensor levels for, and determines the length of, the label you are using. To auto calibrate: 1. Load the media according to the instructions in “Loading the Media” in Getting Ready to Print. 2.
6. Press the Feed button. One entire blank label should feed. If this doesn’t happen, try defaulting (refer to “Feed Button Modes” in the “Troubleshooting” section) and recalibrating the printer. NOTES: Performing a manual calibration disables the auto calibration function. To return to auto calibration, either default the printer (see “Feed Button Modes” in “Troubleshooting”) or refer to your label preparation software users manual.
Preventive Maintenance WARNING: To avoid possible personal injury or damage to the printer, never insert any pointed or sharp objects into the printer. Cleaning CAUTION.- Use only the cleaning agents indicated. Zebra Technologies Corporation will not be responsible for damage caused by any other cleaning materials used on this printer.
Lubrication CAUTION. No lubricating agents of any kind should be used on this printer! Some commercially available lubricants, if used, will damage the finish and the mechanical parts inside the printer. Extending Battery Life • Never expose the battery to direct sunlight or temperatures over 104∞ F (40∞ C). • Choose the media or ribbon that is easiest to “burn.” An authorized Zebra reseller can help you determine this. • Make sure you’re using the optimal ribbon/media combination for your application.
Battery Disposal The EPA certified RBRC® Battery Recycling Seal on the nickel-cadmium (Ni-Cd) battery indicates Zebra Technologies Corporation is voluntarily participating in an industry program to collect and recycle these batteries at the end of their useful life, when taken out of service in the United States or Canada. The RBRC® program provides a convenient alternative to placing used Ni-Cd batteries into the trash or the municipal waste stream, which may be illegal in your area.
Troubleshooting Try as you may, you can’t seem to get the label to look right. Or, the LEDs are on or flashing when they’re normally off. This is the section of the User’s Guide that can help you solve your printer’s problems! If, after reading this section, you’re still having difficulty getting your printer to print, contact a qualified Zebra service technician.
in “Getting Ready to Print”. Then, press the Feed button to resume printing. The ribbon is out (PT SERIES only). • Load the ribbon, following the instructions in “Loading the Ribbon” in “Getting Ready to Print”. Then, press the Feed button to resume printing. The head open sensor plate is dirty. • Clean the head open sensor plate according to the instructions in “Preventive Maintenance”. 3. The printer is paused. • Press the Feed button to resume printing. 4. The printhead is under temperature.
• You may be trying to use the printer outside of its environmental limits. The correct operating temperature range for this printer is between 32∞ F and 104∞ F (0∞ to 40∞ C). The printed image doesn’t look right. • The printhead is dirty. Clean the printhead according to the instructions in “Preventive Maintenance”. • Printhead pressure needs to be adjusted. Follow the steps in “Adjusting the Printhead Pressure” in “Getting Ready to Print”. • The print darkness needs to be adjusted.
correct communications port on the computer is selected. Next, verify that the same handshaking is in use by both the printer and the computer. Then, ensure that the communication parameters of the printer and the computer match. Refer to “Communicating with the Printer” in “Getting Ready to Print”. Troubleshooting Tests Printing a Configuration Label To print out a listing of the printer’s current configuration (a sample is shown in Figure 28), refer to “Feed Button Modes” in this chapter.
Communications Diagnostics If there’s a problem transferring data between the computer and the printer, try putting the printer in the Communications Diagnostics mode. The printer will print the ASCII characters and their respective hexadecimal values for any data received from the host computer (see Figure 29). To find out how, refer to “Feed Button Modes” in this chapter.
Specifications NOTE.- Printer specifications are subject to change without notice. Printing Specifications Print Density 203 dots/inch (8 dots/mm) Print Width Up to 4.1“ (104 mm) Print Speed 1.5” or 2” per second (38.1 mm or 50.8 mm per second), 3” per second on 403 Series Registration Tolerance Horizontal +/- 0.059"1 (+/- 1.5 mm) Vertical +/- 0.0393" 1.0 mm) on media >2” (50.8 mm) in height +/- 180"(3.0 mm) on media < 2" (50.
Label Specifications Label/Tag Width 1" to 4.25" (25.4 mm to 108 mm) Fanfold Width 3.5" to 4.25" (89 mm to 108 mm) Label/Tag Length 0.5" to 10" (1 2.7 mm to 254 mm) 400 Series; Inter-label Gap. 08" to .16" (.12" preferred) 0.5” to 70” (1 2.7 mm to 1778 mm) 403 Series 2 mm to 4 mm (3 mm preferred) Label/Tag Thickness .0030- to .0106- (.076 mm to .269 mm) Label RollSize: Max.Diameter 2.1" (53.3 mm) Inner Core 1" (25.
Font/Bar Code Specifications Fonts Available CG Triumvirate Bold Condensed scalable smooth Zebra fonts A, B, C, D, E, H, GS 1D Bar Codes Available 2D Bar Codes Available Rotation Angles Codabar (supports ratios of 2 l to 3: 1) Code 11 Code 128/USD 8 (supports serialization in all subsets and UCC Case Codes) Code 39 (supports ratios of 2:1 to 3: 1) Code 93 EAN 8/JAN 8 EAN 13/JAN 13 EAN 14/UPCA lndustrial 2 of 5 Standard 2 of 5 lnterleaved 2 of 5 (supports ratios of 2:1 to 3: l, Modulus 10 Check Digit) L
Agency Approvals • • • • • • • • • UL 544 Medical Equipment Standard Part 42.5 CSA 22.
PA/PT400 & PA/PT 403 User’s Guide
Index A Fanfold media 16 Loading the ribbon 17, 18 Lubrication 31 Adapter cable 22, 42 Adjusting the strap 26 Adjustments Print darkness 25 print width 24 Printhead pressure 25 Agency approvals 41 M Maintenance Manual 7 Media Loading Peel-off mode 13 Tear-off mode 10 Media loading Fanfold media 16 B Battery, charging 9 Battery Charglng LED 21 Battery disposal 32 Battery, installing 9 Battery life, tips 31 N Null modem cable 22 pinouts 42 O C Calibration Automatic 28 Manual 28 Cleaning Exterior 30 Hea