
User Manual
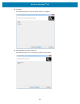
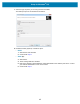


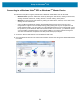
Table Of Contents
- Terms of Use
- Publication Date
- About
- Contents
- Introduction
- Printer Features
- Controls and Indicators
- Setup
- Printer Setup Overview
- Select a Location for the Printer
- Attaching Power
- Getting Ready to Print
- Loading Roll Media
- Run a SmartCal Media Calibration
- Test Printing with the Configuration Report
- Detecting a Media Out Condition
- Connecting your Printer to a Computer
- Wi-Fi and Bluetooth Classic Wireless Connectivity Option
- Setup for Windows® OS
- Print Operations
- Maintenance
- Troubleshooting
- Interface Connector Wiring
- Dimensions
- Media
- ZPL Configuration

Setup for Windows
®
OS
42
7. Select the type of printer you are using and then click Next.
The wizard prompts for the wireless IP information.
8. Enable the DHCP (dynamic) or Static IP option.
•
DHCP
1. Select DHCP and click Next.
2. Continue with step 9.
•
Static (IP)
3. Select Static.
4. The IP settings fields are activated.
5. Enter the IP Address, Default Gateway, and Subnet Mask for the wireless print server. Contact
your network administrator for the correct values.
6. Continue with step 9.