
User Manual
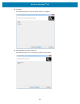
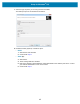
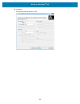


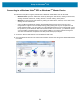
Table Of Contents
- Terms of Use
- Publication Date
- About
- Contents
- Introduction
- Printer Features
- Controls and Indicators
- Setup
- Printer Setup Overview
- Select a Location for the Printer
- Attaching Power
- Getting Ready to Print
- Loading Roll Media
- Run a SmartCal Media Calibration
- Test Printing with the Configuration Report
- Detecting a Media Out Condition
- Connecting your Printer to a Computer
- Wi-Fi and Bluetooth Classic Wireless Connectivity Option
- Setup for Windows® OS
- Print Operations
- Maintenance
- Troubleshooting
- Interface Connector Wiring
- Dimensions
- Media
- ZPL Configuration

Setup for Windows
®
OS
46
14.Click Next.
Based on your selections in the Wireless Setup Wizard, the program writes the appropriate ZPL
commands and displays them for your review. If you selected Tabletop/Desktop then the a dialog box
similar to this displays.
15.Determine if you will send the script immediately, or save it for use at a later time.
Using a Configuration Script
Complete setup by sending the ZPL script to the printer through the port selected at the beginning of this
procedure.
1. Verify that the printer is connected to the computer through the wired cable connection to the USB port.
2. If you have not already done so, turn ON the printer.
3. On the Review and Send ZPL for Wireless window, click Finish.
4. The printer sends the ZPL script to the printer through the interface port. The Wireless Setup Wizard
screen closes.
5. Turn the printer OFF and then back ON.