
User Manual
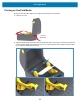
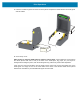
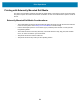

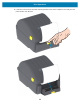

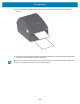


Table Of Contents
- Terms of Use
- Publication Date
- About
- Contents
- Introduction
- Printer Features
- Controls and Indicators
- Setup
- Printer Setup Overview
- Select a Location for the Printer
- Attaching Power
- Getting Ready to Print
- Loading Roll Media
- Run a SmartCal Media Calibration
- Test Printing with the Configuration Report
- Detecting a Media Out Condition
- Connecting your Printer to a Computer
- Wi-Fi and Bluetooth Classic Wireless Connectivity Option
- Setup for Windows® OS
- Print Operations
- Maintenance
- Troubleshooting
- Interface Connector Wiring
- Dimensions
- Media
- ZPL Configuration

Print Operations
65
Using the Label Dispenser Option
The label dispenser option allows you to print a label and have the backing material (liner/web)
automatically removed. When printing multiple labels, removing the dispensed (peeled) label triggers the
printer to print and dispense the next label.
To use dispense-mode, set ‘Media Handling’ to ‘Peel-Off’ in the printer driver or with the Zebra Setup Utility
using the ‘Configure Printer Settings’ wizard. Otherwise, you must send the ZPL programming commands
to the printer.
When programming in ZPL, you can use the command sequences shown below to configure the printer
to use the dispenser option:
^XA ^MMP ^XZ
^XA ^JUS ^XZ
1. Load your labels into the printer. Close the printer and press the FEED button until a minimum of
100 millimeters or 4 inches of exposed labels exit the printer. You can leave the labels on the liner.