
User Manual
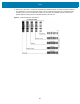

Table Of Contents
- About
- Introduction
- Printer Features
- Inside the ZD421 Dual Capacity Ribbon Roll Printer
- Inside the ZD621 Dual Capacity Ribbon Roll Printer
- Inside the ZD421 Direct Thermal Printers
- Inside the ZD621 Direct Thermal Printers
- Inside the ZD421 Ribbon Cartridge Printer
- Label Dispenser Option (field installable) - All Models
- Cutter Option (field installable) - All Models
- Linerless Media Tear-Off Option (Direct Thermal Models Only)
- Linerless Cutter Option (Direct Thermal Models Only)
- Identifying Platen Drive Rollers Types
- Printer Power Supply Options
- ZD621 Direct Thermal Locking Printer Features
- Zebra Print Touch
- Controls and Indicators
- Install Hardware Options
- Field Installable printer Accessories and Options
- Printer Connectivity Modules
- Media Handling Options
- Removing the Standard Bezel
- Installing the Label Dispenser
- Installing the Standard Media Cutter
- Installing the Linerless Media Cutter
- Installing the Linerless Media ‘Tear-Off’ Bezel
- Media Roll Core Size Adapters
- Print Resolution Upgrade Kits
- Installing the Attached Power Supply Base Options
- Installing the Attached Battery Base Options
- Installing the Battery into the Attached Power Base
- Color Touch Display and Controls
- Color Touch Display Printer Controls
- Home Screen
- System Menu
- System > Language
- System > Program Language > Diagnostic Mode
- System > Program Language > Virtual Device
- System > Program Language > ZBI
- System > Settings > Display Time Format
- System > Settings > Password Level
- System > Settings > Set Password
- System > Settings > Power Up Action
- System > Settings > Head Close Action
- System > Settings > Screen Calibration
- System > Settings > Restore Defaults
- System > Settings > Print: System Settings
- System > Energy Saving > Energy Star
- Connection Menu
- Connection > Networks > Reset Network
- Connection > Networks > Primary Network
- Connection > Networks > IP Port
- Connection > Networks > IP Alternate Port
- Connection > Networks > Print: Network Info
- Connection > Networks > Visibility Agent
- Connection > Wired > Wired IP Protocol
- Connection > Wired > Wired IP Address
- Connection > Wired > Wired Gateway
- Connection > Wired > Wired Mac Address
- Connection > WLAN > WLAN IP Protocol
- Connection > WLAN > WLAN IP Address
- Connection > WLAN > WLAN Subnet
- Connection > WLAN > WLAN Gateway
- Connection > WLAN > WLAN Mac Address
- Connection > WLAN > ESSID
- Connection > WLAN > WLAN Security
- Connection > WLAN > WLAN Band
- Connection > WLAN > WLAN Country Code
- Connection > Bluetooth > Bluetooth
- Connection > Bluetooth > Bluetooth Discovery
- Connection > Bluetooth > Friendly Name
- Connection > Bluetooth > Minimum Security Mode
- Connection > Bluetooth > Specification Version
- Connection > Bluetooth > MAC Address
- Connection > Bluetooth > Bluetooth Auth. PIN
- Connection > Bluetooth > Bluetooth Bonding
- Print Menu
- Print > Print Quality > Darkness
- Print > Print Quality > Print Speed
- Print > Print Quality > Print Type
- Print > Print Quality > Label Type
- Print > Print Quality > Label Length
- Print > Print Quality > Label Width (Dots)
- Print > Label Position > Collection Method
- Print > Label Position > Tear Line Offset
- Print > Label Position > Horizontal Label Offset
- Print > Label Position > Vertical Label Offset
- Print > Sensors > Manual Calibration
- Print > Sensors > Label Sensor
- Print > Sensors > Sensor Type
- Print > Sensors > Print: Sensor Profile
- Print > Print Station
- Print > Applicator > Applicator Port Mode
- Print > Applicator > Start Print Mode
- Print > Applicator > Error on Pause
- Print > Applicator > Applicator Reprint
- RFID Menu
- Storage Menu
- Setup
- Printer Setup Overview
- Select a Location for the Printer
- Install Printer Options and Connectivity Modules
- Attaching Power
- Getting Ready to Print
- Loading Roll Media
- Loading Thermal Transfer Roll Ribbon
- Loading the ZD421 Ribbon Cartridge
- Run a SmartCal Media Calibration
- Test Printing with the Configuration Report
- Detecting a Media Out Condition
- Detecting a Ribbon Out Condition
- Connecting your Printer to a Computer
- Wi-Fi and Bluetooth Classic Wireless Connectivity Option
- Setup for Windows® OS
- Print Operations
- Thermal Printing
- Select a Print Mode or Collection Method
- Adjusting the Print Quality
- Adjusting the Print Width
- Printing on Fan-Fold Media
- Printing with Externally Mounted Roll Media
- Using the Label Dispenser Option
- Using the Linerless Options
- Sending Files to the Printer
- Ribbon Cartridge Programming Commands
- Printing with the Attached Battery Base and Battery Option
- Printer Fonts
- EPL Line Mode - Direct Thermal Printers only
- ZD621 and ZD421 Locking Printer Option
- Zebra® ZKDU — Printer Accessory
- ZBI 2.0™ — Zebra Basic Interpreter
- Setting the Power Failure Recovery Mode Jumper
- USB Host Port and Link-OS Usage Examples
- USB Host
- USB Host and Printer Usage Examples
- Items Required for the USB Host Exercises
- Files for Completing the Exercises
- Exercise 1: Copy Files to a USB Flash Drive and Perform USB Mirror
- Exercise 2: Print a Label Format from a USB Flash Drive
- Exercise 3: Copy Files to/from a USB Flash Drive
- Exercise 4: Enter Data for a Stored File with a USB Keyboard and Print a Label
- Using the USB Hosts Port and the NFC Capabilities
- Maintenance
- Troubleshooting
- Tools
- Printer Diagnostics
- Power-On Self Test
- SmartCal Media Calibration
- Configuration Report (CANCEL Self Test)
- Printer Network (and Bluetooth) Configuration Report
- Print Quality Report (FEED self test)
- Reset Printer Factory Defaults (PAUSE + FEED Self Test)
- Reset Network Factory Defaults (PAUSE + CANCEL Self Test)
- Reset Button
- Communication Diagnostics Test
- Sensor Profile
- Advanced Mode
- Factory Test Modes
- Printer Diagnostics
- Interface Wiring
- Dimensions
- Media
- ZPL Configuration

Tools
298
5.
Note the relative darkness value and the print speed printed on the best test label.
6. Add or subtract the relative darkness value from the darkness value specified on the configuration
label. The resulting numeric value is the best darkness value for that specific label/ribbon combination
and print speed.
7. If necessary, change the current darkness value to the darkness value on the best test label.
8. If necessary, change the current print speed to the speed value on the best test label.
Table 1 Visual Darkness Descriptions
Print Quality Description
Too dark • Labels that are too dark are fairly obvious. They may be readable but not
“in-spec.”
• The normal barcode bars increase in size.
• The openings in small alphanumeric characters may appear filled in.
• Rotated barcode have bars and spaces run together.
Slightly dark • Slightly dark labels are not as obvious.
• The normal barcode will be “in-spec.”
• Small character alpha numerics will be bold and could be slightly filled in.
• The rotated barcode spaces are small when compared to the “in-spec”
code, possibly making the code unreadable.
“In-spec” • The “in-spec” barcode can only be confirmed by a verifier, but it should
exhibit the following visible characteristics.
• The normal barcode will have complete, even bars and clear, distinct
spaces.
• The rotated barcode will have complete, even bars and clear, distinct
spaces. Although it may not look as good as a slightly dark barcode, the
barcode will be “in-spec.”
• In both normal and rotated styles, small alphanumeric characters look
complete.
Slightly light • Slightly light labels are, in some cases, preferred to slightly dark ones for
“in-spec” barcodes.
• Both normal and rotated barcodes will be in spec, but small alphanumeric
characters may not be complete.
Too light • Labels that are too light are obvious.
• Both normal and rotated barcodes have incomplete bars and spaces.
• Small alphanumeric characters are unreadable.