ZEBRA PERSONAL PRINTER LINE 333 Corporate Woods Parkway Vernon Hills, Illinois 60061.3109 USA Telephone +1 847.634.6700 Facsimile +1 847.913.
55530lr4 Page -3 Wednesday, March 26, 1997 11:18 AM Zebra A300 ® User’s Guide Customer order # 55530L Manufacturer part # 55530LB Rev.
55530lr4 Page -2 Wednesday, March 26, 1997 11:18 AM Zebra A300 Users Guide Proprietary Statement This manual contains proprietary information of Zebra Technologies Corporation. It is intended solely for the information and use of parties operating and maintaining the equipment described herein. Such proprietary information may not be used, reproduced, or disclosed to any other parties for any other purpose without the expressed written permission of Zebra Technologies Corporation.
55530lr4 Page -1 Wednesday, March 26, 1997 11:18 AM Zebra A300 Users Guide Contents Introduction . . . . . . . . . . . . . . . . . . . . . . . . . . . . . . . . . . . . . . . . . . . . . . . . . . 1 Unpacking and Inspection . . . . . . . . . . . . . . . . . . . . . . . . . . . . . . . . . . . . . . . 1 Additional Requirements. . . . . . . . . . . . . . . . . . . . . . . . . . . . . . . . . . . . . . . . 1 Setting Up the Zebra A300 Printer . . . . . . . . . . . . . . . . . . . . . . . . . . . . . . . .
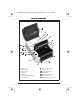
5530lr4 Page 0 Wednesday, March 26, 1997 11:18 AM Zebra A300 Users Guide 1 2 3 4 5 3 6 14 13 12 11 10 7 6 8 9 1 2 3 4 5 6 7 Media cover Media holder Media guides Tear bar Printhead Print mechanism latches Peel-off roller 8 Peel-off door latches 9 Platen roller 10 Power/fault lights 11 Feed button 12 Printhead open sensor 13 Paper out sensor 14 Label presentation sensor Figure 1: Printer Overview ii
55530lr4 Page 1 Wednesday, March 26, 1997 11:18 AM Zebra A300 Users Guide Introduction This manual provides all of the information you will need to operate your printer on a daily basis. To print labels, tags, or tickets with the A300 printer, refer to the ZPL II Programming Guide (part # 46469L) or to the on-line instructions with the BAR-ONE software. To obtain a copy of the ZPL II Programming Guide, mail or fax in the card at the back of this book.
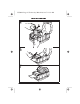
55530lr4 Page 2 Wednesday, March 26, 1997 11:18 AM Zebra A300 Users Guide Setting Up the Zebra A300 Printer Tear-Off Mode of Operation 1 2 2
55530lr4 Page 3 Wednesday, March 26, 1997 11:18 AM Zebra A300 Users Guide 3 4 3
55530lr4 Page 4 Wednesday, March 26, 1997 11:18 AM Zebra A300 Users Guide 5 1 2 6 7 4 3
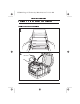
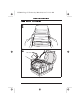
55530lr4 Page 5 Wednesday, March 26, 1997 11:18 AM Zebra A300 Users Guide Peel-Off Mode of Operation 1 2 5
55530lr4 Page 6 Wednesday, March 26, 1997 11:18 AM Zebra A300 Users Guide 3 4 6
55530lr4 Page 7 Wednesday, March 26, 1997 11:18 AM Zebra A300 Users Guide 5 1 2 3 6 7
55530lr4 Page 8 Wednesday, March 26, 1997 11:18 AM Zebra A300 Users Guide 7 8 8
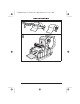
55530lr4 Page 9 Wednesday, March 26, 1997 11:18 AM Zebra A300 Users Guide Fanfold Media Loading 1 2 9
55530lr4 Page 10 Wednesday, March 26, 1997 11:18 AM Zebra A300 Users Guide A300 Printer to the Computer Figure 2: Parallel Connection Connecting the Zebra 10
55530lr4 Page 11 Wednesday, March 26, 1997 11:18 AM Zebra A300 Users Guide Figure 3: Serial Connection 11
55530lr4 Page 12 Wednesday, March 26, 1997 11:18 AM Zebra A300 Users Guide Setting Up the Software Note: If you plan to use BAR-ONE software to create your labels, you will need to install the software on your computer before you can operate your printer. You will not need to use BAR-ONE software if you are printing label formats created in ZPL II.
55530lr4 Page 13 Wednesday, March 26, 1997 11:18 AM Zebra A300 Users Guide BAR-ONE Installation The A300 printer uses BAR-ONE software or ZPL II Programming Language sent from any Windows™ or DOS application. 1. Start Windows. 2. Insert disk 1 of the BAR-ONE software in your floppy disk drive (A: or B:). 3. In Program Manager, click on the File menu. Select Run. (Windows 95 users: select Run from the Start menu.) 4. Type A:\SETUP (or B:\SETUP) and then press OK. 5.
55530lr4 Page 14 Wednesday, March 26, 1997 11:18 AM Zebra A300 Users Guide Operator Controls Power Switch. Located on the right-hand side of the printer near the back. The power switch should be turned off before connecting or disconnecting any cables. Feed Key. In normal use, pressing the Feed Key once when the printer is idle (not printing) will cause the printer to feed a blank label. The Feed Key also activates a number of specialized functions which are described in Table 1.
Color profile: Disabled Composite Default screen Zebra A300 & T 300 User's Guide Adde ndum 1 C:\A_Series\A_T_Adden.
Color profile: Disabled Composite Default screen Scope This addendum contains information about the new Calibration features added to the Zebra A300 and Zebra T300 printers when upgraded with the 25.8.1 and 23.8.1 versions of firmware respectively. Calibration Auto-Calibration The printer only auto-calibrates when using non-continuous media (a gap, notch, or black mark separates each label). During this process, the printer sets the sensor levels for, and determines the length of, the labels being used.
Color profile: Disabled Composite Default screen Manual Calibration Manual calibration should be performed whenever you are using preprinted labels or preprinted label backing, or if the printer will not auto calibrate. NOTE: Before performing a manual calibration, refer to your label preparation software user’s manual and set the printer for the media type (web or black mark). To manually calibrate: 1. Turn the printer power ON. 2. Remove several labels from a section of backing material. Load 3. 4. 5.
Color profile: Disabled Composite Default screen Figure 1. A300 Sample Media Sensor Profile Figure 2. T300 Sample Media Sensor Profile © Zebra Technologies Corporation 4 C:\A_Series\A_T_Adden.vp Wed Aug 12 10:52:07 1998 Part # 55560L Rev.
55530lr4 Page 15 Wednesday, March 26, 1997 11:18 AM Zebra A300 Users Guide Printer Indicator Lights. Table 2: Printer Indicator Lights Power Light Fault Light g ni Printer Condition ff n O Power is off or printer not receiving power Power is on Paper out or not sensed or Printhead is open Printhead is over temperature hs O O F • O • • • • • ff la n • • Initial Printer Power-Up Turn the printer on by pressing the Power Switch on the right side of the printer.
55530lr4 Page 16 Wednesday, March 26, 1997 11:18 AM Zebra A300 Users Guide 6. Press and release the Feed Key. A profile of the media sensor settings will print. When complete, the printer will save the new settings in memory and the printer is ready for normal operation.
55530lr4 Page 17 Wednesday, March 26, 1997 11:18 AM Zebra A300 Users Guide Here is the command description for the Set Communications command (refer to your ZPL II Programming Guide for additional programming information): ^SCa,b,c,d,e,f where a = baud rate (110 - 19200 baud) b = word length (7 or 8 data bits) c = parity (N = none, E = even, O = odd) d = stop bits (1 or 2 ) e = handshake (X = XON/XOFF, D = DTR/DSR) f = Zebra protocol (Y = yes, N = no) If you do not specify a new setting for a parameter, i
55530lr4 Page 18 Wednesday, March 26, 1997 11:18 AM Zebra A300 Users Guide Preventive Maintenance Cleaning CAUTION: Use only the cleaning agents indicated in the following table. Zebra Technologies Corporation will not be responsible for any other fluids being used on this printer. Inconsistent print quality, such as voids in the bar code or graphics, may indicate a dirty printhead. For best results, perform the cleaning procedures in Table 4.
55530lr4 Page 19 Wednesday, March 26, 1997 11:18 AM Zebra A300 Users Guide Troubleshooting Table 4. Troubleshooting Symptom Diagnosis Power light does not turn on when Power switch is turned on. When printer is first powered on, the Fault light remains on. Fault light is flashing. Printer is not receiving Make sure that the power supply is plugged power. into the printer and into a wall outlet, power strip, or other source of power. Printer failed an inter- Turn the printer power off and then back on.
55530lr4 Page 20 Wednesday, March 26, 1997 11:18 AM Zebra A300 Users Guide Troubleshooting Modes Printing a Configuration Label. To print out a listing of the printer’s current configuration (configuration label), refer to Table 1, “Feed Key Troubleshooting Modes,” on page 14. Figure 5: Configuration Label (Sample) Calibration. If the printer is exhibiting unusual symptoms, such as skipping a label, you may need to recalibrate the printer. See “Calibration” on page 15.
55530lr4 Page 21 Wednesday, March 26, 1997 11:18 AM Zebra A300 Users Guide Figure 6: Communications Diagnostics Printout (Sample) 21
55530lr4 Page 22 Wednesday, March 26, 1997 11:18 AM Zebra A300 Users Guide Specifications Table 5: Specifications Print density Print width Print speed Label width (including backing material, if any) Label length Interlabel gap Label thickness (including backing material, if any) Label roll size Maximum outer diameter Minimum inner core diameter Registration toler- Horizontal ance Vertical First dot location (from outer media edge) Fonts available Bar codes available 22 203 dots/inch 1² to 4.
55530lr4 Page 23 Wednesday, March 26, 1997 11:18 AM Zebra A300 Users Guide Table 5: Specifications (Continued) Media requirements Physical size (L ´ W ´ H) Weight (without media) Temperature Operating range Storage Relative humidity, operation and storage Electrical Communications Agency approvals Processor/memory Power line cord Parallel data cable Zebra recommends use of Zebra brand media. All media must be direct thermal media. Media may be continuous, die-cut, or notched.
55530lr4 Page 24 Wednesday, March 26, 1997 11:18 AM Zebra A300 Users Guide Figure 7. 230 VAC Power Line Cord Figure 8. Examples of International Safety Organizations Table 6. Parallel Pinouts Pin No. 1 2-9 Data Bits 0-7 10 Acknowledge 11 Busy 12 Paper end 13 Select 14-17 18 24 Description Strobe Not used +5 V @ 0.75 A 19-30 Ground 31 Not used 32 Error/fault 33 Ground 34 Not used 35 +5 V through 3.
55530lr4 Page 25 Wednesday, March 26, 1997 11:18 AM Zebra A300 Users Guide Table 7. RS-232 Pinouts Pin No. Description 1 Unused 2 RXD (receive data) input to printer 3 TXD (transmit data) output from printer 4 DTR (data terminal ready) output from printer 5 Ground 6 DSR (data set ready) input to printer 7 RTS (request to send) output from printer 8 Unused 9 Unused To connect your serial port to a 9-pin connector on your PC, use a 9-pin to 9-pin null modem (crossover) cable.
55530lr4 Page 26 Wednesday, March 26, 1997 11:18 AM Zebra A300 Users Guide Warranty 1. Printer Warranty ZEBRA printers, excluding thermal printheads which are warranted separately below, are warranted against defects in material or workmanship for twelve (12) months from the date of purchase by the end user.
ZEBRA PERSONAL PRINTER LINE 333 Corporate Woods Parkway Vernon Hills, Illinois 60061.3109 USA Telephone +1 847.634.6700 Facsimile +1 847.913.