Zebra® RW 220 Vehicle Cradle Installation Guide UMAN-RW2VC-002 rev.
Proprietary Statement This manual contains proprietary information of Zebra Technologies Corporation. It is intended solely for the information and use of parties operating and maintaining the equipment described herein. Such proprietary information may not be used, reproduced, or disclosed to any other parties for any other purpose without the expressed written permission of Zebra Technologies Corporation.
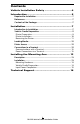
Contents Vehicle Installation Safety ................................. 4 Introduction ....................................................... 5 Required for Installation........................................................................7 References .............................................................................................7 Contents of the Package......................................................................7 Installation ......................................................
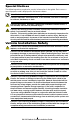
Special Notices The following notices emphasize certain information in the guide. Each serves a special purpose and is displayed in the format shown: Note: Note is used to emphasize any significant information. Caution: Indicates information that, if not followed, can result in damage to software, hardware, or data. Caution-This symbol indicates a potentially hazardous situation which, if not avoided, can result in personal injury.
Introduction Note: Zebra Technologies Corporation is not liable for personal injury or damage to any equipment caused by the improper installation of this equipment to any power source. Caution- This equipment should be installed in accordance with this installation guide and under the supervision of properly trained and qualified personnel. The RW 220 Vehicle Cradle allows use of the Zebra® RW 220 Receipt Printer in a vehicle.
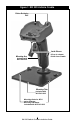
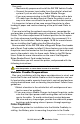
Figure 1: RW 220 Vehicle Cradle Printer Retaining Pins Latch Release Lift up to release Printer from Cradle Mounting Arm Included with AK17463-018 Mounting Plate Included with AK17463-018 Mounting Holes for RCLI series Charger Mounting hardware included with AK17463-018 6 RW 220 Vehicle Cradle Installation Guide
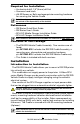
Required for Installation • An electrical drill, 1/4”(6 mm) drill bit • Common hand tools. • #8-32 Screws or Bolts and appropriate mounting hardware for securing the Vehicle Cradle Note: Use of appropriate hardware used to secure the Vehicle Cradle to the vehicle is the responsibility of the installer References • • • • RW Series Quick Start Guide RW Series User’s Guide RCLI-DC Mobile Charger Installation Guide RCLI-AC Charger Installation Guide Note: Reference documents are available for download at www.
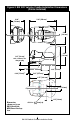
Figure 2: RW 220 Vehicle Cradle Installation Dimensions (Printer Installed) 2.94" 4.00” [102 mm] 5.39" mm] 7.00” [178 4.82” 3.69" [122 mm] 4.50” [114 3.78" mm] 1.25” [32 mm] min. clearance for charger plug 1,25" 2.30” [58 mm] 0.60” [15 mm]0.32" 4.05" mm] 5.25” [133 8.75” [2226.40"mm] 1.5” [38 mm] Dimensions shown are for an RW 220 with the MSR/Smart Card option. 1.19” [30 mm] #8-32 x .38” [9 mm] dp.
You must: • Mechanically prepare and install the RW 220 Vehicle Cradle • Connect the power input cable from the vehicle’s electrical system if you are also using a Zebra Mobile Charger • If you are communicating to the RW 220 printer with a data I/O cable from the data terminal: Route the cable in such a way as to allow use of both the printer and the data terminal. It is important to leave a free zone around the printer to allow loading of paper and routine cleaning of the print head. Refer to Figure 2.
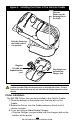
Figure 3: Installing the Printer In The Vehicle Cradle Place the Printer over the Retaining Pins in the Cradle. Rock the Printer into the Cradle to latch it in position. Plug data I/O cable into Communications port Plug Charger output cable into Charger Jack Caution: It is strongly recommended that as a safety precaution the adjustable shoulder strap be removed prior to docking the Printer. This precaution will ensure the strap will not interfere with proper operation of the vehicle.
• Turn the vehicle’s power source on, and verify that the power indicator light and the charger light on the charger module are lit. 4. Turn the printer on and print a configuration label to verify that the printer is functioning properly. Refer to the RW Series User’s Guide for instructions on printing a configuration label. 5. If you will be communicating to a data terminal with a data I/O cable, turn the printer off, plug in the data I/O cable and turn the printer back on.
from the charger jack. • Press the latch release button on the Vehicle Cradle and pivot the Printer out of the Cradle. Loading Media Follow the loading procedures found in the RW Series Users Guide. Printer Access The media compartment and operator controls can be reached while the printer is secured in the Vehicle Cradle. If you need to remove the printer for servicing follow the printer removal procedure detailed above.
Installing the Mounting Arm Description A mounting arm is included in Zebra accessory kit p/n AK17463-018. The mounting arm allows a more versatile method of positioning the RW 220 printer. It consists of an arm with a ball and socket joint at either end, which in turn are terminated with a mounting flange. One flange is secured to the Cradle by the four mounting holes provided on the bottom plate, and the other is secured to the desired mounting surface.
Figure 7: Optional Mounting Arm Dimensions 7.35” [187 mm] 2.43” [62 mm} R .91” [23 mm} 1.19” [30 mm} 1.
Mounting Arm the operator can easily load printing media, operate the printer’s controls and perform routine maintenance such as cleaning the printhead. Follow these steps: 1. Select a location in the vehicle that will avoid personal contact in case of an accident. 2. Turn the Cradle upside down and secure one of the mounting flanges from the movable Arm to the bottom of the Vehicle Cradle with the (4) #8-32 x 1/2” Screws supplied with the Mounting Arm. 3.
Technical Support U.S. ONLY Zebra maintains a help line for questions involving installation and use of the RW 220 Vehicle Cradle. Please have as much information as possible regarding your particular application ready when you call to enable the technical support personnel to help you. The number in the U.S. is +01.847.913.2259 and is open Monday through Friday from 7:00 AM to 5:30 P.M. P.S.T. ALL OTHERS For Technical Support please contact your local Zebra sales representative listed below:.