
Specifications


Operation
Carl Zeiss Attaching adapters for digital compact cameras Axiostar plus
3-24 B 40-81 e 12/01
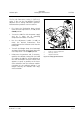
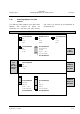
1 SONY DCR-PC100 camera
2 Sliding mount with thread M37
3 Set screw
4 Lens mount
5 Set screw
6 Connector 60 for microscope camera
7 Binocular phototube
8 Set screw
Fig. 3-15 Attaching Sony "Digital Handycam DCR-
PC100" camera
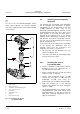
3.11.1 Digital cameras with 37 mm
filter thread, e.g. SONY DCR-
PC100 / SONY DSC – S50
When delivered, the sliding mount with thread
M37 (3-15/2) and the lens mount (3-15/4) are
premounted. The drawing on the right shows
the disassembled components.
• Remove threaded adapter ring M37/M52
(3-16/3).
• Plug connector 60 (3-15/6) onto the
binocular phototube (3-15/7) and tighten
the 3 set screws (3-15/8).
• Screw the unit, consisting of sliding mount
with thread M37 (3-15/2) and lens mount
(3-15/4), into the M37 filter thread of the
camera (3-15/1).
• With the lens mount (3-15/4) pointing
forward, plug the unit onto connector 60
(3-15/6) until stop and tighten the set
screw (3-15/5).
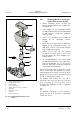
Depending on the microscope configuration
and the camera used, the distance between
the camera lens and the lens mount (3-15/4)
must perhaps be optimized (see double arrow).
This is required in particular if an untrimmed
image cannot be achieved in any zoom
position of the camera lens.
Make the following settings on the camera:
• Switch off the autofocus.
• Set the distance to ∞.
• Set the automatic exposure control to time
priority.
• Set the aperture as wide as possible (i.e.
select a small f-stop number!).
Not all cameras feature these possibilities.
Please see the operating instructions of the
camera used.
• Loosen the set screw (3-15/3).
• Vary the distance between the camera lens
and the lens mount in steps, i.e. move the
sliding mount with camera on the lens
mount by defined steps.