
Technical data


46 Preparations for use
G-30-1439-en OPMI® VISU 200 BrightFlex™ Surgical Microscope Issue 3.0
Printed on 21. 11. 2002
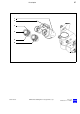
Mounting the binocular tubes, eyepieces and the objective lens
Note:
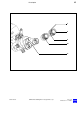
Always use the assistant's microscope with the appropriate binocular as-
sistant's tube (shown). If you use a different tube, you will obtain an in-
verted image.
• Loosen securing screw (5) by a few turns.
• Remove cover (1) and store it in a safe place.
• Place binocular tube (2) on the surgical microscope and tighten secu-
ring screw (5) firmly.
• You can install other units between the binocular tube and the micro-
scope body. Lock these units in position in the same way using secur-
ing screw (5).
• Place binocular tube (10) on the assistant's microscope and tighten
securing screw (7)firmly.
• You can install other units between the binocular tube and the micro-
scope body (e.g. an optical wedge, 30°). Lock these units in position
in the same way using securing screw (7).
• Insert 12.5x widefield eyepieces (4) into the mounts intended for them
(3) as far as they will go. The magnetic coupling reliably secures them
in position.
• Insert 10x widefield eyepieces (9) into the mounts intended for them
(8) as far as they will go. The magnetic coupling reliably secures them
in position.
Note:
If a documentation device is used, one of the eyepieces can be delivered
with a reticle to aid focusing. Retrofitting the reticle can only be performed
at the factory or by our service representative. Always use the eyepiece
with reticle on the same side of the binocular tube as the documentation
device is installed.
• Screw objective lens (6) into the microscope body and tighten itfirmly.