
Operation Manual


66
Technical specications
Technical parameters are indicated on the appliance’s name
plate.
Admissible continuous operating time of the motor with
15 minutes
A break between successive uses 30 minutes
A break between successive turbo uses 10 seconds
The appliance’s noise level (L
WA
) 75 dB/A
Speed range I gear, II gear
The juice extractor type 477 is constructed in II class
insulation .
It does not require connection to the grounded socket.
ZELMER appliances meet the requirements of effective
standards.
The appliance meets the requirements of the following
directives:
Low Voltage Device (LVD) – 2006/95/EC. –
Electro-Magnetic Compatibility (EMC) – 2004/108/EC. –
The product is marked with CE symbol on the name plate.
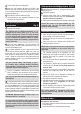
Construction of the appliance (Fig. A)
1
Motor
a
power on/off button
b
gear 1 – gear 2 / turbo button
c
indicator light
d
pulse button (does not apply in case of juice extractor)
e
skimmer
f
sucker
g
power supplying cord
2
Juice container
h
spout
i
cover
3
Body of the juice collector
4
Strainer
5
Lid
6
Clamps
7
Pusher
8
Pulp container
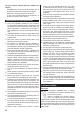
Preparation of the juice extractor for
operation (disassembling) (Fig. B)
Before using the juice extractor for the rst time, disassemble
it and wash parts in contact with the processed product.
1
Place the juice extractor near the socket on the rm,
clean and dry surface.
2
Pull down the clamps (6) so that the tracks moved out of
grooves of the lid (5).
3
Take the pusher (7) and the lid (5) out.
4
Then remove the juice collector (2) including the body
(3) and the lter (4). To this end, turn the body (3) right
(clockwise) to the limit and raise the body with the juice
collector and the lter.
5
Finally, disassemble the juice collector (2) from the body (3).
Wash the disassembled parts (except the motor unit)
●
carefully in hot water and wash-up liquid. You can also
clean them in a dishwasher in max temp. 60°C (except
for the strainer and the motor unit). After drying them
carefully, start assembling the clean parts.
Preparation of the juice extractor for
operation (assembling) (Fig. C)
1
Put the body of the juice collector (3) on the motor unit
so that a clamp (6) is placed slightly on the left of the buttons
on the motor and turn left to the limit (anticlockwise) so that
a clamp is placed over the buttons.
2
Put the juice container (2) on the body (3) so that the lip
(h) was placed in the cutting of the body (3).
3
Put the lter (4) inside, press it slightly and check if it is
well mounted and rotates easily.
4
Put the lid (5) and close the clamps (6).
INFORMATION ON FRUIT AND VEGETABLES
Fruit/vegetables Centrifuging speed Fruit/vegetables Centrifuging speed
Pineapples II Carrots II
Blueberries I Melons I
Peaches I Apricots I
Beetroots I Nectarines I
Pears I Cucumbers I
Apples I Kiwi I
Cabbage II Tomatoes I
Fennel I Celery II
Raspberries I Grapes I