MODEL N0: 2-DIN MONICEIVER 15,5cm/6.
TABLE OF CONTENTS TABLE OF CONTENTS .............................................................................................................................................. 2 INTRODUCTION ........................................................................................................................................................ 3 WARNINGS...........................................................................................................................................................
ZE-MC294 INTRODUCTION Dear customer, thank you for purchasing the ZE-MC294 moniceiver. You acquired a multifunctional car multimedia center which is able to playback files from a plethora of formats. It can be extended with the navigation unit ZE-NA2000N and the DVB-T-receiver ZE-DVB2000. You can directly connect an iPod, iPhone and play all formats the handheld can, when it is connected.
WARNINGS 1. Only connect this unit to a 12V DC power supply with negative grounding. 2. Never install this unit at a place where it could interfere with your overview during driving. It is designed for the center console. 3. Do not circumvent the security function which prevents you from watching a movie using the front display when you are driving. It' s a dangerous distraction and may also conflict with your local law or even void your insurance. 4.
ZE-MC294 WARNINGS PRECAUTIONS 1. Never disassemble or adjust the unit without any professional guide. For details, please consult an authorized ZENEC dealer. 2. lf the front panel or TFT monitor needs to be cleaned, please use a clean silicone cloth and a neutral detergent. Using a rough cloth and non-neutral detergent or all solvents (i.e. ethanol, benzene) for cleaning may result in damage or discoloration. 3. lf any abnormal behaviour of the unit is found, please refer to the trouble shooting guide.
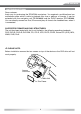
PANEL CONTROLS START CODE: 012345 (Description: Page 9, 24) FRONT PANEL Press the ( ) button to turn on the unit. 1. Power on Mute When on, long press to power off. 2. Screen ON/OFF. Keep pressed to toggle between Navigation and Play. 3. Keep pressed for Main Menu.
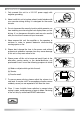
ZE-MC294 REMOTE CONTROLS REMOTE CONTROL OPERATING RANGE The remote control can operate within a distance of 3~5 m. 1. Select the following sources: Radio Disc (when a disc is inserted) USB (when USB drive is connected) Card (when an SD card is inserted) AV1 (rear A/V In) AV2 (front A/V In) Bluetooth Navigation (optional) iPod (optional) DVB-T (optional) 2. Radio preset scan Radio auto preset 3. Menu (DVD) 4. Title (DVD) 5. Go to search 6. Radio band Video System PAL/NTSC/AUTO 7. Sound/display setting 8.
REMOTE CONTROLS (COnTinUED) REPLACING THE LITHIUM BATTERY OF THE REMOTE CONTROL UNIT ■ When the range of the operation of the card remote control deteriorates or has no functions at all, replace the lithium battery type 2025 with a new one. 1. Open the back cover of the remote control unit. 2. Insert the button-type battery with the stamped (+) mark facing upwards, directly under the small metal tongue. Close the back cover. WARNING: ■ Store the battery where children cannot reach it.
ZE-MC294 BASIC OPERATIONS Method 2: ■ Open the 'Main menu' by keeping SRC pressed at the top left corner of the TFT or press MODE button on remote control, and then touch the desired option or select the option by moving the cursor and then confirm. Touch / on the TFT to show other options of the main menu. PASSWORD If you power-on the unit for the first time you need to enter a password.
DISC OPERATION INSERT A DISC Insert a disc into the slot, and the unit will change automatically to disc mode. NOTES: ■ Please check, if there is already a disc in the unit before you try to insert another one. ■ The unit will exit current playing source and enter DVD mode when a disc is inserted. ■ Some recorded discs, such as CD-R, CD-RW, DVD-R, DVD + R, DVD-RW, DVD+RW can only be played, when they are closed after recording (i.e. “close session and disc”).
ZE-MC294 DISC OPERATION (COnTinUED) SELECT DESIRED TRACK ■ Press or to skip to the next or previous track. ■ Use 1-9 and 0, 10+ buttons on the remote control to select the desired track number. FAST FORWARD/BACKWARD DURING PLAYBACK Press or for more than 2 seconds once and repeat to select X2, X4, X8 or X20 speed of fast backward or forward playback. ■ During the fast forward or backward operation, press briefly to playback again. into standby mode.
DISC OPERATION (COnTinUED) PROGRAM ■ Press PROG to enter the program list. Use / or / cursor and digit button to enter a number. DVD PLAYBACK MENU Touch the center of the screen during playback: For DVD and File disc, select the title and chapter number. For VCD and CD, select the track number. ■ Press to play, or move the cursor to select "PLAY" and press ENTER to play. ■ If you want to delete the list, move the cursor to "CLEAR" and press ENTER to delete all the list set before.
ZE-MC294 DISC OPERATION (COnTinUED) CD/MP3/MOVIE/PHOTO MENU Touch the icon to access desired function. 1. Display main menu 2. Display audio/video setting menu 3. Current time 4. Folder/file list 5. Repeat playback 6. Previous/next page 7. Random play 8. Play/Pause 9. Stop 10. Show audio file 11. Show photo file 12. Show video file 13. Back to up folder 14. Show next menu PHOTO INTRO MENU While intro photos, touch the center of the screen: Touch to access desired function. 1.
TUNER OPERATION RADIO MENU Touch to access desired function. 1. 2. 3. 4. 5. Display main menu Display audio/video setting menu Current time Tuner information Touch to tune automatically Press more than 2 seconds to tune manually. 6. Select Previous/next preset station 7. Show radio list 8. Tuner information 9. Preset station 10. Touch to tune automatically. Press more than 2 seconds to tune manually. 11. Band switch 12. Auto search and store stations 13.
ZE-MC294 TUNER OPERATION (COnTinUED) TA SEEK/TA ALARM Main menu ➞ Setup menu ➞ Radio ➞ TA Seek/Alarm. If the TA (Traffic Announcements) is turned on and there is no traffic program identification code received in the specified time, no TA/TP will display and either TA Alarm or TA Seek will be activated. TA Alarm mode: Alarm is turned on. TA Seek mode: TA Seek is automatically activated in non-radio mode.
USB/SD CARD OPERATION USING SD-CARD 1. Open the cover flap, insert an SD-Card into the corresponding slot. The unit then switches to card mode, and automatically starts to play back the files found on the card. 2. To remove the card, you should first select another source, in order to avoid damaging the card, press the card slightly, and remove the card after it has popped out, then dose the cap. 3.
ZE-MC294 iPod OPERATION USING THE iPod 1. Connect the optionally available iPod cable to the "iPod" connector on the back of the unit. If you want to use the video/ photo function of the iPod, you also need to connect the "iPod CVBS" (3.5 mm) part of the cable. 2. Turn on the unit, the unit should switch to iPod mode upon connection, if not, select the iPod from the main menu. The TFT will show the menu below. 3. When you want to play songs, operate it via the touch-screen of the ZE-MC294. 4.
BLUETOOTH OPERATION NOTE: ■ Avoid using the phone when driving. If you still have to use it during driving, your ZE-MC294 offers you hands-free device functions via the built-in Bluetooth interface. After connection, you may also control your mobile phone through the unit. PAIRING Use this function to establish a connection between the unit and your mobile phone. Press the SRC button repeatedly on the panel or touch BT on the Main menu to enter Bluetooth mode.
ZE-MC294 BLUETOOTH OPERATION (COnTinUED) HISTORY After successful pairing, touch the LOG menu. to open LO G 10. Dial 11. Page up 12. Search mode This icon opens an on-screen keyboard. Touch the character on-screen, touch to < button to delete a digit, touch begin searching. 13. Page down 14. Enter 15. Phonebook 16. Received calls 17. Dialed numbers 18. Missed calls 19. Return to BT main menu 2. Auto Connect On/Off You can toggle the automatic connection On or Off.
OTHER MODES A/V MODE ■ External peripheral devices with RCA audio and video outputs can be connected with the unit. ■ For more details, please refer to . NAV MODE (OPTIONAL) This player is "navigation ready". Before you can access any navigation features, you need to purchase and install the suitable navigation module ZE-NA2000N. Please refer to the separate “Navigation manual” you will find included with the module. DVB-T MODE (OPTIONAL) This player is "DVB-T ready".
ZE-MC294 SYSTEM SETUP AUDIO/VIDEO SETTING Three ways will lead you to the audio/video settings menu. Choose the one you like. Method 1: Touch SEL on the TFT. Method 2: Press the VOL knob. Method 3: Press the SEL button on the remote control. SETUP MENU You have three choices to reach the setup menu: Method 1: Select SETUP on the main menu. Method 2: Press the VOL knob more than two seconds. Method 3: Press the SETUP button on the remote control. 12H 1.
SYSTEM SETUP (COnTinUED) GENERAL SETTINGS Beep: On, Off Touch [On] or [Off] to select beep sound on or off. Loudness: On, Off Touch [On] or [Off] toggle loudness on or off. Time Mode: 12H, 24H Touch [12H] or [24H] to select between 12 or 24 hour time format. Time Adjust: ,hh:mm, Touch left side of [,hh:mm,] to activate setting of the hours, touch []/[] to adjust. Touch right side of [,hh:mm,] to activate setting of the minutes, touch []/[] to adjust.
ZE-MC294 SYSTEM SETUP (COnTinUED) RADIO SETTINGS LOC_DX: LOC, DX Touch [LOC] or [DX] to select preferred reception to local or distant. LOC: Only (mainly local) stations broadcasting a strong signal can be received. DX: Distant stations can be received. Stereo_Mono: Mono, Stereo Touch to select FM stereo or mono. AF: On, Off Touch [On] or [Off] to turn Alternative Frequency on or off.
SYSTEM SETUP (COnTinUED) BT SETTINGS Pair: On, Off Touch [On] or [Off] to toggle auto-pairing on or off. To reset the password, you should enter the original password first, then input a new to confirm it and input password, touch the password again to confirm it. Auto Connect: On, Off Touch [On] or [Off] to toggle auto-connect on or off. Auto Answer: On, Off Touch [On] or [Off ] to toggle auto-answer on or off. PIN Code: Touch to set the password to connect to other Bluetooth devices.
ZE-MC294 DEVICE CONNECTIONS NOTES OF CONNECTION ■ This unit is designed to be used in a vehicle with a 12-volt battery and negative grounding. Before installing this unit to a mobile home, a bus, or a truck, make sure the battery voltage is appropriate for this unit to be used, otherwise, install a transformer to convert the output voltage to 12 V DC. ■ To avoid short circuits in the electrical system, ensure that the negative battery cable is disconnected before installation.
DEVICE CONNECTIONS (COnTinUED) Parking Brake Cable Connections Brake engaged: Signal 0V Parking Brake Switch Pink Wire Main Unit Parking Brake Switch Reverse Driving Cable Connections Car Frame Reverse Driving Light Green Wire Rear View Video Camera Lead Battery Gearbox 26 Car Frame
ZE-MC294 INSTALLATION INSTALLATION GUIDE 1. If relevant, remove any other audio system(s) from the car. 2. Perform the required electrical connections: 3. If necessary, connect the hand brake wire to your hand brake contact in order to activate the video display when playing a DVD (when the car is parked). 4. Connect the wire that activates the rear view camera to the reversing sensor or to a reversing light.
TROUBLESHOOTING ■ The following checklist can help you solve the problems which you may encounter when using the unit. Before consulting it, check the connections and follow the instructions in the user manual. Problem Cause Corrective action General Unit can not power on. Unit fuse blown. lnstall new fuse with correct rating. Car battery fuse blown. lnstall new fuse with correct rating. lllegal operation. Reset the unit. Battery depleted. Change the Battery. Battery installed incorrectly.
ZE-MC294 TROUBLESHOOTING (COnTinUED) Problem Cause Corrective action Disc playback Cannot insert disc. A disc inside the unit already. Eject current disc and insert new one. Disc is warped or scratched. Use disc in good condition. Disc is dirty or wet. Clean disc with soft cloth. lncompatible disc is used. Use compatible disc. Disc is inserted upside down. lnsert disc with label side up. Disc region code is not compatible with unit. Use disc with proper region code.
SPECIFICATIONS General Power supply ........................................................................................12 V DC (11 V–16 V) Test voltage ...................................................................................... 14.4 V, negative ground Maximum power output ........................................................................... 40 W x 4 channels Continuous power output ............................................. 20 W x 4 channels (4 Ω 10% T.H.D.
ZE-MC294 APPENDIX CONTENTS PCS Remote control .................................................................................................................... 1 External microphone ........................................................................................................... 1 Front A/V cable (RCA -> 3.5 mm) ........................................................................................ 1 Cable for preamplifier outputs etc. .........................................................
APPENDIX (COnTinUED) REGION CODE According to DVD sale region, the whole world is divided into six regions. A DVD disc can be played back only when its region code is compatible with that of the player in use.
ZE-MC294 APPENDIX (COnTinUED) WIRING CONNECTIONS 33
■ If at any time in the future you should need to dispose this product please note that waste electrical products should not be disposed of with household waste. Please recycle where facilities exist. Check with your Local Authority or retailer for recycling advice (Waste Electrical and Electronic Equipment Directive). This unit is manufactured under license from Dolby Laboratories. “Dolby” and the double-D symbol are trademarks of Dolby Laboratories. CAUTION This product is a CLASS 1 LASER PRODUCT.
ZE-MC294 2 YEARS LIMITED WARRANTY Dear customer Thank you for purchasing this ZENEC product. It is advisable to keep the original packing material for any future transporting of the product. Should your ZENEC product require warranty service, please return it to the retailer from whom it was purchased or the distributor in your country. This ZENEC product is warranted against defective materials or workmanship for a period of TWO years from date of purchase at retail.
ZENEC by ACR AG · Bohrturmweg 1 · Bad Zurzach · Switzerland