machine numbers I C27C41 C32C41 I C36C41 zenith
RECORDYOUR MODEL NUMBER _N | (Now, while you can see it) / The model and serial number of your new TVare located on the back of the TVcabinet. For your future convenience, we suggest that your record these numbers here: MODELNO. SERIALNO. WARNING WARN I NG" TO REDUCETHE RISK OF ELECTRICSHOCKDO NOT REMOVECOVER(OR BACK). NO USER SERVICEABLEPARTS INSIDE. REFERSERVICING TO QUALIFIED SERVICEPERSONNEL.
Important safeguards for you and your new product Your product has been manufactured and tested with your safety in mind. However, improper use can result in potential electrical shock or fire hazards. To avoid defeating the safeguards that have been built into your new product, please read and observe the following safety points when installing and using your new product, and save them for future reference.
(Continued from previous page) 18. Object and Liquid Entry 14. Outdoor Antenna Grounding Never push objects of any kind into this product through If an outside antenna or cable system is connected openings as they may touch dangerous voltage points or short-out parts that could result in a fire or electric shock. Never spill liquid of any kind on the product.
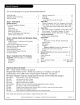
Turn to the next page to set up your Entertainment Safety Warnings ........................... Important Safety Instructions ............... Table of Contents .......................... Machine 2 3-4 5 Captions, Captions/Text ................... Language ............................ Source Menu Select Main Picture and PIP sources Video Menu ............................ Step 1. Hook Up TV Hookup Directory ......................... TV and other Equipment Hookups Antenna ..............................
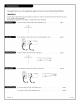
This page directs you to the appropriate page for hook up of your Entertainment Machine IMPORTANT!! Use this page to decide where you need to begin your setup. First, find the line below that best describes what you want to do, then go to that page number. Note: Design and specifications are subject to change without prior notification. If you are using an antenna and no other equipment, \\ \\ \\ /z // go to ..................
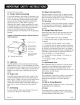
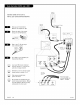
Connect an off air antenna to your Entertainment Hook up your Entertainment Machine Machine, see diagrams at right. ....,.... h Remove the back of the remote and put in two AAA batteries. Antenna ;;................ _ _;; back of _i_: i;__....... _J; remote i! i........ _) l Flat (300 wire Antenna ohm) / Cable Plug in your TV.Do not plug it into a switched outlet. TV back panel (expanded view) 6OHz 300/75 Adapter h ohm Go to page 13 to EZProgram your Entertainment Machine.
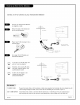
Connect Cable Service to your Entertainment Hook up your Entertainment Machine, Machine Without Cable Box see diagrams at right. CableTV Remove the back of the remote and put in two AAA batteries. wall Jack Antenna / Cable RF coaxial wire (75ohm) L F Plug in your TV.Do not plug it into a switched outlet. TV back panel (expanded view) With Cable Box 60 Hz 120V A_ CableTV wall Jack _L F Go to page 13 to EZProgram your Entertainment Machine.
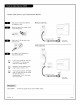
Connect an off air antenna VCR to your Entertainment and Machine Round wire (75ohm) L F Flat wire Hook up your Entertainment Machine, see diagrams at right. L F VCR back Remove the back of the remote and put in two AAA batteries. 3oo/75ohmL_ -'-'--(/_ Adapter _................ backor_; _ _
Cable TV wall jack Connect Cable service and a VCRto your Entertainment Machine Cable TV L F wall jack re (75ohm) Hook up your Entertainment Machine, see diagrams at right. L Removethe back of the remote F and put in two AAA batteries. Cable box VCR back' _,/V In Out L F _1_ Audio Video R L Out Out Plug in your TV. Do not plug it into a switched outlet. RF coaxial wire (75ohm) not included with TV 6O Hz L F Go to page 13 to EZProgram your Entertainment Machine.
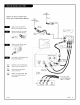
Connecting a S-VHS VCRor DVDplayer to your Entertainment Machine (VCR Only) ALtach to cable wall jack, cable box, or antenna Super VHS VCR Locate the Ant In jack on the back of your S-VHSVCR.Connect the cable line coming from your wall directly to this jack, Now locate the Out to TVjack. Connect a cable from the Out to TVjack to the ANTENNA/CABLE jack on the back of your TV.
Use your stereo to play the sound from your Entertainment Machine I Locate the jacks marked VARIABLE AUDIO OUT, R - L. These are for the stereo system. Connect the stereo system's cables, according to their color (red is the right channel, white the left) to these,jacks.
SETUP W Use EZ Program to automatically find and store in I EZ PROGRAM ADn/DEL/SURF CABLE AIR TV ANTEN_ A EZ CLOCK CAPTIONS the TV's memory, all the channels in your area CAPTION/TEXT LANGUAGE SOURCE MENU Select." AIR ANTENNA, If you receive over-the-air CABLE TV, If you subscribe programs. to a cable service. @NEXT Press MENU repeatedly MENU_MOVE _NEXT n until the SETUP menu appears. 0 Using the Up or Down arrow on the remote control, EZ Program on your screen.
Note: Pressing TV puts remote into TV operating mode A quick list of the keys on your remote and what they do in TV mode, see page 44 for remote key functions PRG in the other modes POWER Turns TV On or OFF. (PROGRAM) Programs your remote to operate other products. See page 38. o LED INDICATOR LIGHT Lights when keys are pressed. FLASHBK (FLASHBACK) Return to the lastchannel CABLE / VCR / AUX / TV viewed. Selects remote operating mode.
Use either the remote or the TV front controls I PARENTAL AUX. to access the on-screen menus CTRL ,/ NBLOCKED BLOCK MPAA BLOCKED AGE BLOCK CONTENT BLK SET HOURS SET PASSWORD LOCK ON/OFF I@NEXT MENU_MOVE _'NEXTI PressMENUrepeatedly on the remote control, to "select" one of the five main menus on your screen like PARENTAL CONTROL. © Usethe UP/DOWNdirectional arrow to select an option like AUX. BLOCK.
How to use your front control panel to operate the menus When using the on-screen menus, the buttons on the TV front panel correspond to the remote control keys as follows: CHANNEL= VOLUME= MovesUp/Down MovesLeft/Right To access the on-screen menus, press MENU.Pressing MENUrepeatedly will cycle through the available menus. / / / / / / / Highlight the option you want using the DOWNor UPChannel arrow.
L audio R video s-video 1 Front and Back Connection Panels. w_ab_ Audio o_ Where picture and sound "sources" are rnnn_rt_rt, Camcorder _ R s - Video Video __ _adi_ _R Pick the viewing source (picture L_ _ Antenaa L/ Nono VCR S-Video VCR and sound) you want to see and hear on your Entertainment Machine DVDPlayer m L F Press TV/VCR SOURCErepeatedly to choose from the available viewing sources that are connected to the TV.
Descriptions of the menus and displays on your Entertainment Menu Name Page Machine Description/Function ON-SCREEN MENUS SETUP 13 Sets the TV up and adjusts the basic features. EZProgram 13 Automatically finds and stores active channels you will choose using Channel Up/Down. 20 Choose which channels will appear when using Channel Up/Down. EZClock 21 Sets the TV's clock.
On-screen displays reveal the current status of your Entertainment Machine "Surf" Channels Mode Active Display Press SURF to turn on Surf channels tuning mode; only channels specified as Surf channels will appear when using channel Up/Down. Surf' s Up No Surfing Press SURF to display "No Surfing!" channel tuning mode. and return to normal No Surfing @ Mute Display PressMUTEto quiet sound, PressMUTEagain to remove the sound. PressMUTEa third time to restore the sound.
SETUP Customize your channel selection list." Add Channels not found by EZ Program EZ channels CH EZ CLOCK CAPTIONS Delete channels you don't watch Create a favorite PROGRAM ADD/DEL/SURF 20 DELETED _ADDED SURF CAPTION/TEXT LANGUAGE SOURCE MENU list to "Surf" - - with Surf on, only those channels specified as Surf channels Channel Up/Down I[I will appear when pressing the keys i Use the NUMBERkeypad to go to the Channel you want to add, delete, or include in the Surf channel list.
Set the clock yourself or have the TV do it for you SETUP EZ EZ PROGRAM CLOCK ADD/DEL/SURF EZ CLOCK CAPTIONS TO SET CLOCK MODE TIME ZONE DAY. SAVINGS _ _/AUTO MANUAL PRESS CAPTION/TEXT LANGUAGE SOURCE [@NEXT MENU MENU_MOVE I Movs _'NEXT _ln the Setup menu with the EZ Clock option highlighted, Adjust RIGHT arrow to go to the EZ Clock Menu. _I Use the Select UP or DOWN arrows, the AdJust LEFT or RIGHT arrows, and the NUMBER keypad to set the clock menu options.
Turn on Closed Captioning or Captions when sound is Mute, then choose a Closed Captions or Text option SETUP EZ SETUP IRm PROGRAM W ADn/DEL/SURF EZ CLOCK CAPTIONS CAPTION/TEXT LANGUAGE SOURCE MENU I@NEXT MENU_MOVE _ON MUTE _'NEXT PROGRAM CAPTION CAPTION CAPTION CAPTION TEXT 1 TEXT 2 ADn/DEL/SURF EZ CLOCK CAPT IONS CAPTION/TEXT LANGUAGE SOURCE MENU OFF EZ EZ I@NEXT TEXT TEXT MENU€MOVE 3 4 _NEXT The Caption/Text feature sets up your Entertainment Machine to receive various closed caption
SETUP EZ Choose the language you want the on-screen PROGRAM ADn/DEL/SURF menus to appear in EZ CLOCK CAPTIONS CAPTION/TEXT LANGUAGE ENGLISH SOURCE SPANISH MENU FRENCH I@NEXT MENU€MOVE _NEXT_ Press MENU repeatedly to select the SETUPmenu. Use the Up/Down arrow to select the Language option on your screen, then press the Right arrow. © Use the Up/Down arrow to choose any of the following options: English, Spanish or French. Press QUIT to remove menu and to return to TV viewing.
Choose the picture and sound you want to view on the Main Picture Screen and the smaller SETUP EZ SOURCE PROGRAM MAIN Ann/DEE/SURF PIP EZ CLOCK CAPTIONS TO CAPTION/TEXT LANGUAGE SOURCE SOURCE SOURCE PIP inset MENU _ _/ANTENNA/CABL _ VIDEO VIDEO 1 2 SET PRESS MENU N ,XT M ,NU#Mov N,,XT / .'Move BACK Selecting Sources with the Menus Press MENU repeatedly to select the SETUPmenu. o Use the Up/Down arrow to select SOURCE MENU,then press the Right arrow.
VIDEO ] CONTRAST BRIGHTNESS COLOR TINT SHARPNESS COLOR TEMP EZ PICTURE Customize the picture to your personal viewing preferences CONTRAST _Move / | 64% I llllllllllllllll With the VIDEO menu on-screen, use the Up/Down arrow to select an option like EZ Picture, press the Right arrow to go to the EZ Picture menu selections. 0 Using the Up/Down arrow, select a Video menu feature. Your options are: Contrast: Changes the amount of difference els and white levels in your picture.
AUDIO Personalize the sound coming from your Entertainment Machine n I BASS TREBLE BALANCE AUDIO MODE FRONT SURR EZ SOUNDRITE SPEAKERS EZ SOUND _Move i With the AUDIO menu selected and the Audio Mode option highlighted, press the Right arrow. Using the Left/Right arrows, select your preferred settings. Choose from Mono, Stereo, or SAP. Audio Menu Options Include: • Bass: Increases/decreases • Treble: Increases/decreases lower-end sounds. © higher-end sounds.
This optional feature can be used to "block" Note." If you use this feature, undesirable programming from appearing on your TV PIP will not be available. Parental Control offers the user a wide variety of options and settings that restrict or "block" the programming that can appear on the TV. Parental Control allows the user the capability of defining which program rating they consider acceptable, to the younger or more sensitive viewer.
After you have read the preceding PARENTAL AUX. BLOCK page, follow instructions below to set up and activate Parental Control CTRL _' _ UNBLOCKED MPAA BLOCKED AGE BLOCK CONTENT BLK SET HOURS SET PASSWORD LOCK ON/OFF B Note: Use the remote control to set up Parental Control. In the PARENTAL CONTROL menu, highlight the Content Block option, then press the RIGHTarrow. choose an acceptable rating.
[ PARENTAL CTRL I I PARENTAL CTRL I ,/UNBLOCKED MPAA AGE AUX. BLOCK BLOCK SET SET BLOCKED HOURS PASSWORD SET SET LOCK ON/OFF ONTENT BLK _ CTRL I_MOVE AGE AUX. GENERAL CHILDREN-- SET BLOCK BLOCK _ 1 _BACK_ SET TV-G TV-PG TV-14 and ab{ ve and and PRESS _BACK_ I PARENTAL CTRL I DIALOG LANGUAGE MEAA AGE BLOCK AUX.
Set the Sleep Timer to automatically On/Off Timer to turn turn the TV off, after the preset time has expired TV on and off each day at the specified time SPECIAL EZ TIMER [ EZ TO SET TIME_S SLEEP ON CH. LABELS XDS DISPLAY PIP MENU EZ DEMO EZ HELP TIMER TIMER 8:00 TIME OFF TIME ON/OFF TIM. JAM PM r_ II @NEXT MENU_MOVE _NEXT MOVE _NEXT @BACK_ Sleep Timer Direct Access Press TIMER to place the Sleep Timer menu on the screen.
Pick a preset label to help identify the network you just tuned to or are currently watching SPECIAL EZ CH. XDS I\PIP I /I PIP _cH 2,cBs<-I TIMER LABELS 20 CH USA DISPLAY MENU EZ DEMO EZ HELP J Channel/Time Display with Channel Labels @NEXT MENU_MOVE _NEXT i Using the NUMBERkeypad or the CHANNELUp/Down arrow, pick the channel you want to label. © PressMENUrepeatedly to choose the SPECIALmenu. Use the Up/Down arrow to select CH. LABELS,then press the Right arrow.
Use the Extended Data Service to show in-depth program information SPECIAL Ch 25 - PBS 7:15PM EZ | | CH. Stereo XDS PIP Ch 30-ABC| PIP TIMER LABELS OFF ON DISPLAY MENU EZ DEMO EZ HELP M NOVA Length 01:00 Time Left 00:45 @NEXT MENU_MOVE _NEXT PressMENUrepeatedly to select the SPECIALmenu on your screen. Use the Up/Down arrow to select the XDS DISPLAY option, then press the Right arrow. Use the Up/Down arrow to choose: On, or Off.
Customize the PIP inset appearance SPECIAL and size PIP I EZ TIMER CH. LABELS XDS DISPLAY TO PIP PRESS EZ EZ CONTRAST MENU MENU 4 lllllllllllllllll, BRIGHTNESS COLOR TINT SET DEMO HELP SIZE r_ i_ADJUST i_ Press MENU repeatedly to select the SPECIALmenu screen. _I Use the Up/Down arrow to highlight press the Right arrow. I Use the Up/Down/Left/Right PIP menu options.
PIP = Picture-In-Picture Think of PIP as a mini TV screen superimposed Press PIP on the remote onto your main TV screen to place the PIP inset on the screen, press PIP again to remove it YOUR PICTURE-IN-PICTURE FEATURE The Picture-in-Picture (PIP) function allows you to put a smaller picture, called the "inset," on the bigger screen, or the "main" picture. Normally you would need some other piece of equipment, like a VCR, to act as a tuner to receive and display a second channel at the same time.
Using two-tuner, Picture-in-Picture (PIP) Musical Note Symbol Indicates if PIP or the Main screen is features the sound source. (In this case sound is from Main screen source.) To change sound source, press QUIT repeatedly with the Channel/Time/Audio Display on-screen. PIP Inset Press PIP to turn PIP on and off. Channel/Time/Audio Source Display Press ENTERto show display. Shows source for: Main picture, PIP, and sound source (Main or PIP).
SPECIAL Your Entertainment menus available EZ TIMER CH. LABELS XDS DISPLAY PIP MENU Machine can show you the EZ DEMO _/ EZ HELP OFF ON M Im" @NEXT m MENU_MOVE _NEXT L D' h F Press MENU repeatedly to select the SPECIAL menu. Use the Up/Down arrow to select the EZ DEMO option, press the Right arrow. then o Use the Up/Down arrow to choose either: On; then press ENTER. EZ Demo will continue to run (even if the TV is turned off and on again) until it is turned off in the SPECIAL menu.
SPECIAL EZ TIMER CH. LABELS XDS DISPLAY PIP MENU EZ DEMO Need Help? Go to the on-screen EZ Help menu and use it to solve the problems below listed EZ TO SET PRESS HELP r_l m,ml @NEXT MENU_MOVE _NEXT PressMENUrepeatedly to select the SPECIALmenu on your screen. o Use the Up/Down arrow to select the EZHELP option, then press the Right arrow. Use the (Up/Down/Right/Left arrow keys) as described onscreen to select the options below and correct the problem.
Set up your remote to operate other IR controlled VCRs, Cable Boxes, TVs, Satellite Audio Tuners and Amplifiers brand name devices." Receivers, DVD Players, Audio CD Players, Audio etc. See listing Tape Decks, on pages 42/43 Turn on the device you want to program. F Iw On the chart on page 42/43, find the type of device you're programming, and then find the brand name. Make a note of the three-number code, you'll need it soon. IL Press and hold PRG.
Control the volume on your home audio system without changing modes Find the code that operates your amplifier. Test it to make sure it's the correct one by following the procedure in "Programming Your Remote" on the previous page. © Programyour audio system into one of the available AUX modes: Aux, Aux+l, Aux+2, or Aux+3. Press and hold PRGon your remote until the indicator light stays lit, then release. Press 4-9-9; then ENTERon the remote.
Control up to seven different devices with your remote Refer to the chart on page 42/43 to find the type and brand name of the device you're programming. Press and hold down PRGwith a small blunt object until the indicator light turns on, then release PRG. Press AUX and the 1 on the NUMBER keypad at the same time (for AUX +1). E Using the NUMBER keypad, enter the three-number the device you've selected. code for Press ENTERto save the code.
Use Auto Find to automatically search and try all possible brand codes Turn on the device you want the remote to control. Press and hold PRGuntil the indicator then release PRG. light turns on, _© Press the key for the device you are trying to program (CABLE,VCR,AUX, TV). E Press 0-0-0 (zero-zero-zero), then press ENTERright away. Aim the remote at the correct device and push the POWER key (The indicator light will turn off while the POWERkey is pressed).
Find the codes you need to program your remote. On this page." TVs, VCRs,and Cable Boxes Admiral ........ 121 Lodgent ........ 121 Signatu_ 2000... 121 Funai TV/VCR.... Bell & Howell .... 121 Logik ......... 121 XR-IO00 ....... 121 Goldstar TV/VCR.. 153 172 Citizen ........ 121 Majestic ....... 121 Zenith 101 121 149 152 Symphonic TV/VCR 154 Curtis Mathis .... 121 Memorex ....... 121 Daewoo ....... 149 Montgomery Ward . 121 Elektra ........ 121 Teknika ........ 121 Kurazi .
Find the codes you need to program your remote. On this page." Cable, Satellite, CD Players, Tape Decks and Audio Tuners and Amplifiers. Alphastar ....... 516 Hughes Network .. 514 RCA .......... 510 517 Toshiba ........ 509 512 Chaparral ....... 501 502 JVC .......... 518 Realistic ....... 506 Uniden ........ 522 Cheyenne ....... 502 Macom ........ 314 Sierra I ........ 502 United ........ 344 Dishnet ........ 515 521 Sierra II ....... 502 Zenith Drake..... Brake .........
A complete list of key functions KEY NAME PRG AUX Mode Zenith Code 960 Program Mode Codes Program Mode Codes Program Mode Codes VCR On/Off Cable Box On/Off AUX On/Off CABLE Selects Cable Selects Cable Selects Cable Selects Cable VCR Selects VCR Selects VCR Selects VCR Selects VCR AUX Selects AUX Selects AUX Selects AUX Selects AUX Selects TV Selects TV Selects TV Selects TV Channel Preview VCR SP/EP Cable FC/Fav Oh AUX Audio TV Flashback VCR Flashback Cable Flashback AUX
Caring for your Entertainment Machine Early malfunctions can be prevented. Careful and regular cleaning can extend the amount of time you will have with your new Entertainment Machine. Be sure to turn the power off and pull out the plug before you begin any cleaning. 1. Here's a great way to keep the dust off your screen for a while. Wet a soft cloth in a mixture of lukewarm water and a little fabric softener or dish washing detergent.
Some quick and easy tips to fixing problems yourself SYMPTOMS SOLUTIONS Snowy picture and poor sound. • Check your antenna Multiple • Checkyour antenna direction and/or location. ° Make sure the wire from your antenna to your Entertainment Machineis properly connected. images Interference: or 'ghost shadows.' Sharp lines across the screen and poor sound. The following phones; • If possible picture but no sound.
SYMPTOMS SOLUTIONS Weak or no Stereo Sound • Check to see if all the connections when using • Look in the AUDIO menu to see if all the settings a stereo VCR. With no key presses, on-screen continue menus • EZ Demo feature is operating. are secure. are correct. Turn EZ Demo off in the SPECIAL menu. to appear. PIP Problems PIP does not work. • Is Parental Control set to block programming? The PIP inset is black or lacks contrast when VIDEO is the PIP source.
Some quick and easy tips to fixing problems yourself SYMPTOMS SOLUTIONS Channel/Time Display does not disappear after a period of time. • Display will not function connected to it. EZ Help menu shows only two options. • A Video source is the selected source. Main screen source has more EZHelp options.
A list of definitions A/V CABLES for some of the words found in this operating Audio and Video cables. Three cables bunched together--Right audio (white), guide MONO SOUND audio (red), Left Mono (monaural) sound is one channel of sound. On more than one speaker, all the and Video (yellow). A/V speakers play the same audio. cables are used for stereo playback of videocassettes and for higher quality picture and sound from other A/V devices.
PAGE 5 0 206-3483
INDOOR AMPLIFIED ANTENNA Receive Local pro qramming NOT available on your Satellite system!!! Perfect bac_.up antenna for cable outages. Enhanced quality picture and stereo sound in weak signal areas. • Amplified VHF/UHF/FM Antenna includes :4 feet of 75 ohm cable for easy hookup. ATS775 ONLY$34 95 PLUS$6.95 SHIPPING & HANDLING TELEVISION WALL MOUNTS et up your game room or spare room in style!! Sturdy black wall mounts eep the TV off y.our furniture and in easy view.
Direct-View Color _/ Welcome to the warranty carefully, other rights Zenith family! We believe it is a "LIMITED that vary from that you will be pleased WARRANTY" as defined staLe-to-state within the under with your new Zenith Entertainment Federal Law. This warranty Machine '_. Please read this gives you specific legal rights, and you may also have U.S.A.