DSV-110 operating guide Presentation Series DSV-100
WARNING RISK OF ELECTRIC SHOCK DO NOT OPEN WARNING: IMPORTANT SAFETY INSTRUCTIONS Important safeguards for you and your new product TO REDUCE THE RISK OF ELECTRIC SHOCK DO NOT REMOVE COVER (OR BACK). NO USER SERVICEABLE PARTS INSIDE. REFER SERVICING TO QUALIFIED SERVICE PERSONNEL. Your product has been manufactured and tested with your safety in mind. However, improper use can result in potential electrical shock or fire hazards.
IMPORTANT SAFETY INSTRUCTIONS short-out parts that could result in a fire or electric shock. Never spill liquid of any kind on the product. (Continued from previous page) 14. Outdoor Antenna Grounding 19. Servicing If an outside antenna or cable system is connected to the product, be sure the antenna or cable system is grounded so as to provide some protection against voltage surges and built-up static charges. Article 810 of the National Electrical Code (U.S.A.
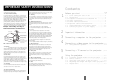
Page 7 Using the menus . . . . . . . . . . . . . . . . . . . . . . . .1 9 7.1 The Menu System . . . . . . . . . . . . . . . . . . . . . .1 9 7.1.1 Main menu . . . . . . . . . . . . . . . . . . . . . . . . . . .1 9 7.2 Set-up Menu . . . . . . . . . . . . . . . . . . . . . . . . . .2 1 7.2.1 Picture orientation . . . . . . . . . . . . . . . . . . . . .2 1 7.2.2 Language . . . . . . . . . . . . . . . . . . . . . . . . . . . .2 2 7.2.3 Mouse system . . . . . . . . . . . . . . . . . . . . . . . .2 2 7.2.
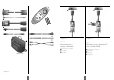
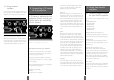
1 1 1 U EN M Q N O P1 ZA K IC U 2 FF O P2 ZA 3 2 4 2 4 5 3 3 8 9 Figure 3. Figure 2. 10 11 Figure 2: Figure 3: Connecting to a laptop, notebook Connecting to a desktop PC with standard RGB •1 Back panel of computer •2 PC adapter •3 EVC cable •1 •2 •3 •4 DSV-100 only Figure 1.
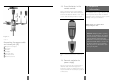
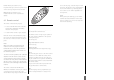
1.3 Insert batteries in the remote control 1 5 6 2. Important information Figure 5 shows the remote control with the battery lid removed. Slide off the battery lid and insert the batteries with the + and - poles correct. Slide the battery lid back on again. 7 The registration card or copy of invoice is your proof of purchase. Please make sure that the registration card is returned in order to get the warranty service you are entitled to 4 2 NOTE! Please use caution when transporting the unit.
5. If you want to use the remote control to control your computer, connect the correct mouse cable from the computer to the adapter box. See figure 4. When your computer is connected to the projector with the EVC cable (with EVC connector on the computer), the remote mouse control will automatically function as a regular mouse on your PC. 3.Connecting a computer to the projector The procedure for connecting a computer to the projector is the same for all types of computers. 6.
4.1 Using external speakers 5. Connecting a TV-source to the projector In order to use external speakers with the projector you will need an amplifier. Connect the amplifier to the audio out on the projector. These three work differently and it is important to consider the options of each when adjusting the projector settings. 6. Using Your Zenith projector Antenna A TV-tuner is optional for the projector (Please consult your Zenith dealer for availability of this option). 6.
tion to the zap keys, select the Zap icon from the menu. The zap keys can be programmed to do the same function e.g. volume up/down. See section 7.2.5 for further explanations of the zap menu. Pointer mode (see section 7.2.5) In pointer mode you can move a pointer cursor on the screen by using the mouse function. U EN M Blank mode (see section 7.2.5) Q N O P1 ZA In blank mode the screen is blanked out (black). K IC U FF O P2 ZA 6.
Channel (+/-) 6.3 Using the touch panel on the projector Click on the +/- to switch between pre-programmed TV channels when TV is selected as source. Focus setup source Press the Focus key to focus the projected image after zooming to the correct size. pc volume Zoom tv Press the Zoom key to zoom the projected image to the desired size. channel video focus Stand by s-video The stand by key will set the projector in stand by mode.
Auto set-up Control panel 7.2 Set-up menu Auto set-up will do automatic set-up of the projector: In this menu you can make adjustments for picture and sound. Set-up menu • • • • Removing the main menu Horizontal and vertical position Sampling clock Phase Chooses between available video formats and NTSC/PAL auto detection 7.2.1 Picture orientation In the set-up menu the following sub-menus are available: To remove the menu system, press the MENU key on the Remote control.
7.2.2 Language 7.2.3 Mouse system Mouse system selection USB will be selected automatically when the mouse cable is connected. If your PC uses RS232 mouse, you must choose MS Serial Mouse in this menu. If your PC uses PS/2 mouse, you must choose PS/2 in the menu. Selected system will be active until another system is chosen. When shipped the projector is set up to PS/2.
Automatic TV station search Show accumulated lamp time This function selects all TV stations with a signal (maximum 60 stations). These will be symbolized with a TV icon. 7.3.1 Picture control 7.3 Control panel menu Select the picture control menu for adjusting brightness, contrast, saturation and tint. Programming new channels In this window you can see the accumulated time that the lamp has been in use. You also use this window to reset the accumulated lamp time after the lamp has been replaced.
7.3.2 Audio control In the color manager menu you can choose between four pre-defined Color settings. 7.3.3 Zoom/Focus adjustments 7.3.5 Picture positioning Zoom and focus adjustments When PAL/SECAM video is connected brightness, contrast and saturation will be available. Audio control Select this function when you have connected an audio signal to the ‘Audio in’ on the projector connectors (or through the EVC cable). Use the four sliders to adjust volume, bass, treble and balance.
7.3.6 Synchronization Adjustments 8. Maintenance All maintenance should be done by Zenith authorized service personnel. Contact your Zenith dealer for maintenance. The Zenith projector lamp is designed to give you many hundreds of hours of operation. In the unlikely event that you should have to replace the lamp, you will find complete instruction on how to replace the lamp included in the spare lamp kit.
Specifications: Projector Type Display Device Resolution (native) Resolution (compressed) Light Output, DSV-100 (ANSI, Typical) Light Output, DSV-110 (ANSI, Typical) Projection Lamp Lamp Life (typical) Video Input Capability Horizontal Sync Input Frequency Vertical Sync Input Frequency Aspect Ratio Capability (DSV-100) Aspect Ratio Capability (DSV-110) Contrast Ratio (ANSI Full on/off) Contrast Ratio (ANSI Checkerboard) Brightness uniformity (typical) Color Wheel Enhancement (DSV-100) Color Wheel Enhancemen
206-3651 © Copyright 2000 Zenith Electronics Corporation