DV186NH_HA1ULZ_ENG Installation and Operating Guide | Warranty Model Number | DVB612 | DVD Player For service/ support Call: Toll Free Number 1-800-243-0000 © Copyright 2006, LG Electronics U.S.A., Inc.
CAUTION RISK OF ELECTRIC SHOCK DO NOT OPEN CAUTION: TO REDUCE THE RISK OF ELECTRIC SHOCK DO NOT REMOVE COVER (OR BACK) NO USER-SERVICEABLE PARTS INSIDE REFER SERVICING TO QUALIFIED SERVICE PERSONNEL. This lightning flash with arrowhead symbol within an equilateral triangle is intended to alert the user to the presence of uninsulated dangerous voltage within the product’s enclosure that may be of sufficient magnitude to constitute a risk of electric shock to persons.
IMPORTANT SAFETY INSTRUCTIONS PLEASE READ AND OBSERVE ALL WARNINGS AND INSTRUCTIONS IN THIS OWNER’S MANUAL. AND THOSE MARKED ON THE PRODUCT. RETAIN THIS BOOKLET FOR FUTURE REFERENCE. This product has been designed and manufactured to assure personal safety. Improper use can result in electric shock or fire hazard. The safeguards incorporated in this product will protect you if you observe the following procedures for installation, use, and servicing.
Contents Introduction . . . . . . . . . . . . . . . . . .5-8 Operation . . . . . . . . . . . . . . . . . .16-22 About the Symbol Display . . . . . . . . . . . . .5 Symbol used in this Manual . . . . . . . . . . . . . .5 Notes on Discs . . . . . . . . . . . . . . . . . . . . . . . .5 Handling Discs . . . . . . . . . . . . . . . . . . . . . . .5 Storing Discs . . . . . . . . . . . . . . . . . . . . . . . .5 Cleaning Discs . . . . . . . . . . . . . . . . . . . . . . .5 Types of Playable Discs . . . . . . . .
Introduction This manual provides information on the operation and maintenance of your DVD player. Should the unit require service, contact an authorized service location. Handling Discs Do not touch the playback side of the disc. Hold the disc by the edges so that fingerprints do not get on the surface. Never stick paper or tape on the disc.
Types of Playable Discs DVD (8 cm / 12 cm disc) DVD audio discs (8 cm / 12 cm disc) Audio CD (8 cm / 12 cm disc) This unit has a regional code printed on the rear of the unit. This unit can play only DVD discs labelled same as the rear of the unit or “ALL”. Notes on Regional Codes • Most DVD discs have a globe with one or more numbers in it clearly visible on the cover. This number must match your unit’s regional code or the disc cannot play.
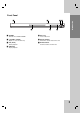
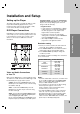
Front Panel e cd f Introduction b g a POWER Switches the unit ON and OFF. e Disc Tray Insert a disc here. b Z (OPEN / CLOSE) Opens or closes the disc tray. f Display window Shows the current status of the unit. c N (PLAY) Starts playback. g Remote Sensor Point the Remote Control here. Installation and Setup a Reference Operation d x (STOP) Stops playback.
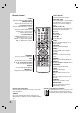
Remote Control SCAN (m / M) Search backward or forward. POWER Switches DVD Player ON and OFF. SKIP (. / >) Go to next chapter or track. Returns to beginning of current chapter or track or go to previous chapter or track. OPEN/CLOSE (Z) Opens and closes the disc tray. 0-9 numerical buttons Selects numbered items in a menu. PAUSE / STEP ( X ) Pauses playback temporarily/ press repeatedly for frame-by-frame playback. CLEAR Removes a track number on the Program List or a mark on the Marker Search menu.
The picture and sound of a nearby TV, VCR, or radio may be distorted during playback. If this occurs, position the player away from the TV, VCR, or radio, or turn off the unit after removing the disc. DVD Player Connections Depending on your TV and other equipment there are various ways you can connect the player. Please refer to the manuals of your TV, stereo system or other devices as necessary for additional connection information.
HDMI connection HDMI compatible TV If you have a HDMI TV or monitor, you can connect it to this player using a HDMI cable. HDMI 1. Set the TV’s source to HDMI (refer to TV’s Owner’s manual). H 2. Connect the HDMI OUT jack on the unit to the HDMI jack on a HDMI compatible TV or monitor (H). 3. Press RESOLUTION repeatedly to select the desired resolution. Notes : • Both PCM and Bitstream Audio out is available, when the sample frequency is set to 48kHz in HDMI connection.
Connect the DVD player to your optional equipment for audio output. Rear of DVD player X Amplifier equipped with 2-channel digital stereo (PCM) or audio / video receiver equipped with a multi-channel decoder (Dolby Digital™, MPEG 2, or DTS): Connect one of the DVD Player’s DIGITAL AUDIO OUT jacks (OPTICAL O or COAXIAL X) to the corresponding in jack on your amplifier. Use an optional digital (OPTICAL O or COAXIAL X) audio cable.
Displaying Disc Information on-screen You can display various information about the disc loaded on-screen. 1. Press DISPLAY to show various playback information. The items displayed differ depending on the disc type or playing status. 1/3 1 / 12 0:20:09 Initial Settings By using the Setup menu, you can make various adjustments to items such as picture and sound. You can also set a language for the subtitles and the Setup menu, among other things. For details on each Setup menu item, see pages 13 to 15.
LANGUAGE AUDIO Introduction Each DVD disc has a variety of audio output options. Set the player’s AUDIO options according to the type of audio system you use. Menu Language Select a language for the Setup menu and on-screen display. Original – Refers to the original language in which the disc was recorded. Other – To select another language, press number buttons then ENTER to enter the corresponding 4digit number according to the language code list on page 23.
LOCK (Parental Control) Area Code Enter the code of the area whose standards were used to rate the DVD video disc, based on the list on page 23. 1. Select “Area Code” on the LOCK menu then press B. 2. Follow step 2 as shown left (Rating). 3. Select the first character using v / V buttons. Rating 4. Press B and select the second character using v / V buttons. Blocks playback of rated DVDs based on their content. Not all discs are rated. 5. Press ENTER to confirm your Area code selection. 1.
OTHERS DivX(R) VOD We provide you the DivX® VOD (Video On Demand) registration code that allows you to rent and purchase videos using the DivX® VOD service. For more information, visit www.divx.com/vod. 1. Select “DivX(R) VOD” option then press B. You can set up the unit so a DVD disc automatically starts playing whenever the DVD is inserted. If Auto Play mode is set to On, this unit will search for title that has the longest playback time and then play back the title automatically. 3.
Operations General features Buttons Operations Z (OPEN / CLOSE) Opens or closes the disc tray. ALL X (PAUSE) During playback, press X to pause playback. ALL Press X repeatedly to play Frame-by-Frame. DVD-V Discs DVD-A VCD DivX DivX SKIP (. / >) During playback, press SKIP (. or >) to go to the next chapter/track or to return to the beginning of the current chapter/track. ALL Press SKIP . twice briefly to step back to the previous chapter/track.
Notes on general features: Marker Search • On a Video CD with PBC, you must set PBC to Off on the setup menu to use the repeat function (See “PBC” on page 15). To enter a Marker • Zoom may not work on some DVDs. • When you are playing a DVD disc contains scenes recorded different camera angles, the angle indicator will blink on the TV screen during scenes recorded at different angles as an indication that angle switching is possible. • The A-B repeat function is available only in the current track.
DVD Audio Discs Moving to another GROUP DVD Audio is a new disc format building on the success of DVD to provide high quality, uncompressed, multi-channel audio for a new experience in audio quality. A DVD Audio disc can be identified by the DVD audio logo on the disc jacket or on the disc itself. Some DVD Audio discs divide content into different groups. Your player enables you to quickly access different groups during playback via the on-screen display.
Playing an Audio CD or MP3/WMA file This unit can play Audio CDs or MP3/WMA files recorded media. MP3/ WMA/ Audio CD Once you insert an MP3/WMA files recorded media or Audio CD, a menu appears on the TV screen. Press v / V to select a track/file then press PLAY or ENTER and playback starts. You can use variable playback functions. Refer to page 16-17. Programmed Playback The program function enables you to store your favorite tracks from any disc in the player memory. A program can contain 30 tracks. 1.
Viewing a JPEG file Zoom This unit can play JPEG files recorded media. 1. Insert a JPEG files recorded media. The PHOTO menu appears on the TV screen. During watching pictures, press ZOOM to enlarge the video image (3 steps). You can move through the zoomed picture using b B v V buttons. Note: When the resolution is set to 720p or 1080i, this function is not available. To rotate picture Press v / V during showing a picture to rotate the picture clockwise or counter clockwise. 2.
Playing a DivX Movie file Using this DVD Player you can play DivX file. DivX disc compatibility with this player is limited as follows: 1. Insert a DivX file recorded media. The MOVIE menu appears on the TV screen. • Available resolution size of the DivX file is under 720x576 (W x H) pixel. • The file name of the DivX subtitle is available by 56 characters. • If there is impossible code to express in the DivX file, it may be displayed as “ _ ” mark on the display. 3.
Controlling other TVs with the Remote Control You can control the sound level, input source, and power switch of your LG TV with the supplied Remote Control. You can control the sound level, input source, and power switch of non-LG TVs as well. If your TV is listed in the table below, set the appropriate manufacturer code. Refer to the information in this chapter before contacting a service technician. Handling the Unit When shipping the unit Please save the original shipping carton and packing materials.
Reference Language Codes Use this list to input your desired language for the following initial settings: Disc Audio, Disc Subtitle, Disc Menu.
Troubleshooting Symptom Possible Cause Correction No power. • The power cord is disconnected. • Plug the power cord into the wall outlet securely. The power is on, but the DVD player does not work. • No disc is inserted. • Insert a disc. (Check the disc indicator in the display window is lit.) No picture. • The TV is not set to receive DVD signal output. • Select the appropriate video input mode on the TV. • The video cable is not connected securely. • Connect the video cable securely.
LG Electronics, Inc. Limited Warranty - USA This LG Electronics product, will be repaired or replaced, at LG’s option, if it proves to be defective in material or workmanship, under normal use, during the warranty period (“Warranty Period”) listed below, effective from the date (“Date of Purchase”) of original consumer purchase of the product. This warranty is good only to the original purchaser of the product and effective only when used in the United States, excluding U.S. Territories.