DV380H-N.CUSALZK_0960_ENG 4/7/08 9:09 AM Page 1 Installation and Operating Guide | Warranty Model Number | DVB812 | DVD Player For service/ support Call: Toll Free Number 1-877-9-ZENITH (http://www.zenithservice.com) © Copyright 2008, LG Electronics U.S.A., Inc. P/No.
DV380H-N.CUSALZK_0960_ENG 4/7/08 9:09 AM Page 2 Introduction CAUTION RISK OF ELECTRIC SHOCK DO NOT OPEN CAUTION: TO REDUCE THE RISK OF ELECTRIC SHOCK DO NOT REMOVE COVER (OR BACK) NO USER-SERVICEABLE PARTS INSIDE REFER SERVICING TO QUALIFIED SERVICE PERSONNEL.
DV380H-N.CUSALZK_0960_ENG 4/7/08 9:09 AM Page 3 IMPORTANT SAFETY INSTRUCTIONS CAUTION: PLEASE READ AND OBSERVE ALL WARNINGS AND INSTRUCTIONS IN THIS OWNER’S MANUAL. AND THOSE MARKED ON THE PRODUCT. RETAIN THIS BOOKLET FOR FUTURE REFERENCE. This product has been designed and manufactured to assure personal safety. Improper use can result in electric shock or fire hazard.
DV380H-N.CUSALZK_0960_ENG 4/7/08 9:09 AM Page 4 Contents About the Introduction . . . . . . . . . . . . . . . . . . . . . . . . . . . . . . . . . . . . . . . .2 Important Safety Instructions . . . . . . . . . . . . . . . . . . . . . . . . . . .3 Types of Playable Discs . . . . . . . . . . . . . . . . . . . . . . . . . . . . . . .4 Hooking up the unit . . . . . . . . . . . . . . . . . . . . . . . . . . . . . . . .5-6 Remote Control . . . . . . . . . . . . . . . . . . . . . . . . . . . . . . . . . . . .
DV380H-N.CUSALZK_0960_ENG 4/7/08 9:09 AM Page 5 Hooking up the unit Hooking up the unit - more you can do Audio and Video Connection A S-Video connection The unit Audio/Video jacks are color coded (yellow for video, red for right audio and white for left audio). If your TV has only one input for audio (mono), connect it to the left (white) audio jack on the unit. Connect the S-VIDEO OUTPUT jack on the unit to the corresponding input jacks on your TV using a S-Video cable.
DV380H-N.CUSALZK_0960_ENG 4/7/08 9:09 AM Page 6 Hooking up the unit HDMI Connection Connect the HDMI OUTPUT jack on the unit to the HDMI input jack on an HDMI compatible TV using an HDMI cable. About HDMI HDMI (High Definition Multimedia Interface) supports both video and audio on a single digital connection for use with DVD Players, Set-Top Boxes, and other AV devices. HDMI was developed to provide the technologies of HDCP (High-bandwidth Digital Content Protection).
DV380H-N.CUSALZK_0960_ENG 4/7/08 9:09 AM Page 7 Remote control a b d a b SCAN (m / M) : Search backward or forward. SKIP (. / >) : Go to next or previous chapter/track. PAUSE/STEP (X) : Pauses playback temporarily/press repeatedly for frame-by-frame playback. PLAY (N) : Starts playback. STOP (x) : Stops playback. c POWER (1) : Switches the unit ON or OFF. OPEN/CLOSE (Z) : Opens and closes the disc tray.
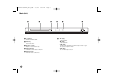
DV380H-N.CUSALZK_0960_ENG 4/7/08 9:09 AM Page 8 Main Unit a b a 1/I (Power) Turn the unit ON or OFF. d e f f • N (Play) Starts playback. b Disc Tray Insert a disc here. • x (Stop) Stops playback. c Z (Open / Close) Opens or closes the disc tray. • . (Skip) Returns to the beginning of current chapter or track or go to the previous chapter or track. d Display window Shows the current status of the unit. • > (Skip) Go to next chapter or track. e Remote sensor Point the remote control here.
DV380H-N.CUSALZK_0960_ENG 4/7/08 9:09 AM Page 9 Adjust the display settings Adjust the settings ON REMOTE 1 Display setup menu: SETUP 2 Select a desired option on the first level: vV 3 Move to second level: B 4 Select a desired option on the second level: vV 5 Move to third level: B 6 Change the setting: v V / ENTER Adjust the settings - more you can do When you turn on for the first time The menu for a language selection will appear when you turn on the unit for the first time.
DV380H-N.CUSALZK_0960_ENG 4/7/08 9:09 AM Page 10 Adjust the lock settings You must set the [Area Code] option to use the lock options. Select [Area Code] option then press B. Enter a 4-digit password then press ENTER. Enter it again then press ENTER to verify. If you make a mistake while entering number, press CLEAR then correct it. If you forget your password you can reset it. Display setup menu then input the 6-digit number “210499”.
DV380H-N.CUSALZK_0960_ENG 4/7/08 9:09 AM Page 11 Pause a playback Playing a Disc ON REMOTE 1 Open the disc tray: Z 2 Insert a Disc: - 3 Close the disc tray: Z OPEN/CLOSE Frame-by-Frame playback DVD Press PAUSE/STEP (X) repeatedly to play Frame-by-Frame playback. OPEN/CLOSE 4 Start playback: N PLAY 5 To stop playback: x STOP Playing a Disc - more you can do Stops the playback x ” appears on the The unit records the stopped point depending on the disc. “ Xx screen briefly.
DV380H-N.CUSALZK_0960_ENG 4/7/08 Watching a enlarged video image 9:09 AM Page 12 DVD During playback or pause mode, press ZOOM repeatedly to select zoom mode. You can move through the zoomed picture using vVb B buttons. Press CLEAR to exit. Viewing the title menu DVD Press TITLE to display the disc's title menu, if available. Viewing the DVD menu DVD Press DVD MENU to display the disc menu, if available.
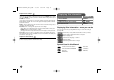
DV380H-N.CUSALZK_0960_ENG 4/7/08 9:09 AM Page 13 Viewing photo files ON REMOTE 1 Open the disc tray: Z 2 Insert a disc: - 3 Close the disc tray: Z 4 Select a photo file on the menu: v V, DVD MENU OPEN/CLOSE OPEN/CLOSE 5 Display the selected file in full screen: N PLAY 6 To return to the menu: x STOP Viewing photo files - more you can do Viewing photo files as a slide show Use vV b B to highlight ( ) icon then press ENTER to start slide show.
DV380H-N.CUSALZK_0960_ENG 4/7/08 9:09 AM Page 14 Language Codes Use this list to input your desired language for the following initial settings: Disc Audio, Disc Subtitle, Disc Menu.
DV380H-N.CUSALZK_0960_ENG 4/7/08 9:09 AM Page 15 Specifications Troubleshooting Symptom No power. Cause The power cord is disconnected. Correction Plug the power cord into the wall outlet securely. The power is on, but the unit does not work. No disc is inserted. No picture. The TV is not set to receive the signal from the unit. Select the appropriate video input mode on the TV. The video cable is not connected securely. Connect the video cable securely.
DV380H-N.CUSALZK_0960_ENG 4/7/08 9:09 AM Page 16 Zenith Electronics, Inc. Limited Warranty - USA This Zenith Electronics product, will be repaired or replaced, at Zenith’s option, if it proves to be defective in material or workmanship, under normal use, during the warranty period (“Warranty Period”) listed below, effective from the date (“Date of Purchase”) of original consumer purchase of the product.