Installation and Operating Guide | Warranty Model Number | DVB412 | DVD Player © Copyright 2004, LG Electronics U.S.A., Inc.
CAUTION RISK OF ELECTRIC SHOCK DO NOT OPEN Warning: To reduce the risk of electric shock, do not remove the cover or back of this product. There are no userserviceable parts inside. Refer servicing to qualified service personnel. Warning: To reduce the risk of fire or electric shock, do not expose this product to dripping or splashing water, rain, or moisture. Do not place objects filled with water such as vases, on the product. Warning: This digital video disc player employs a laser system.
Contents Introduction . . . . . . . . . . . . . . . . . . . . . .4 Symbol used in this Manual . . . . . . . . . . . . . .4 About the Symbol Display . . . . . . . . . . . .4 Notes on Discs . . . . . . . . . . . . . . . . . . . . . . . .4 Handling Discs . . . . . . . . . . . . . . . . . . . . . .4 Storing Discs . . . . . . . . . . . . . . . . . . . . . . . .4 Cleaning Discs . . . . . . . . . . . . . . . . . . . . . .4 Types of Playable Discs . . . . . . . . . . . . . . . . .5 Regional code . . . . . . . . . .
Introduction To ensure proper use of this product, please read this owner’s manual carefully and retain for future reference. This manual provides information on the operation and maintenance of your DVD player. Should the unit require service, contact an authorized service location. About the Symbol Display “ ” may appear on your TV display during operation and indicates that the function explained in this owner’s manual is not available on that specific DVD video disc.
DVD (8 cm / 12 cm disc) Audio CD (8 cm / 12 cm disc) In addition, this unit plays DVD -R, DVD +R, DVD RW, DVD +RW, Kodak Picture CDs, and CD-R / CD-RW that contains audio titles, MP3, WMA, and/or JPEG files. This indicates a product feature that is capable of playing DVD-RW discs recorded with Video Recording format.
Disc-related terms DVD ±R / DVD ±RW DVD -R and DVD +R are two different standards for recordable DVD drives and discs. This format allows information to be recorded onto the DVD disc only once. DVD +RW and DVD -RW are two standards for re-writable media, meaning the DVD content can be erased and re-recorded. Single-sided discs can hold 4.38 Gigabytes and double-sided discs hold twice as much. There are no dual layer single sided recordable discs.
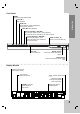
Front Panel POWER Switches the player ON and OFF. Introduction PLAY ( N ) Starts playback. PAUSE ( X ) Pauses playback. Press repeatedly for frame-by-frame playback. STOP ( x ) Stops playback. Reverse Scan/Skip ( m / . ) Go to previous chapter / track or to the beginning. Press and hold for two seconds for fast reverse search. Forward Skip/Scan ( > / M ) Go to the next chapter / track. Press and hold for two seconds for fast forward search. Disc Tray Insert a disc here.
Remote Control OPEN / CLOSE Opens and closes the disc tray. TV Control Buttons TV POWER: Turns the TV on or off. POWER Switches DVD Player ON and OFF. TV PR/CH +/–: Selects TV’s channel. 0-9 number buttons Selects numbered items in a menu. TV VOL +/–: Adjusts TV’s volume. CLEAR Removes a track number on the program list or a mark on the MARKER SEARCH menu. AV: Selects the TV’s source. SKIP (. / >) Go to next chapter or track.
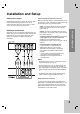
Installation and Setup Setting up the Player Video and Audio Connections to Your TV The picture and sound of a nearby TV, VCR, or radio may be distorted during playback. If this occurs, position the player away from the TV, VCR, or radio, or turn off the unit after removing the disc. Make sure the DVD player is connected directly to the TV and not to a VCR, otherwise the DVD image could be distorted by the copy protection system.
Audio Connection to Optional Equipment Connect the DVD player to your optional equipment for audio output. Amplifier equipped with 2-channel digital stereo (PCM) or audio / video receiver equipped with a multi-channel decoder (Dolby Digital™, MPEG 2, or DTS): Connect one of the DVD Player’s DIGITAL AUDIO OUT jacks (COAXIAL X) to the corresponding in jack on your amplifier. Use an optional digital (coaxial X) audio cable.
You can display the general playback status on the TV screen. Some items can be changed using the menu. To use the on-screen display: 1. Press DISPLAY during playback. 2. Press v / V to select an item. The selected item is highlighted. 3. Press b / B to change the setting. You can also use the number buttons if appropriate (e.g. inputting the title number). For some functions, press ENTER to execute the setting. Notes: • Some discs may not provide all of the features shown below.
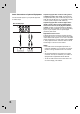
Initial Settings LANGUAGE LANGUAGE By using the Setup menu, you can make various adjustments to items such as picture and sound. You can also set a language for the subtitles and the Setup menu, among other things. For details on each Setup menu item, see pages 12 to 15. English Disc Audio Original Disc Subtitle Off Disc Menu Original To display and exit the Menu: Press SETUP to display the menu. A second press of SETUP will take you back to initial screen.
DISPLAY Notes: At this point the only video displaying is Component video. If your screen goes to a black screen, your television/display may not be compatible to progressive scan. In this case the player will time out after 10-12 seconds if no other keys are pressed. After the unit times out, the player will automatically return to standard format, and your picture will return. DISPLAY 16 : 9 TV Aspect Display Mode Widescreen Progressive Scan Off Move 4.
AUDIO OTHERS Each DVD disc has a variety of audio output options. Set the player’s AUDIO options according to the type of audio system you use. The Auto Play and B.L.E. settings can be changed. OTHERS AUDIO Dolby Digital Bitstream DTS Bitstream MPEG PCM Sample Freq. 48 kHz DRC On Vocal On Select DVD Bitstream: Select “Bitstream” if you connect the DVD Player’s DIGITAL OUT jack to an amplifier or other equipment with a Dolby Digital, DTS or MPEG decoder.
LOCK (Parental Control) Password (Security Code) You can enter or change password. LOCK Rating Unlock Password New Country Code US SE 1. Select Password on the LOCK menu then press B. 2. Follow step 2 as shown left (Rating). “Change” or “New” is highlighted. 3. Enter the new 4-digit code, then press ENTER. Input it again to verify. Rating Select DVD Some movies contain scenes that may not be suitable for children to view.
Operation Playing a DVD General Features Playback Setup Note: Unless stated otherwise, all operations described use the remote control. Some features may also be available on the Setup menu. 1. Turn on the TV and select the video input source connected to the DVD player. 2. Turn on the audio system (if applicable) and select the input source connected to the DVD player. 3. Press OPEN/CLOSE to open the disc tray and load your chosen disc in the tray, with the playback side down. 4.
Still Picture and Frame-by-Frame Playback DVD DVD You can play a title/chapter/all/track on a disc. 1. Press PAUSE/STEP on the remote control during playback. Advance the picture frame-by-frame by pressing PAUSE/STEP repeatedly. 2. To exit still motion mode, press PLAY. Slow Motion DVD 1. Press PAUSE/STEP (X) during playback. The DVD player will now go into PAUSE mode. 2.
Zoom Special DVD Features DVD Use zoom to enlarge the video image. 1. Press ZOOM during playback or still playback to activate the Zoom function. The square frame appears briefly in the right bottom of the picture. 2. Each press of the ZOOM button changes the TV screen in the sequence: 400% size → 1600% size → normal size 3. Use the b B v V buttons to move through the zoomed picture. 4. To resume normal playback, press ZOOM or CLEAR button repeatedly. Note: Zoom may not work on some DVDs.
The DVD player can play MP3/WMA formatted recordings on CD-ROM, CD-R, or CD-RW discs. Audio CD Once you insert an audio CD a menu appears on the TV screen. Press v / V to select a track then press PLAY or ENTER and playback starts. AUDIO CD 0:00:00 1 / 12 List Program Track1 Track2 Track3 Track4 Track5 Track6 Track7 Track8 MP3 / WMA 1. Press v / V to select a folder, and press ENTER to see the folder contents. 2. Press v / V to select a track then press PLAY or ENTER. Playback starts.
Audio CD and MP3 / WMA Disc Features Pause CD MP3 WMA 2. To return to playback, press PLAY, ENTER or press PAUSE/STEP again. CD MP3 WMA 1. Press SKIP (. or >) briefly during playback to go to the next track or to return to the beginning of the current track. 2. Press SKIP . twice briefly to go back to the previous track. 3. You can play any track by inputting its number. Repeat Track/All/Off CD MP3 CD 1. Press RANDOM during playback.
Programmed Playback Repeat Programmed Tracks You can play a title/chapter/all/track on a disc. The program function enables you to store your favorite tracks from any disc in the player memory. A program can contain 99 tracks (Audio CD) or 999 tracks (MP3/WMA). 1. Insert a disc. Audio CD and MP3/WMA Discs: Audio CD or MP3/WMA menu appears as below.
Viewing a JPEG Disc Moving to another File Using this DVD Player you can view Kodak PICTURE CDs and discs with JPEG files. Press SKIP (. or >) or cursor (v or V) once while viewing a picture to advance to the next or previous file. 1. Insert a disc and close the tray. The PHOTO menu appears on the TV screen.
Playing a DVD VR format Disc Maintenance and Service This unit will play DVD-R/RW discs recorded using the DVD-Video format that have been finalized using a DVD-recorder. Refer to the information in this chapter before contacting a service technician. • This unit will play DVD-RW discs recorded using the Video Recording (VR) format. 1. Insert a disc and close the tray. The TITLE LIST menu appears on the TV screen.
Reference Language Codes Use this list to input your desired language for the following initial settings: Disc Audio, Disc Subtitle, Disc Menu.
Troubleshooting Possible Cause Correction No power. • The power cord is disconnected. • Plug the power cord into the wall outlet securely. The power is on, but the DVD player does not work. • No disc is inserted. • Insert a disc. (Check that the DVD or audio CD indicator in the display window is lit.) No picture. • The TV is not set to receive DVD signal output. • Select the appropriate video input mode on the TV. • The video cable is not connected securely. • Connect the video cable securely.
LG ELECTRONICS USA., INC. DVD PLAYER LIMITED WARRANTY-USA LG will repair or replace your product, at LG’s option, if it proves to be defective in material or workmanship under normal use, during the warranty period (“Warranty Period”) listed below, effective from the date (“Date of Purchase”) of original consumer purchase of the product. This warranty is good only to the original purchaser of the product and effective only when used in the United States, excluding U.S. Territories.