TheaterLite™ DXG-210 operating guide
WARNING RISK OF ELECTRIC SHOCK DO NOT OPEN WARNING: TO REDUCE THE RISK OF ELECTRIC SHOCK DO NOT REMOVE COVER (OR BACK). NO USER SERVICEABLE PARTS INSIDE. REFER SERVICING TO QUALIFIED SERVICE PERSONNEL. The lightning flash with arrowhead symbol, within an equilateral triangle, is intended to alert the user to the presence of uninsulated “dangerous voltage” within the product’s enclosure that may be of sufficient magnitude to constitute a risk of electric shock to persons.
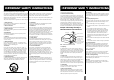
IMPORTANT SAFETY INSTRUCTIONS IMPORTANT SAFETY INSTRUCTIONS Important safeguards for you and your new product (Continued from previous page) 19. Servicing Your product has been manufactured and tested with your safety in mind. However, improper use can result in potential electrical shock or fire hazards.
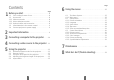
Page Contents Page 1 Before you start . . . . . . . . . . . . . . . . . . . . . . . . . . . . . .8 2 3 4 5 Important information 1.1 1.2 1.2.1 1.2.2 1.2.3 1.3 1.4 Color coding for ease of use . . . . . . . . . . . . . . . . . . . .8 Accessories . . . . . . . . . . . . . . . . . . . . . . . . . . . . . . . .8 Video accessories . . . . . . . . . . . . . . . . . . . . . . . . . . .8 Other cables/accessories . . . . . . . . . . . . . . . . . . . . . .8 Optional cables and accessories . . . . . . . . . .
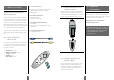
1.2 Accessories 1. Before you start Please take a few minutes to make sure that your Zenith projector contains all the necessary parts: Thank you for choosing a Zenith projector 1.2.1 Video accessories • Super-video cable • Composite video cable Your Zenith projector will display high brightness images with vivid colors, even under normal light conditions. As input for your presentation you can use CD-ROM, Photo CDs, Laser Disks, DVD, normal VCRs or computers.
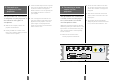
3. Connect the RGB output from the computer using a 15 pin VGA type cable (not included) to the connector on the projector labeled “monitor in”.You can optionally use the gold BNC connectors to connect to your computer. 3.Connecting a computer to the projector The procedure for connecting a computer to the projector is the same for all types of computers. 4. Turn on the projector and then the computer. The computer image should now be projected from the projector.
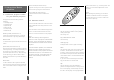
5. Using Your Zenith projector do the same function e.g. volume up/down. See section 6.2.4 for further explanations of the zap menu. Blank mode (see section 6.2.4) Quick U EN M In blank mode the screen is blanked out (black). When pressing the Quick key you can switch between all selected functions for the Quick key. See section 6.2.3. for how to select functions for the Quick key. K IC U Q N O P1 ZA 5.
5.3 Using the touch panel on the projector Stand by The stand by key will set the projector in stand by mode. To return to normal mode, press the Stand by key once more, or press the Menu key on the remote control. Automatic set-up The automatic set-up key will set up the projector with optimal settings for the connected source. If you want to do manual adjustments you can do this by using the menus (see section 6). Brightness/Contrast Controls the brightness and contrast of the image. 5.
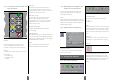
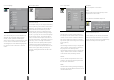
Auto set-up Control panel 6.2 Set-up menu Auto set-up will do automatic set-up of the projector: In this menu you can make adjustments for picture. Set-up menu • • • • Removing the main menu Horizontal and vertical position Sampling clock Phase Chooses between available video formats and NTSC/PAL auto detection To remove the menu system, press the MENU key on the Remote control. You can also remove the menu by clicking the right mouse button (on the top of the remote control).
6.2.2 Language 6.2.3 Quick menu 6.2.4 Zap menu Computer Selects Computer as the source. Video Selects video sources. Both Zap keys can be programmed to select Video. 6.2.5 Show accumulated lamp time Quick menu settings In the quick menu you can assign functionality for the quick key on the remote control. When clicking on the quick key you will be able to switch between all the functions you have selected in this menu.
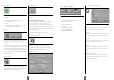
6.3 Control panel menu 6.3.3 Color manager Control panel menu when PC is selected In the control panel you have access to menus for adjusting picture settings. The icons “Picture positioning” and “Synchronization Adjustments” are only visible if PC source is active. Color tone settings When PAL/SECAM video is connected brightness, contrast and saturation will be available. The color manager is designed to give you optimal performance from your projector, independent of ambient lighting conditions.
6.3.5 Synchronization Adjustments 7. Maintenance All maintenance should be done by Zenith authorized service personnel. Contact Zenith at 1-888-865-3026 for service Synchronization Adjustments It is possible to adjust the synchronization in Computer mode by adjusting the Phase and the Frequency. The synchronization will be set by the automatic set-up function. Manual sync adjustments should typically not be required.
206-03704 © Copyright 2001 Zenith Electronics Corporation 24