Installation and Operating Guide | Warranty Model Number LMG340 High-Performance, Mini Component CD System Compact Disc Player System with Speakers © Copyright 2003, Zenith Electronics Corporation.
Precautions CAUTION RISK OF ELECTRIC SHOCK DO NOT OPEN CAUTION:TO REDUCE THE RISK OF ELECTRIC SHOCK DO NOT REMOVE COVER (OR BACK) NO USER SERVICEABLE PARTS INSIDE. REFER SERVICING TO QUALIFIED SERVICE PERSONNEL.
CAUTION: PLEASE READ AND OBSERVE ALL WARNINGS AND INSTRUCTIONS IN THIS OWNER’S MANUAL AND THOSE MARKED ON THE UNIT. RETAIN THIS BOOKLET FOR FUTURE REFERENCE. This set has been designed and manufactured to assure personal safety. Improper use can result in electric shock or fire hazard. The safeguards incorporated in this unit will protect you if you observe the following procedures for installation, use, and servicing. This unit does not contain any parts that can be repaired by the user.
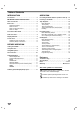
Table of Contents INTRODUCTION OPERATION Precautions . . . . . . . . . . . . . . . . . . . . . . . . . . . . . . . 2 Presetting the Radio Stations (Channel Search) . 12 IMPORTANT SAFETY INSTRUCTIONS . . . . . . . . . . 3 Listening to the Radio. . . . . . . . . . . . . . . . . . . . . . 13 Table of Contents . . . . . . . . . . . . . . . . . . . . . . . . . . 4 Tape Playback . . . . . . . . . . . . . . . . . . . . . . . . . . . . 14 Basic Playback . . . . . . . . . . . . . . . . . . . . . . . . .
Safety Precautions Notes on Remote Control Handling the unit Remote control operating range When shipping the unit Point the remote control at the remote sensor and press the buttons. " Distance: About 23 ft (7 m) from the front of the remote sensor. " Angle: About 30° in each direction of the front of the remote sensor. The original shipping carton and packing materials come in handy. For maximum protection, re-pack the unit as it was originally packed at the factory.
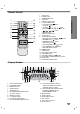
Front Panel/Rear Panel 23 22 21 AM 20 18 19 17 16 1 2 3 4 5 6 7 8 9 10 11 12 24 FM L 25 R 15 L 14 13 R + + 26 27 1. 2. POWER (STANDBY/ON) button • PLAY MODE button • DEMO button • CD SYNC. button • NORMAL DUBBING button HIGH SPEED DUBBING button 3. 4. 5. 6. RECORD/ RECORD PAUSE ( FUNCTION SELECT buttons (TUNER, TAPE, CD, AUX) • TUNING DOWN button • PRESET DOWN button 7.
Remote Control 1. 2. 3. 4. 5. 6. 2 3 4 5 16 15 14 X AUTO 13 6 12 11 10 7 8 TAPE-A 7. 8. 9.
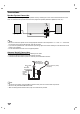
Connections Speaker System Connection Connect the speakers using the supplied speaker cords by matching the colors of the terminals and those of the cords. To obtain the best possible surround sound, adjust the speaker parameters (distance, level, etc.). FM L R red L R Right speaker + + black Left speaker red otes • Be sure to match the speaker cord to the appropriate terminal on the components: + to + and – to –. If the cords are reversed, the sound will be distorted and will lack base.
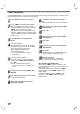
Setting the CLOCK 2. Press CLOCK. (If the clock requires setting, press and hold CLOCK for more than 2 seconds.) - The hours display begins to blink. Select either the 24 hour cycle or the 12 hour cycle with the MULTI JOG SHUTTLE. (12HR) 3 or (24HR) Press SET to confirm the selected hour cycle. 4 5 6. 7 8 Use MULTI JOG SHUTTLE to set the current hour. BEFORE OPERATION 1 Press SET. Use MULTI JOG SHUTTLE to set current minutes. Press SET and the correct time is shown on the display.
Timer Functions Using the TIMER function you can have the radio reception and recording, CD play, tape play or auxiliary source play and recording turned on and off at the time desired. 1 2 3 4 5 6 7 8 10 Press CLOCK to check the current time. Press “TIMER” to enter the timer setting mode. (If you want to correct the previous memorized TIMER setting, press and hold the “TIMER” button more than 2 seconds.) The previous memorized timer setting for On Time and “TIMER” appear in the display.
Volume Adjustment DISPLAY MODE • On unit, turn VOLUME DOWN/UP knob clockwise to increase the sound level, or counterclockwise to decrease it. • On remote, use VOLUME CONTROL ( ) to increase the sound level, or use the VOLUME CONTROL ( ) to decrease sound. Whenever you press DISPLAY MODE, you can enjoy the spectrum change with 6 types in the display. Sound Quality Adjustment • To activate stereo sound - You can choose between 8 fixed sound impressions and 1 USER MODE.
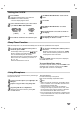
Presetting the Radio Stations (Channel Search) You can preset 30 stations for FM and AM. Before tuning, make sure that you have turned the volume down to the minimum level. X TUNER/ BAND POWER PRESET ( ) TUNER MEMO MULTI JOG SHUTTLE TAPE-A TAPE-B TAPE-A TAPE-B • TUNING DOWN/UP • PRESET DOWN/UP • STOP ( )/ CLEAR 1 2 3 4 7 8 12 Use the MULTI JOG SHUTTLE to tune in the station manually. Press TUNER or TUNER/BAND to show either FM or AM in the display window.
Listening to the Radio Preset radio stations in the units memory first (see “Presetting the Radio Stations (Channel Search)” on the previous page). TUNER/ BAND PRESET ( POWER VOLUME ( ) ) MODE/RIF VOLUME DOWN/ UP KNOB TUNER TAPE-A TAPE-B TAPE-A TAPE-B •TUNING DOWN/UP •PRESET DOWN/UP 1 2 3 To turn the radio off Use TUNER or TUNER/BAND to select either AM or FM in the display window. The last received station is tuned in.
Tape Playback X PLAY MODE NOR./Hi DUBB TAPE TAPE-A PLAY ( / ) TAPE-A/B TAPE-B / • • PLAY ( • STOP ( 2 3 Open cassette TAPE A (or B) door by pushing the PUSH OPEN button. Insert one or two cassettes with the tape side to the bottom and then close the TAPE A (and/or B) door. 4 AUTO STOP DECK (TAPE A) or ). Select cassette playback direction (front or back) with PLAY MODE button. Function One After the cassette in deck TAPE B plays front or reverse (backward play) side, stops automatically.
Recording Setup Wind the tape to the recording start point. Only use normal tapes to make recordings. You can only use deck B for recording. OPERATION X TUNER/ BAND PLAY MODE CD SYNC. REC CD, TUNER PLAY ( TAPE-A / ) TAPE-B TAPE-A TAPE-B TAPE STOP ( ) • / •PRESET DOWN •PLAY ( / ) •STOP ( )/ CLEAR Basic Recording Setups To Pause Recording 1 2 To pause the recording, press RECORD/ RECORD PAUSE ( REC or ) button again. “ REC” flashes in display window. Press CD or TUNER/BAND to select source.
CD Playback (Continued) DISC SKIP X DISC 1,2,3 PLAY/ PAUSE ( ) CD OPEN/ CLOSE( ) POWER STOP ( TAPE-A ) TAPE-B D.SKIP TAPE-A TAPE-B • / •PLAY ( / ) •STOP ( )/ CLEAR •CD PAUSE (CD ) Basic Playback Setup To Pause Play 1 2 Press CD PAUSE (CD ) or PLAY/ PAUSE ( the remote control during playback. Press the button again to resume play. 3 Press POWER to turn on the unit. ) on Press the CD button to enter the CD mode. If no disc is in the disc drawer, the “NO DISC” indicator appears.
CD Playback (Continued) CD OPEN/CLOSE( OPERATION X ) REPEAT TAPE-A TAPE-B TAPE-A TAPE-B To Exchange Discs During Playback To Repeat Play You can open the disc tray while playing a disc to check what discs are to be played next and exchange discs, without interrupting playback of the current disc. To play one track repeatedly. 1 2 Press CD OPEN/CLOSE ( ). The disc tray is opened. Two disc compartments appear. Even if the unit is playing a disc, it doesn’t stop playing.
CD Playback DISC 1,2,3 X PLAY/ PAUSE ( ) PROGRAM CD STOP ( ) PROG. TAPE-A TAPE-B TAPE-A TAPE-B • PLAY ( / ) • PRESET DOWN/UP • STOP ( )CLEAR Program Play Setup To check program contents You can arrange the order of the tracks on the discs and create your own program. The program can contain up to 20 tracks. Press PROG. (or PROGRAM on the remote control) in Stop mode. - The disc, track and program number will be displayed. 1 2 3 To clear program contents 4 5 6 18 Press PROG.
Troubleshooting Check the following guide for the possible cause of a problem before contacting service. Cause Possible Solution • The power cord is disconnected. • Plug the power cord into a wall power outlet securely. No sound. • The audio cables are not connected securely. • Insert the audio cables into the jacks securely. • The external source equipment’s power is switched off. • Turn on the power of the external equipment connected with the audio cables.
Speakers TAPE Amp AM (MW) Tuner FM CD General Specifications Power Supply Power Consumption Weight (Approx.) External Dimensions (Approx.) Frequency response Signal-to-Noise Ratio Dynamic range Tuning Range Intermediate Frequency Signal-to-Noise Ratio Frequency Response Tuning Range Intermediate Frequency Signal-to-Noise Ratio Frequency Response Output Power T.H.D Frequency Response Signal-to-Noise Ratio Tape Speed Wow Flutter F.
Notes 21
Notes 22
Notes 23
ZENITH ELECTRONICS CORPORATION Compact Disc Player System with Speakers LMG340 LIMITED WARRANTY – USA Zenith will repair or replace your product, at Zenith’s option, if it proves to be defective in material or workmanship under normal use, during the warranty period ("Warranty Period") listed below, effective from the date ("Date of Purchase") of original purchase of the product.