Installation and Operating Guide | Warranty Model Numbers | R40W46, R40W46F, R45W46, R45W46F, R50W46, R57W46 | Projection TVs © Copyright 2003, Zenith Electronics Corporation.
RECORD YOUR MODEL NUMBER (Now, while you can see it) The model and serial number of your new TV are located on the back of the TV cabinet. For your future convenience, we suggest that your record those numbers here: MODEL NO.______________________ SERIAL NO.________________________ CAUTION RISK OF ELECTRIC SHOCK DO NOT OPEN WARNING: TO REDUCE THE RISK OF ELECTRIC SHOCK DO NOT REMOVE COVER (OR BACK). NO USER SERVICEABLE PARTS INSIDE. REFER SERVICING TO QUALIFIED SERVICE PERSONNEL.
IMPORTANT SAFETY INSTRUCTIONS Important safeguards for you and your new product Your product has been manufactured and tested with your safety in mind. However, improper use can result in potential electrical shock or fire hazards. To avoid defeating the safeguards that have been built into your new product, please read and observe the following safety points when installing and using your new product, and save them for future reference.
IMPORTANT SAFETY INSTRUCTIONS (Continued from previous page) 14. Outdoor Antenna Grounding If an outside antenna or cable system is connected to the product, be sure the antenna or cable system is grounded so as to provide some protection against voltage surges and built-up static charges. Article 810 of the National Electrical Code (U.S.A.
CONTENTS Important Safety Instructions ......................3 AVL (Auto Volume Leveler) ............................21 TV Speaker On/Off..........................................21 Adjusting Balance, Treble, Bass .....................21 Remote Control Key Functions ...................6 PIP (Picture-in-Picture) / Twin Picture. .....22 Basic TV Setup and Operation ....................9 Watching PIP (Picture-in-Picture) ..................22 Selecting Viewing Sources (In PIP and Twin picture modes).......
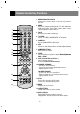
Remote Control Key Functions 1. MODE INDICATOR LIGHTS Show active remote mode every time any button is pressed. 1 vcr cable dvd sat tv mode 2 3 4 5 6 power comp/dvi tv/video sleep cc flashbk 4. TV/VIDEO Selects TV, VIDEO, COMPONENT, or DVI mode. 1 2 3 5. COMP/DVI Selects COMPONENT or DVI mode. 4 5 6 7 8 9 video 0 audio 6. ARC Selects 4:3, 16:9, Horizon, Zoom 1, or Zoom 2 picture formats.
15. POWER (or ON/OFF) Refer to "Turning the TV on/off". 16. SLEEP (Sleep Timer) Sets turn off time. vcr cable dvd sat tv mode light power 15 comp/dvi tv/video arc sleep flashbk cc 17 18 1 2 3 4 5 6 7 8 9 video 0 audio vol 19 21 PIPCH +/Selects the sub picture channel. mts 22 up left right 23 menu exit 24 down rew SWAP Switches the main and sub pictures. PIP INPUT Selects the input signal for the sub picture. enter play 21.
Remote Control Key Functions / TV Setup 26. REMOTE CONTROL SENSOR 27. LED (Light Emitting Diodes) Displays LEDs light when source is selected or feature is present. 28. INDEX Switches LED Display on or off. Installing Batteries in the Remote Control • Remove the battery compartment cover on the back side and insert the batteries with correct polarity. • Install two 1.5V, AA type batteries. Don’t mix used and new batteries. Front Panel Controls This is a simplified representation of front panel.
Basic TV Setup and Operation Before operating your TV, make sure the TV has been connected to an antenna or cable system and the TV is plugged into a power outlet. Turning the TV On/Off The set switches to standby mode and the standby indicator lights red. To switch the TV on from standby mode, press the on/off, tv/video, chD / E button on the set or tv/video, chD / E, comp/dvi, power or number button on the remote control. A channel number will be displayed on the screen.
Basic TV Setup and Operation Channel Search Channel Search memorizes all the active channels in your area. You must do a channel search before you can use the TV. There two ways of memorizing channels. You can use either, EZ Scan or Manual Program.. In EZ Scan, the TV memorizes the channels in ascending numerical order. You can also add or delete channels manually. Finding Channels with EZ Scan EZ Scan searches and memorizes all the active channels in your area.
Adding/Deleting Channels with Manual Program 1. Press the menu button and then use D / E button to select the Channel menu. 2. Press the G and then use D / E button to select Manual prog.. 3. Press the G and then use D / E button to select Channel. 4. Press the G and then use D / E button to select the channel number you want to memorize or erase. 5. Press the F button and then use D / E button to select Memory. 6. Press the G and then use D / E button to select On or Off. 7.
Features Clock Setup: Auto/Manual Before using the on/off timer features, set the current time on the clock. Timer Auto Clock Setup CH. The time is set automatically from a PBS broadcast signal. The PBS channel signal includes information for the correct time and daylight saving time. 1. Press the menu button and then use D / E button to select the Timer menu. 2. Press the G and then use D / E button to select Clock . 3. Press the G and then use D / E button to select Auto . 4.
Off Timer/On Timer Setup Off Timer automatically switches the TV to standby mode at the preset time. On Timer automatically turns the TV on at the preset time and tunes to the specified channel. 1. Press the menu button and then use D / E button to select the Timer menu. 2. Press the G and then use D / E button to select Off timer or On timer. 3. Press the G and then use D / E button to set the hour. 4. Press the G and then use D / E button to set the minute. 5.
Features Sleep Timer Setup You don't have to remember to switch the TV to standby mode before you go to sleep. The Sleep Timer automatically turns the TV off after the preset sleep time expires. Use the sleep button to select the desired sleep time. Each time you press this button, preset sleep time settings are displayed one by one as shown below. The Sleep Timer begins to count down from the number of minutes selected.
Fine Tuning Adjustment Use Fine Tuning is to stabilize the picture's condition if it is poor, for example, a horizontal stripe, twisted picture or no color in broadcast. Channel CH. 1. Press the menu button and then use D / E button to select the Channel menu. 2. Press the G and then use D / E button to select Manual prog.. 3. Press the G and then use D / E button to select Fine. 4. Press the G and then use F / G button to adjust the picture appearance to your preference. 5.
Features Picture Format Selection You can select 5 picture formats are available. Press the ARC button repeatedly to select your desired picture format. Each time you press the button, the picture format is changed in the order of 4:3, 16:9, Horizon, Zoom 1, and Zoom 2. Using the arc Button 16:9 1. Repeatedly press the arc button to select 4:3, 16:9, Horizon, Zoom 1 or Zoom 2. 2. Press the enter ( ) button to exit. Using the Menu 1.
Picture Setup EZ Video Setup For optimum picture quality, use the factory preset picture modes. EZ Video set up using the video button 1. Press the video button repeatedly to select Clear, Optimum, Soft, or User. 2. Press the enter ( ) button to return to TV viewing. Clear EZ Video set up using the Picture menu 1. Press the menu button and then use D / E button to select the Picture menu. 2. Press the G and then use D / E button to select EZ Video. 3.
Picture Setup VM (Velocity Modulation) Setup If you select VM High , the TV will automatically enhance the sharpness of the image's edges. 1. Press the menu button and then use D / E button to select the Picture menu. 2. Press the G and then use D / E button to select VM. 3. Press the G and then use D / E button to select High, Medium, Low or Off. 4. Press the exit button to return to TV viewing. Picture EZ Video CH.
Color Convergence Adjustment (R40W46, R40W46F, R45W46, R45W46F only) Use this function to adjust the R-G-B color convergence while a stable signal is being received. When the TV is first installed or if it is relocated, the picture may be unstable with three color ghosts (red, green, blue). This problem can be solved by adjusting the color convergence. 1. Press the menu button and then use D / E button to select the Picture menu. 2. Press the G and then use D / E button to select Convergence. 3.
Sound Setup Stereo/SAP Broadcasts Setup This TV can receive MTS stereo programs and any SAP (Second Audio Program) accompanying the stereo program. The broadcaster may transmit one additional sound signal as well as the original one. The MTS function doesn't operate in the video mode. 1. Use the mts button to select your desired MTS mode. Each time you press this button, the Mono, Stereo, or SAP mode appear in turn. 2. Press the enter ( ) button to return to TV viewing.
AVL (Auto Volume Leveler) AVL automatically maintains an equal volume level even if you change channels. 1. Press the menu button and then use D / E button to select the Sound menu. 2. Press the G and then use D / E button to select AVL. 3. Press the G and then use D / E button to select On or Off. 4. Press the exit button to return to TV viewing. Sound CH.
PIP (Picture-in-Picture) /Twin Picture Notes: PIP does not work using Component 1080i mode. PIP is not available if Parental Control (Lock) is active. Watching PIP (Picture-in-Picture) Channel of Main Picture PIP is a smaller inset picture placed on the larger main picture screen. Using the PIP feature enables you to view two different programs on the TV screen at the same time. 11 +24 Channel of Sub Picture 1.
POP (Picture-Out-Picture: Channel Search and Display) Use this Channel Search to view the current programs on all the memorized channels one-by-one on the 12 POP screen display, while the main screen displays the current channel. Press the pip button in twin picture mode. The pictures of all the memorized channels are shown on the 12 PIP screen, as shown to the right. To exit channel search, press the pip button.
Closed Captions Closed captioning is a process which converts the audio portion of a television program into written words, which then appear on the television screen in a form similar to subtitles. Closed captions allow viewers to read the dialogue and narration of television programs. Using Closed Captions FOLLOW ME Captions are the subtitles for the dialogue and narration of television programs. For prerecorded programs, program dialogue can be arranged into captions in advance.
Displaying Text Text services offer a wide variety of information on all kinds of subjects (ex. captioned program lists, weather forecasts, stock exchange topics, news for hearing-impaired---) filling the TV screen. However, even though the program does offer captioning, text services may not be available. Note • In the event you are receiving a poor signal, an empty black box may appear and disappear, when text mode is turned on. This commonly happens under poor signal conditions.
Parental Control Overview Parental Control (V-Chip) can be set up to block program viewing based on the restriction settings. The default setting is to allow all programs to be viewed. Viewing can be blocked by the type of program and by the categories chosen to be blocked. It is also possible to block all program viewing for a time period. To use Parental Control, Function, the following must be set. 1. Ratings and categories to be blocked. 2. A password. 3. Enabling the lock.
Canadian English language rating system: • • • • • • • Unblocked C and above (Children) C8 and above (8 years and up) G and above (General audience) PG and above (Parental guidance suggested) 14+ and above (Viewers 14 years and up) 18+ and above (Adult) Canadian French language rating system: • • • • • • Unblocked G (General audience) 8 ans+ and above (8 years and up) 13 ans+ and above (13 years and up) 16 ans+ and above (16 years and up) 18 ans+ (Adult) Blocking Scheme Setup 1.
Antenna Connections Combination VHF/UHF Antennas 300 ohm Flat Wire 300 ohm Flat Wire TV rear 75 ohm Antenna Jack 300 to 75 ohm Adapter 75 ohm Coaxial Cable 300 to 75 ohm Adapter 75 ohm CATV Cable Connecting an Outdoor Antenna For the best signal reception, we recommend you use an outdoor antenna. Severely weathered antennas and antenna cables can reduce the signal quality. Before connecting an outdoor antenna, inspect it yourself or have a TV technician inspect it.
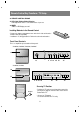
External Equipment Connection and Viewing Setup You can connect additional equipment, such as VCRs, camcorders etc. to your TV. Connection panels shown here may be somewhat different from your TV. Here is an example drawing of a typical jackpack layout.
External Equipment Connection and Viewing Setups VCR Connections Playback VCR TV 1. Connect the audio/video output jacks from the VCR to IN 1 (A/V) jacks on the TV. 2. Use the tv/video button to select Video 1. • If you connect the audio/video output jacks from the VCR to the IN2, IN3 or IN4 jacks on the TV, select Video 2, Video3, or Video 4. VIDEO (L)-AUDIO-(R) MONITOR OUTPUT IN 2 DVI (AUDIO ) IN 1 3. Press the PLAY button on the VCR. The video playback appears on the TV screen.
External Stereo Amplifier/Speakers 1. Connect analog/stereo amplifier input jacks to variable audio out of the TV. 2. Set up your speakers through your analog/ stereo amplifier, according to the instructions provided with the amplifier. (L)-AUDIO-(R) (L)-AUDIO-(R) VARIABLE AUDIO OUTPUT VIDEO IN 4 Note • If you want to hear the sound through your amplifier's speakers, set the TV Speaker option to Off (Refer to p.17). Analog/Stereo Amplifier MONO TV DVD Player Connection TV 1.
External Equipment Connection and Viewing Setup DTV (Set-top Box) Connection 1. Connect DTV component video outputs to Y, PB, PR on the TV and audio outputs to audio (L/R) left/right input jacks. 2. Turn on the digital set-top box. Use the tv/video or comp/dvi button to select Component 1 or Component 2. • If you connected the DVI output jack from the DTV to the DVI input jack on the TV, select DVI.
Programming the Remote to operate other devices The remote control for your projection TV is a multi-brand or universal remote control. It can be programmed to operate most remote-controllable devices of other manufacturers. Note that the remote control may not control all models of other brands. vcr cable dvd sat tv mode 1. Test your remote control.
Programming Codes VCRs Brand AIWA AKAI AMPRO ANAM AUDIO DYNAMICS BROKSONIC CANON CAPEHART CRAIG CURTIS MATHES DAEWOO DAYTRON DBX DYNATECH ELECTROHOME EMERSON FISHER FUNAI GE GO VIDEO GOLDSTAR HARMAN KARDON HITACHI INSTANTREPLAY JCL JCPENNY JENSEN JVC KENWOOD LG LLOYD Codes 034 016 043 124 125 072 031 033 012 023 043 035 037 028 031 108 003 040 031 033 005 007 064 065 110 111 116 117 108 012 023 043 034 053 059 006 017 027 029 034 035 037 046 129 131 153 003 008 010 034 031 033 072 107 144 147 132 13
SAT Brand ALPHASTAR DSR AMPLICA BIRDVIEW BSR CAPETRONICS CHANNEL MASTER Codes 123 050 051 126 053 053 013 014 018 036 CHAPARRAL 008 009 077 CITOH 054 CURTIS MATHES 050 145 DRAKE 005 006 010 011 112 116 DX ANTENNA 024 046 076 ECHOSTAR 038 040 058 093 095 096 098 099 122 ELECTRO HOME 089 EUROPLUS 114 FUJITSU 017 021 027 133 GENERAL INSTRUMENT 003 004 029 031 101 Brand 129 015 055 012 007 052 141 056 057 094 097 100 022 134 016 059 Codes HITACHI 139 140 HOUSTON TRACKER 033 037 051 057 HUGHES 068 HYTEK
Programming Codes CATV Brand ABC ANTRONIK ARCHER CABLE STAR CENTURION CENTURY CITIZEN COLOUR VOICE COMBANO COMTRONICS DIAMOND EAGLE EASTERN ELECTRICORD GE GEMINI GI GOLDEN CHANNEL HAMLIN HITACHI HOSPITALITY JERROLD Codes 003 004 042 046 053 014 005 007 024 026 092 007 007 065 090 080 081 019 030 023 020 030 057 062 032 072 008 022 054 052 074 030 049 050 052 055 070 077 002 003 008 009 052 069 Brand 039 LG 052 M-NET MACOM MAGNAVOX 014 MEMOREX MOVIE TIME NSC OAK PANASONIC PARAGON PHILIPS 040 066 PIONEER 0
Maintenance Early malfunctions can be prevented. Careful and regular cleaning can help extend the amount of time you will have your new projection TV. Be sure to turn the power off and pull out the power plug from the wall power outlet before you begin any cleaning. Screen Cleaning 1. Here’s a great way to keep the dust off your screen for a while. Wet a soft cloth in a mixture of lukewarm water and a little fabric softener or dish washing detergent.
Product Specifications Model R40W46, R40W46F, R45W46, R45W46F, R50W46, R57W46 Power requirements AC 120V Television system NTSC Television channels VHF : 2 ~ 13, UHF : 14 ~ 69 Cable : 01 ~ 125 Power consumption See the back of the TV External antenna impedance 75 Ω Audio output 15W + 15W External Equipment Input/output jacks and ports Video input jacks (4 sets) S-video input jacks (2) Component input jacks (2 sets) DVI-HDTV input port (1) Variable audio output jacks (1 set) Monitor output jac
Troubleshooting Checklist SYMPTOMS No power No picture or sound Poor picture but good sound Poor reception Lines in picture Ghosts (multiple images) Remote control does not work. Cannot tune desired channel. CHECK THESE THINGS Is power cord plugged in? Is television turned on? Check batteries in remote control. Try another channel (station trouble). Check antenna connections. Check for local interference. Adjust the antenna. Adjust the picture settings. Reprogram channels with EZ Scan.
ZENITH ELECTRONICS CORPORATION Projection TV Limited Warranty - USA Zenith will repair or replace your product, at Zenith’s option, if it proves to be defective in material or workmanship under normal use, during the warranty period ("Warranty Period") listed below, effective from the date ("Date of Purchase") of original consumer purchase of the product. This warranty is good only to the original purchaser of the product and effective only when used in the United States, excluding U.S. Territories.