INTEGRATED 225 OPERATING MANUAL w w w. a n t h e m AV.
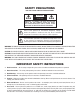
SAFETY PRECAUTIONS READ THIS SECTION CAREFULLY BEFORE PROCEEDING! WARNING RISK OF ELECTRIC SHOCK DO NOT OPEN WARNING: TO REDUCE THE RISK OF ELECTRIC SHOCK, DO NOT REMOVE COVER (OR BACK). NO USER-SERVICEABLE PARTS INSIDE. REFER SERVICING TO QUALIFIED SERVICE PERSONNEL.
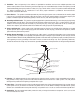
8. Ventilation – Slots and openings in the cabinet are provided for ventilation and to ensure reliable operation of the product and to protect it from overheating, and these openings must not be blocked or covered. The openings should never be blocked by placing the product on a bed, sofa, rug, or other similar surface. This product should not be placed in a built-in installation such as a bookcase or rack unless proper ventilation is provided or the manufacturer’s instructions have been adhered to. 9.
16. Object and Liquid Entry – Never push objects of any kind through openings as they may touch dangerous voltage points or short-out parts that could result in a fire or electric shock. Do not expose this product to dripping or splashing and ensure that no objects filled with liquids, such as vases, are placed on the product. 17. Servicing – Do not attempt to service this product yourself, as opening or removing covers may expose you to dangerous voltage or other hazards.
1. INTRODUCTION Thank you for purchasing the Anthem Integrated 225. The I225 is an integrated preamplifier and amplifier. Anthem products are engineered to recreate the passion of live performance and thrill of the best movie theaters by using the highest level of circuit design, superior build quality, innovative features, and intuitive ergonomics. 1.1 BEFORE MAKING CONNECTIONS Check that you have received everything listed below and report discrepancies to your dealer as soon as possible.
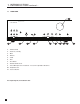
1. INTRODUCTION continued … 1.3 FRONT PANEL 1 I N T E G R AT E D PHONO CD 225 BALANCED RECORDER AUX 1 AUX 2 AUX 3 11 AUX 4 10 9 TONE DEFEAT BASS 8 1 – Volume Control 2 – Power On / Standby 3 – Mute 4 – Balance 5 – Treble 6 – Bass 7 – Tone Defeat 8 – Remote Control Sensor 9 – Stereo Mini Input Jack and Selector – for use with a portable audio device 10 – Headphone Jack 11 – Source Selection For a larger diagram, see inside back cover.
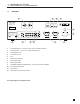
1. INTRODUCTION continued … 1.4 REAR PANEL 2 1 3 4 BALANCED INPUT I N T E G R AT E D 225 RS-232 CONTROL I.R. RECEIVER 12 V TRIGGER DESIGNED AND ENGINEERED BY SONIC FRONTIERS INTERNATIONAL R MADE IN TAIWAN RISK OF ELECTRIC SHOCK – DO NOT OPEN RISQUE DE CHOC ELECTRIQUE – NE PAS OUVRIR L IN OUT IN OUT FUSE T12A/250V 5 INPUTS PHONO GND PHONO CAUTION | TO PREVENT ELECTRIC SHOCK, DO NOT REMOVE TOP COVER. NO USER-SERVICEABLE PARTS INSIDE, REFER SERVICING TO QUALIFIED SERVICE PERSONNEL.
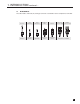
1. INTRODUCTION continued … 1.5 REMOTE CONTROL 1 2 1 – Power OFF 3 2 – IR Transmitter (front face) 4 3 – LED 5 4 – Power ON 6 5 – Set (for customization of remote) 6 – Control mode (to control other components) 7 – Volume 8 – Tone Enable / Bypass 9 – Mute 10 – Source The remaining keys are for custom setup to control other equipment. When a key is pressed, the keys light with amber color.
1. INTRODUCTION continued … 1.6 INTERCONNECTS These illustrations show audio, IR, and trigger connectors used between source components and the I225. 1/4” Stereo 3.5mm Mini (Mono) 3.
2. CONNECTIONS 2.1 INPUT CONNECTIONS Connect source components and recorder according to the diagrams in the following pages. If using a turntable, connect it to PHONO input only. If the turntable is equipped with a ground wire, connect it to the ground terminal next to the PHONO input by unscrewing the terminal then inserting wire and tightening the screw terminal onto the wire.
2. CONNECTIONS continued … Example 1: CD Player to Integrated 225 AUDIO OUT R L BALANCED INPUT I N T E G R AT E D 225 RS-232 CONTROL I.R. RECEIVER 12 V TRIGGER DESIGNED AND ENGINEERED BY SONIC FRONTIERS INTERNATIONAL R MADE IN TAIWAN RISK OF ELECTRIC SHOCK – DO NOT OPEN RISQUE DE CHOC ELECTRIQUE – NE PAS OUVRIR L IN OUT IN OUT FUSE T12A/250V INPUTS PHONO GND CAUTION | TO PREVENT ELECTRIC SHOCK, DO NOT REMOVE TOP COVER.
2. CONNECTIONS continued … Example 2: Recorder to Integrated 225 AUDIO IN AUDIO OUT R R L L BALANCED INPUT I N T E G R AT E D 225 RS-232 CONTROL I.R.
3. OPERATION 3.1 POWER ON/OFF Power on is indicated when the LED above the from panel power button is lit. Front panel – power ON/OFF POWER • Press POWER in the lower left of the front panel. Remote control – power ON • Make sure that INT control mode is set then press the power key in the upper left. Remote control – power OFF • Make sure that INT control mode is set then press the power OFF key in the upper right. 3.
3. OPERATION continued … 3.4 BALANCE CONTROL If the center of the soundstage is off-center, rotate the balance control in the direction that the soundstage needs to be moved. The center position is the default. 3.5 BALANCE TONE CONTROL To adjust the bass and/or treble level, rotate the Bass and Treble knobs on the front panel. The center position is the default.
4. REMOTE CONTROL CUSTOMIZATION 4.1 CODES FOR OTHER BRANDS The Integrated 225 remote can control other components – a list of brands and setup instructions are at the end of this section. If the brand for your component is not listed, try searching for a code as follows: 1. Turn on the component, for example the DVD player. 2. Press a control mode key other than INT, for example DVD. 3. Press and hold SET until the LED flashes twice then press 9, 9, 1. 4.
4. REMOTE CONTROL CUSTOMIZATION continued … 4.3 COPYING COMMANDS The command from one key can be copied to another key (not applicable to Power, Record, and Set keys). To copy a command to another key in the same control mode: 1. Press the control mode key. 2. Press and hold SET until the LED flashes twice. 3. Press 9, 9, 4. 4. Press the key to be copied. 5. Press the new key that will have the command. The LED flashes twice. To copy a command into a different control mode: 1.
4. REMOTE CONTROL CUSTOMIZATION continued … 4.5 PROGRAMMING MACROS Macros are used to execute multiple functions with one key press, such as powering the Integrated 225, cable box, and display On at the same time. Up to 32 commands can be programmed. Programming a Macro that works regardless of control mode setting: 1. Press and hold SET until the LED flashes twice. 2. Press 9, 9, 5. 3. Press the key you want to use to activate your macro (e.g. Power). 4.
4. REMOTE CONTROL CUSTOMIZATION continued … The following codes are for setting operation of other components with the Integrated 225 remote control. If codes for your components are not in this library, see sections 4.1 and 4.2. To enter a 5-digit code: 1. Press the control mode key near the top of the remote (e.g. CD). 2. Press and hold SET until the LED flashes twice. 3. Enter the 5-digit code. Two LED blinks indicate that the code is accepted.
4.
4.
4.
4.
4.
4.
SPECIFICATIONS PHONO PREAMPLIFIER Input Resistance . . . . . . . . . . . . . . . . . . . . . . . . . . . . . . . . . . . . . . . . . . . . . . . . . . . . . . . . . . . . . . . . . . . . . . 47 kΩ Input Capacitance . . . . . . . . . . . . . . . . . . . . . . . . . . . . . . . . . . . . . . . . . . . . . . . . . . . . . . . . . . . . . . . . . . . . 100 pF Maximum Input . . . . . . . . . . . . . . . . . . . . . . . . . . . . . . . . . . 18 mV at 20 Hz, 140 mV at 1 kHz, 160 mV at 20 kHz Gain (at 1 kHz). . . .
SPECIFICATIONS continued … POWER AMPLIFIER Power Output (per channel, continuous RMS, 20 Hz to 20 kHz, <1% THD) 8 Ω . . . . . . . . . . . . . . . . . . . . . . . . . . 240 W one channel driven, 225 W both channels driven (FTC) 4 Ω . . . . . . . . . . . . . . . . . . . . 330 W one channel driven, 310 W both channels driven (short term) Frequency Response . . . . . . . . . . . . . . . . . . . . . . . . . . . . . . . . . . . . . . . . . . . . . . 20 Hz to 20 kHz (+0, -0.15 dB) Bandwidth . . . . . . . . . . . .
LIMITED WARRANTY CANADA & USA The warranty period on Anthem products is five (5) years for power amplifiers and integrated amplifiers, three (3) years for audio preamplifiers and audio processing, two (2) years for video equipment and video processing, one (1) year for remote controls, and six (6) months for projector lamps from date of purchase from Anthem or an Authorized Anthem Dealer.
CD AUX 2 PHONO AUX 1 AUX 3 BALANCED RECORDER I N T E G R AT E D 225 AUX 4 THE BIG PICTURE FRONT PANEL TONE DEFEAT BASS TREBLE BALANCE MUTE POWER
225 EXPOSE THIS UNIT TO RAIN OR MOISTURE. WARNING | TO PREVENT FIRE OR SHOCK HAZARD, DO NOT TOP COVER. NO USER-SERVICEABLE PARTS INSIDE, REFER SERVICING TO QUALIFIED SERVICE PERSONNEL.
t e l . ( + 1 ) 905-362-0958 M-F 9:00 am - 5:30 pm (ET) www.anthemAV.