machine numbers I IQA56M98D l IQA60Mg8D l IQA36M46W nith! about your trakbatt yo u.ff.
The mode[ and serial number of your new 13/are located on the back of the 13/cabinet. For your future convenience, we suggest that you record these numbers here: MODEL NO. SERIAL NO. J • WARNING WARNING: TO REDUCETHE RISK OF ELECTRICSHOCK DO NOT REMOVECOVER(OR BACK). NO USERSERVICEABLEPARTSINSIDE!. REFERTO QUALIFIED SERVICEPERSONNEL.
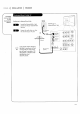
INSTALLAT,ON IO TT,NO STA.T IPAGE O3 This; page wiLL help you hook up your Entertainment IMPORTANT!! Usethispageto decidewhere you needto beginyoursetup. First, fi_dthe[inebetowthatbestdescribes what you wantto do,thengo to thatpage number.FoTa completeindexgo to page54. GENERAL Machine prolperty. HOOKUP INFORMATION Forgen_rat information aboutthejackson yourEntertainment Machine,go to .... pacles 4 and 5 INPU'F HOOKUP OPTIONS Ifyou areusingan antennaorhavedirect cabteservice, go to ..................
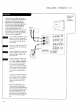
PAGE 41,.ST,''AT,O. I OE'T'"O S'A"TED f You'jack-pack and its various uses. Video 1_/2/3 \ Connects the video _ Right/Left Audio , _x-"" types of equipment:,-" _ Used for stereo sound_ .-"" from various types of equl;ment. _ _I ",, ," ......... i----_ ,_ . . ." " _ '. '_ ."_ ", ", '", _LAOO!"- !MO"O 'DEOS-VIDEO L 2, OOP OUT I and Loop Out Used to connect LL ' ))_]_,/ _,J___/ _ _ / directly or through teLevision, either cable box. _- AUDIC- L/MONO .......................
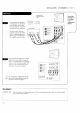
,.STAL'AT,O. I OE.,NOSTA.TEO I PAGE 5 Hooking up temporary equipment to your Entertainment ,Machirle. There are four jacks on the front of -your Entertainment: connecting Machine that Audio/Video make devices like video games and camcorders very simple. The jacks are located below the buttons behind a small door on the front panel. The jacks are like those found in the jack pack on the back of you_.F__ertainment Nacqine.
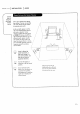
PAOE +IINS+ALLA+,ON IS+ANOA"O f / " Connecting I_--_ antenna/cabLe to your Entertainment _ TV back Cable TV Hooking up to Antenna/Direct Cable -/ il L _Fl waftjack Machine. Locate the Antenna/Cable Hooking up to I jack Antenna/Direct on the back of your Entertainment Machine. Connect the cable that runs from Rf coaxia[ wire the wal!. directly to thisjack. Cabte .-"'" _ -"" (75ohm) or Ifyou receiveantenna througha wire thatisseveralyears old and _.
,.STA'LAT,O. I S,A.OARO I PAGE 7 -'N Using a cable box with Some cable services require the use of a the Loop Out function. cable box to decode premium channeLs and pay-.per-view. Using the Loop Out to - Decoder-option, and programming your remDte, you can connect your cable box so that you on[y need your MBR Trakba[L ramble to control all the channels.
p_GE 81,NSTA,,AT,ON I STANOA.O Connecting a VCR to your Entertainment Machine. To hear stereo sound from your VCR,you will need to Optional (to receive signal on channel 3 or 4). Ccb/e not ,'nduded. connect A/V cables. Ifyou want to receiveyour signalson Channe( 3 or 4 from Antenna/Cable 1, locate the Out to TVjack.Connecta cable.fromthe Out to TVjack to the Antenna/Cable I jack on the back ofyour EntertainmentMachine. \ 3357-0
INSTALLATION I PAGE I STANDARD AiV and S-Video cables not included with TV 9 Connecting a I)VDplayer or S-VHSplayer to your I'ntertainment Machine. Find the audio and composite or S-Video jacks on the back of your DVD PLayer and connect them foLLowing the instructions provided with your equipment. You may connect composite t :k AV either the J video or the S-Video cables to- you F;E'atertai n ment Machine. Do not connect both the com_ite and the S-Video.
PAGE 101,NSTAL'AT'ON I AUO'O General. help on designing your home theater set-up. This is just a genera[ room design. Any number of set-ups are possible, and some changes may be needed to maximize your sound. / / sound / / ',y \ i' / \\ left speaker / \ \\ / in movies. \ '\ sub-woof=.r / ! / generates uLtra-low / frequency sound, for rumbling tow-end audio. / \ \ / / \ { ! t' L "x surround I / \ surround / '_ sound \ //',x/sound i Sound is affected \ / ! of other soun
,.'TA'
PAGE ,2 I 'NSTA'LAT'O" I A"O'O f Combine your new Enteitainment Macline _ Locate the Vadable Out jacks on your home the back of your Entertainment stereosystem. Machine and the Input jacks on the back of your stereo's amp{ifier. III Connect the two jacks, making sure that the right and [eft channe{s are p{aced correctly. .Set up your speakers through your stereo, according those directions. to _:.
,.STAL'AT,O. I O TT,.OSTA.T I PAOE ,3D Have your Entertainment Machine automaticalty f_indand save ' aLLthe channels avaiLabLeto Use pages 6-12 to hook up your Entertainment Machine. Plug in your Entertainment Machine and press the Power button / on the front panel. The Quick Start screen will instantty "'Q_qb "" I appear, with tI 901" _" o 0 caL'It7
P.AG14 I I,STALLATIO. I G .INGsTARTeD f Find all your available chan qets from any source. [his function allows you to set up the channel selection on Antenna/Cable 2. Other sources, such as VIDEO1 and 2 won't have channels available to scan, and when they're selected as the source, the option won't even appear in the Setup menu. CLick on the Source Menu icon in -the Menu Display. -'CLick on Ant/Cable 2 to search for available channels.
INSTALLATION I GETTING STARTED I PAG E 15 Adjust the color alignment -_ Click on your Setup Menu icon in the Menu Display at the top of the screen. to make your picture • the sharpest il: can be. Select Projo Setup on your screen by clicking on it once. _ Click again to enter the InTE[_ Setup J Convergence screen. You wilt see two inter_e_ctih_%Trie_If Quick the lines Start Ch. Search are perfec_ly white, your colors Add/Del/S are fine.
PAGE I0 10.E.AT,ON I T.AKBALL"E"OTE f All the buttons your on remote, and what they POWER INDICATOR LIGHTS l[luminate to show which mode your remote is in. do. MODE LEFT/RIGHT Adjust which mode your remote is working in. Turn your Entertainmen: Machine or any other programmed equipment on or off depending or mode. / t / TRAKBALL CLick and move the on-_creen "_4UTE Press once for Soft Mute, again for Full Mute, and a third time to return to normal volume. pointer. i \ / \ / \ --- SURF FLSHB
I TRAKBALL REMOTE i PAGE OPERATION 17 Learn the ,easiest way to get at Make sure your Entertainment Machine is on. Just click the TrakbaLl by pressing the Setup menu (see pages 23-27), the Featuresmenu (see pages 28-34), gently with your thumb, the Audio menu (see page 35),the Video menu (see page 36), and the pointer and a hand-shaped You can now move the pointer on the screen by rolling Machine! anywhere the Trakbat[ with Source Menu your thumb.
PAGE 18 } OPERATtON ] TRAKBALL REMOTE Learn the easiest way to get at ever:l option on your Entertainment Hachfne! When adjusting options that are on a sliding scale, such as volume, you don't have to increase or decrease them one step at a time. 3ust click anywhere on the spectrum, and the setting jump to that point.
OPE.A,,O. I ,V'U"°A"'"'A'S I PAG E19 Introducing you to the basics of your Entertainment Machine. To watch TV on antenna, cable, a VCR, DVD or any other piece of equipment, you have to make sure you've set your Entertainment Machine to the correct source. Check page 22 to see how to use the Source menu.
PAG, 201 I . .US Descriptions of all the menus on your Ente _cainment Machine. Using the Menu button all the menus below. on your remote or by using the Trakbal[, you can access Menu Name SOURCE MENU SET.UP/MENU Quick Start Go to page Choose from the available Adjust the_asic AutomaticaLly 22 sources for both the main picture and PIP. characteristics of your Entertainment Machine. finds and stores active channels to flip through 13-15, using Channel 23-27 . 13 Up/Down.
PAGE 221OPERA"ON I SOORCE"E"O f Choose the sources for your main picture and PIR This menu is where you switch input source f devices so you can watch your antenna, cable 13/, VCR, DVD, or anything eLse that you have hooked up to your Entertainment Machine. Regular antenna or cable will come through either Antenna/CabLe \ I or Antenna/CabLe 2, depending on how you set up your system. ALLother devices will correspond to the names of the jacks that they're connected Source to.
I .E.usI sE,uP. .u I PAGE 23 Create your own channel selection for cooler CLick on the Setup Menu in your Menu surfing. DispLay. CLick on Add/Det/Surf in the menu. Click on it again and your screen will be replaced by a Large blue one with a full channel listing. -_ IFITEt_Setup Click on the channel number you wish to modify-(add_/de[ete Quick to your chan_l list). CLick on channel number again to add or delete from your listing.
P 2410PE"'"ON I"E"US IS"OP" "O 'Set the dock o1"have it done for you, automatically. REALLY CLick on yourSetupMenu iconintheMenu DispLay. S ........................................................................................................................... CLick on CLockSetinthemenu. CLick itagainto reachthe CLockmenu. CLickon CLock Mode in the menu. imP'e_i%Ynd uF _ CLickagain and a displaywiLLappear InTEG Setup at the bottom of your screen.
OPE.AT,O" I "E"US I SETUP"E"U I PAGE 25 "x Turn closed captioning or text on, off, or have it appear automaticaLLy. CLickon your Setup Menu icon in the menu disp{ay. Select Captions in the menu by clicking on it. Click on it again and a dispiay bottom wit[ appear at the of your screen. Choose whether.you want the captic, ns_0-ff_,0h_-of-c_ ptie n When Quick Muted. Ch. Search Start Add/DeliSurl Click on EXIT to return to the D Setup Menu.
PAG_ 2010'ERA"O" I ME"OS I S_'°P"_"U f Choose what Language your on-screen menus Click on your Setup Menu icon in appear in. the menu dispLay. SeLect Language by clicking on it. Crick again and the Language Menu will appear at the bottom of your screen. _] _, : Choose the Language you want by :--c{icking on Eng[isl_; Spanish, or French. Quick InTEQ.Setup Start Ch. Search AddiDeliSurf CLickon EXITto return to the Setup Menu.
OPE.A,,ON I "ENUS I S'TOP"_NU I PAOE 2_ Customize the look of your on-screen menus. Click on your Setup Menu icon in the menu disptay. Select Background by clicking on it in the menu. Choosewhether you want an opaque background Off or On by clicking on your choice. -_ _ _----_ J Quick Start Ch. Search Add/Del/Surf Clock Set Captions Click on EXITto return to the Setup m_'nu. °" C[ick on another option Setup IB-FE_ to alter, or on the regu[ar screen again to return to norma!, viewing.
P 2+I oPERA+,oN I MENUS I FEA+URES.ENO f Have your Entertainment Machine go to sleep any time. Click on your Features Menu icor_ in the menu display. % Select Timer Setup in the menu by clicking on it. Click on it again and the Timer Menu will appear, replacing the features Menu. - -] InTECgFeatures Click on Sleep Timer in the menu -€o highlight the-_eature, Click it again to specify an amount of Ch. Labels Source ID Ome before your Entertainment Machine turns itself off.
OP ..T,O. I .E.USI FE.T,J. S.ENU I PAGE 2. CLick on your Features Have your Entertainment Machine wake up and go to s[eep any time. Menu icon in the menu display. SeLect Timer Setup by clicking in the menu on it. The Timer Menu wiLLappear, replacing Features menu. the --_ IV-1T_EBFeatures Machine, turns itself on. A display wiLLappear at the bottom of Surf ID your screen.
PAGE 3OIOPE.A,,O" I "E"°S I ,,A,°.ES.E.° f Choose T_ "preset [abeLs for channels or create your own. C[ick on your Features icon in the menu disptay. SeLect Ch. LabeLs by cLicking on it. CLick again and a blue screen wilt flu with a Ust of possible channel [abeLs. The current channel wiLL appear in the upper-right corner inset. -_ InTE@Features ': Choose a channe[to [abel with the Channe[ Up/Down display on tl_e right side of your screen.
OPE.AT,O. I .E"OS I FEA'O"ES"E"U I PAGE 3' Name the sources for the Entertainment Machine with SourceID. Click on your Features Menu icon in the menu display. SeLect Source ID by clicking on it. C[$ck it again to enter the Source ID menu. Your screen wiLL be replaced by a blue one that Lists all the sources and their current ---] INTEI_IFeatures J [abets. Select the Source name you want Timer Setup Ch. Labels by ctick-fng on it. [tick repeatedly on the_abe[ to cycle through the avaiLabLe names.
PA+E +210PE.A+ION I "ENUS I F A+U"ES" NU Customize the name:; of your surf channel lists for up to foul" people. 6.1 Click on your Features Menu icon in the menu display. CLick on the Surf ID item in the menu. Click again and your screen will be replaced by a blue one, showing all your available surf lists. Highlight _ant -_ IF"ITEG_.Features the Surf channel list you to edit by glicking CLick repeatedly cycle through Timer Setup Ch. Labels on it. on the Label to the available names.
OPERA,,O" I "E"OS I FEA'URES"E"O I PAGE Determine the channe8 and video Click on your Features icon in the your Nds can access. % menu dispLay. SeLect ParentaL CtL. in the menu by clicking on it. Click again to enter the parental control menu (Par. Ct[). Click on BLockCh. and the screen will be replaced by a blue screen Listing all of youLa_j[._bL_channeLs. Click 9n the channel numbers that you wish to b[ock._Thescreen-lists the channel as Unbtocked.
PAGEI O,E.A"O" I " "USI 'EA'O"ES"E"O Your Entertainment Machine will show you art your Click on your Features in the Menu icon f ................................................................................................................... menu display. menu options. Select Auto Demo in the menu by clicking on it. Click on it again, and a display will appear at the bottom of your screen. -_ Decide whether you want the -Auto Demo On o_Off, and click on that option.
OPER,,,O. I .E"US I 'UOIO"E"U I PAGE Customize the sound on your Entertainment Machine. C[ick on your Audio Menu icon From the menu display. Your options are: • Bass:: Increase/decrease • Trebte: • Balance: Allows you to put the sound more to the [eft or right channe[. • Audio tower-end Increase/decrease Mode: sounds. higher-end sounds.
3610,E.,,,ON I .ENOS I V'OEO"ENO f "Customize the picture quality on your Enteltainment CLick on your Video Menu icon from Machine. the menu display. Your options are: • Contrast= difference white \ Changes the amount of between black LeveLs and leveLs in your picture. • Brightness: 3ncreases or decreases the amount of white in your picture. • Color: AdJust levels of all colors. r_ Video FITEI_ / 1p ._--Tint= Adjust the relative amounts of the color red and green in your picture.
OPE.AT,ON I P,CTU. -,N-P,CTU.E I PAGE 3 Picture-inpicture explained. YOUR PICTURE-IN-PICTURE _he Picture-ln-Picture picture, FEATURE (PIP) function called the "inset," allows you to put a smaller on the bigger screen, or the "main" picture. Don't want to miss any of the big game, but hate commercials? 3ust put the game in the inset, and surf with the main picture.
PAG E38I OPE.AT,ON I P'C'U"E-'"-P'CTU"E f Gettingthe most:from the PIP and other fund.ionswith your remote. The PIPfunctions can allbe foundintheon-screen menu thatappearswhen you rot[ thepointer to the[eft sideofthescreen. TrakbaLL Speed Adjust how fastthe pointermoves in relation to your moving the Trakbat[. FLips the PIP "- _ _ your Entertainment Nachine shut:; itself the dosed caption menu. off.
OP,.AT,O. I ,C.U.E ,. P'C'O"E I PAG F39 Control , the_pTct_re quahtie_ Click on your PIP Menu icon in of your i / ...................................................................................................................................................................................... :................................ PIP, inset. the menu display. Select clicking Size in the menu by on it once. CLick on it again and a display wiLL appear at the bottom of your screen.
PAGE 40I OP RAT,ON I P,CTUR -'.- 'CTU"E f Controlling the Main and PIP audio/video using your TrakbatL Some functions of PIP can aLso be controlled using the Channel/Time :I display. o--ii oU ii.......... 4:55 Turn PIP on. Click the TrakbaLL i i ! l i i once, and roLl the pointer to the fight Mono side of the screen. The display wiL[ be in two parts. The highlighted I part wilt indicate I the mode you're in (Main or PIP). L. Click on the darkened part to change to operating mode.
OPERATION REMOTE PAGE 41 Usingthe buttonson You can use most of the options your remote to control your Entertainment Machine. on your Entertainment Machine by pressing various buttons. MENUS Fhessing the MENU button repeatedly will cycle you through avai[abLe menus that control your Entertainment all the Machine's settings. \ \ \ Once in a menu, you can select an item by pressing the UP/DOWN arrows to highlight one.
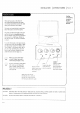
PAGE ,210PE"AT'ON I FRONT PANEL f Using the ten-button frontpanel to operatethe menus. L w Press POWERon the control panel to turn on your Entertainment Machine. To access the menus, push the MENU button on the control panel. Cyc[e through the various menus by pushing the button repeatedly. J Press the SELECT button -repeatedLy to highlight the option you want to modify. Press either Right or LeFt on the ADJUST button -" to modify the "_" iNTER option you have chosen.
oP .A:IO.I P.oG.A..:.G T,E.E,O:EI Se[ect the equipment Operate aLLof your home theater and stereo hardware with the MBRTrakba[t. you want to program, then turn to pages 44-45 to find the programming code appropriate // / for the type and brand of equipment. Make sure the equipment is turned f "t_ vCt cable atix 1 \\ \ /' on. / / i Point the MBR Trakba[[ remote at the t i piece you're programming, and press MUTE and FLSHBK at the same time.
PAGEI O.E.A.,O. I ..O0.A..,NO CO0 S Find the codes you need to program your remote. TVs Admira[ ........ 116 133 Akai .......... 104 /_mark ......... 103 AOC .......... .... 131 ........ Centurion [itizen 136 121 (:o n{e c T:" T.'_. 119 Emerson ....... .......... 114 Panasonic 125 132 164 Phitco......... .......... Odon ......... ...... 103 103 todgenet. ...... 103 113 121 104 114 130 104 119 105 119 133 Skarp .........
OPE.AT,ON I P.OO.A""'NO CO0I PAGE S Find the codes you need to program your remote. CABLE/SATE L LITE/S ET-TOPS Allegro ........ AllegroA-B 358 Switch Americast ...... DISH Network 389 J_rimestar 373 Radio Shack ..... 362 United 314 Regal. ......... 366 Universal ....... 358 334 Regency ....... 329 Vid Tech ....... 340 Video 349 Macom Satellite 389 .. Magnavox ...... DSS . . . 390 331 338 Magnavox 304 307 310 305 308 318 306 309 NSC ..........
PAGE 46 I OPERATION I SPECIAL FEATURES .f Use the Remote contro[ to search for art possibte programming codes. Turn on the device you want to operate. Press and how the MUTE and FLSHBK buttons indicator until the tight turns on. Press MODE Left!Right indicator untiL the tight is underneath the "device you're t#ying to program .(TV, CABLE, VCR, AUX). With the NUMBER keypad, enter the code 0-0-0 (zero-zero-zero), then press the Enter key right away.
OPERATION Amptifier I SPECIAL FEATURES PAGE Contro[ the votume on your sound amptifier white in other modes. Volume Override: llI Find the code that amplifier. operates your Test it to make sure it's the correct one by fo[towing the "Programming the procedure in \ Your Remote" section. / ! Press and hold MUTE and FLSHBK on your remote until ImI the indicator Press MODE Left/Right indicator4_ght tight stays [it.
PAGE 48 I REFERENCE J MAINTENANCE f Caring for your Entertainment Machine. Carefuland regular cLeaningcan extend the amount of time you will have with your new Entertainment Machine. Be sure to turn the power off and putt out the plug before you begin any cleaning. SCREEN CLEANING 1 Spray a small amount of glass cleaner on a soft cloth and wipe the screen until it's clean. 2. Here's a great way to keep the dust off your screen for a white.
.EFE.E.CE I '"O00
PAGE 50 I REFERENCE I TROUBLESHOOTING Some quick and easy tips to fixing Remote control problems doesn't work. • Make sure the batteries are fresh and insta|[ed properly. yourself. Indicator light on remote comes on but remote doesn't transmit. transmitter is pointed toward the Entertainment on bottom Machine) right,when is polarized remote properly (see page 13). Menu options can't be changed or selected.
REFERENCE l FEATURES I PAGE 51 Here are a few features that ADVANCED make your Entertainment Machine more fun to use. SURF In addition to your normal channel Listing, you can customize Lists to fit different members of your family: up to four different channel movie channels for the kids, the sports chan- nel for Dad, etc. See page 23 to set up surf channel Lists and page 32 to customize the names of your channel [isls. PIP SNAPSHOT With the press of a button P]P inset.
PAGE,52 I REFERENCE J GLOSSARY f A complete Listof definitions for words found in 2-TUNER PIP This features aLLowsyou to view a second channel while maintaining a picture on the main screen. this guide. 75 OHM RF CABLE The round cablethat comes from an off-air antenna or cableservice provider. Each end LooksLikea hex shaped nut with a wre sticking throughthe middle,and itscrewsonto the threadedjackon the back ofyour TV. Audio/Video A/V CABLES cables.
REFERENCE I OLOSSARY I PAGE ICON A small graphic item on your screen that represents a function or menu item. INPUT Refers to the jack that receives a signal into the TV, VCR or other A complete list of definitions for words found in this guide. A/V device. 3ACK A connection on the back of a W, VCR, or any other AiV device. This includes the RFjacks and the Audio/Video jacks that are color-coded. MODE The mode determines the type of device (TV, VCR, Cable, Aux) that the remote is controlling.
PAGEI R F RENC I INO X Hnd want what you quickly. FEATURE PAGE 2-Tuner PIP ................................... Add/De[/Su rf-Advanced Amptifier/Cab[e Antenna \ Surf ........................... VoLume Override Hookup 37, 51 ........................ ................................... ................................. 23 47 6 Audio Hookups Audio Menu ....................................... 35 Auto Demo ...................................... 34 Auto Find ................................
REFERENCE ] INDEX I PAGE 55 Find what you want quickty. FEATURE On/Off PAGE Timer ..................................... 29 On Screen Menus ................................ 20-21 Parental Control ................................... Picture-in- Picture 33 (PIP) ............................ 37-38 PIP Menu ....................................... PIP Snapshot .................................. Programming the Remote ........................... 39 37, 51 43-45 Projo Setup ....................
l)ire_-Vie_! Color W Welcome to the Zenith ranty carefully, also have other rights ZENITH We believe that you wit[ be pleased WARRANTY" as defined that vary from under state to state within with your r,ew Zenith Entertainn_ent Federal Law. This warranty Machine. gives you ;pe(Jfic PLease read this legal fights, war- and '/ou may the U.S.A.
O,E.AT,O. I .E"OS I PAOE 21 Descriptions of at[ the menus on your Entertainment Machine. Go to page PienuName (cont'd) Parental Control Allows parents to block any channel for up to gg hours, with the use 33 of a password. Auto ,_by runnino.through A U DI O M E N U M EN U many of its options and menus automatically. Customize the sound to suit your room and your taste.