_211 0 Re Co z e n i t h_enterta| nment mach| nes
RECORD YOUR MODEL NUMBER (Now,whileyoucanseeit) | / The modeland serialnumberofyour newVCRare Located on the backof the VCRcabinet.Foryourfuture convenience, we suggestthat you record these numbershere: SAFETY TIPS: MODEL NO. Refer to the "Safety Tips" Leaflet that came with your product for Important SERIAL NO. Safety Instructions. WARNING WARNING: TO REDUCETHE RISKOF ELECTRIC SHOCK DO NOT REMOVE COVER (ORBACK).NO USERSERVICEABLEPARTSINSIDE. REFERSERVICINGTO QUALIFIEDSERVICEPERSONNEL.
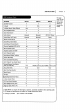
INSTALLATION I PAGE 3 This page shows the feaFEATURES VRA211 VRA411 VRA421 SpeakEZ Function X X X 2-Heads X N/A N/A N/A X X FullLoad/QuickStart X X X Auto Head CLeaner X X X tures of your VCRand the differences betweenthe models m- 4-Heads(Special Video Effects) Audio System Monaural Monaural Audio/Video (A/V) 3acks MTS Hi-FiStereo Monaural Monaural Stereo Remote Control SC411 X X X Auto/ManualBand Select X X X Auto/ManualChannelSearch X X X 181 181 181 R
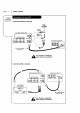
PAGE +4 I INSTALLATION f Required connections for your VCR Connections Without a Cable Box Tum offmaking power any or unplug VCR before connections. Connections With a Cable Box Tum offmaking power any or unplug VCR before connections.
INSTALLATION I PAG E 5 OpUonal connections for your VCR Audio/Video (A/V) Connections to TV Use A/V connections for a better picture. Back Panelof Stereo VCR BackPanel of Typical TV @ ANT IN VHFiUHFICATV or unplug VCR um off power before making any connections. A A/V cableis not providedwith VCR. Back Panel of Monaural VCR BackPanelofTypicaLMonauralTV VHF/UHFICATV IN Note:If the backpanel onyourTVis different, referto the T!i'soperating 9uide.
PAGE 6 I INSTALLATION f Thingsyou must do before you can operate yourVCR PROGRAM 0 ,u,o o: K: L:ON SETUPM_U MONTH: lION BOFF : : STOP : CHANNEL SPEED REPEAT MANUAL CLOCK SET:_ Pressnumber DAY START keY_T" =ex. Iq.AYBACK: CH.
INSTALLATION I PAGE Things you must do before you PointremotetowardVCR can operate your VCR How to Access Menus 1. PressMENUto see Main Menu. Choosesand 0 2. Press NUMBER (1, 2, 3, or 4) to see desired sub menu to be used. / modifiesoptions 3. Press NUMBER to choose desired option to be changed. 4. PressQUIT to exit menu, or wait a few minutes and the VCRreturnsto norma[ operation. 5etec'_ VCRtuner Select SpeakEZ Function (On/Off) Press 4.
PAG E 8 J INSTALLATION f Some things you must do and others you may want to do before you can operate Set Date and Time for Clock Press 3. (Required) Set the clock in the VCR to the current date and time. See CLOCK Menu for detaiLs. I your VCR I CLOCK MENU MONTH : n : : 1996 1 THU TIME : 12.00 PM CLOCK MENU AUTO DAYt_tiT ._VING.'ON BONBOFF Pre. n.m_ keys theft ENTER Youmustset the timer-conclockbefore you con use any trolled VCRfeotures, for exomple, TIMERrecordings.
INSTALLATION Setect Other Menu Options You may not want to have the clockin your VCRadjusted automaticallyfor DaylightSavingTime. Referto CLockMenu for details. I PAGE Thingsyou may want to do beforeyou operate your VCR. CLOCK MENU Press1.
PAGE 10 Descriptions of items you needto know to operate your VCR. I CONTROLS AND DISPLAYS Front Panel ControLs These controls performbasicVCRoperations.The Remoteperformsbasicas weir as advancedVCR operations. POWEROn/Off Button Cassette Compartment Channel Up/Down Se|ector Stop/Eject SeLector zenith \ LEDFron/tPanet PLAY,REW(Rewind), F FWD(Fast Forward), PAUSESelector Recording SpeedSelector Indicators REC/ITR (Instant Timer Record) Setector LED Front P;net Indicators power VCRis turned
CONTROLS AND DISPLAYS I PAGE 11 On-Screendisplays teU you the status of the tape inserted and VCRfunctions. Current mode of operation (STOP,PAUSE,RECORD,PLAY,etc.) and audioformat of tape, where Ptay-.}iI-F! or NORMAL(Nodisplay) I PLAY HI-FI SP TapeSpeed .
PAGE 12 I OPERATION f A quick List of aLLthe buttonson your remote control and what they do. CH (V/A) -- Changesfavorite channel List. ALsoselectsAUX A/V input channeL. CMSKIP -- Fastforwardspicture searchthrough30 secondsof recording. FJECT-- Ejectsthe tape in the VCR. ENTER -- Programs menu options and shows VCR display. F FWD (Fast Forward)--Advances tape rapidly. MEMORY- Returns reaL-time tape counter to zero (M 0:00:00). MENU -- Shows main menu.
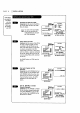
OPERATION PAG E 1 3 Introdudng you to the Main Menu selections CLOCK MENU AUTGDAYUGHT SAVING:ON lIONBOFF MANUALCLOCKSET:E Press number keys QUIT = exit MONTH DAY SETUP MENU : : START STOP • CHANNEL SPEED REPEAT PROGRAM CH.
PA G E 14 I OPERATION f The CLock Menu sets the clockin VCRto the currenttime. How to Access Auto Dayttght Saving ThisVCRcan adjust the clock automaticallyfor Daylight SavingTime. I. PressMENU to seeMainMenu. 2. PressI toseeClockMenu on theMainMenu. CLOCKMENU AUTO DAYLIGHT SAVlI_:ON mON mOFF MANUAL CLOCK Sb-I':IB 3. Press1 to choose ON on the Clock Menu. Note: We recommendthat you set the clock usingthe MANUAL method the first time you useyour VCR.SeeMANUAL option for details.
OPERATION I "CLOCK =AV = sr_r Press2 REPEAT _ • / OAr ; m,xr : cvauemL: SPEED : AUDIO • : QUIT=exit • / (1.8)tom,ct_rogrm num_k_m • 15 The TLMER Menu teLLsthe VCRwhen to recorda program on a day and at a time you specify Youcanspecifyeightdifferentevents to be recordedin a one-yearperiod. "TIElln SETUP PAGE REPEAT : / (t.
PAGE 16 I OPERATION The SETUP Menu ustomizes the VCR's r SETUPMENU eration for your ChooseSETUPMenu as describedin _How to AccessMenus." Par_n'eCU_ar " CH. ADDIDEL: SOURCE: AUTO PROGRAM: ON-SCREEN DISPLAY: LANGUAGE SELECT: Press number keys QUIT = exit AUTO PROGRAM FindsaLLactive channelsand storesthem in the VCR'smemonj for access by Channel Up/Down. Press% to begin search. CH. ADD/DEL Editsthe channelsfound by AUTOPROGRAM.Usenumberkeys foLLowedby ENTERto selectthe channelto be edited (e.g.
OPERATION I " PAGE 17 AUDIO Menu's PLAYBACKand RECORD The AUDIO Menu indicates the audio format options are used when recording or pbying SpeakF.Z:ON EION BOFF PLAYBACK: a tape. Choose AUDIO Menu as described in "How to Access Menus." SpeakEZ VCRs. RECORD: Press ENTER (and repeat) to choose items in the menu (some models). available only with stereo AUDIOMENU Press number keys _. then ENTER QUIT = exit Turns SpeakEZ ON or OFF.
PAGE 18 I OPERATION f Thispage showsa typical video systemand explains how to select _'channeLs. Zenith TV Cable"IV Zenith Stereo VCR W_k _nect Cab_ _Or __v T_c_ cable Box CHANNE,I 31-14 I • I yen o,_,_toTv AUDIO 'IV IN VIOEOI (Channe!. 3 or 4 w_en VIDEO IN AUDIO IN OUT I"LI/t Selecting ChanneLs when the VCR is OFF 1. TurnTV on. 2. SeLectchannelyou'd Liketo watch at the W. If you havea cablebox, select channel3 or 4 at the TV. SeLectscable boxchannelsat the cable box.
OPERATION J I -1- _nDEO--I VHFIUHFICATV I l 4 V Turn offmaking power any or unplug VCR before connections. cabte is not provided with VCR. Select AUX for Viewing an Audio/Video source like a Camcorder 1. With TV and VCRon, ptace VCRin VCRmode by pressingTV/VCRon the remote (and repeat) untit the VCRindicator appearsin the VCR'sfront pane[. 2. Setect channet 3 (or 4) on the TV. Note: If your TV has A/V jacks, you may get a better picture if you connect your VCR there.
L PAGE 20 I OPERATION f This page explainsthe basicsof playing tapes in yourVCR. Automatic Playback (No Safety Tab) 1. TapeplaybackbeginsautomaticaLLy, if the safety tab is removedfrom the cassettecase. For example,most rental movies haveno safely tab. SimpLyinsert the prerecordedVHScassette into the VCR. Powerturns on and playback begins. power VCR'sControLs 2. SeLectthe channel 3 or 4 at the TV. Or,select the TV'sAUX(Auxitianj) sourceto seethe picture, if you are usingthe A/V jacks. \nl ' I] C
OPERATION I PAGE 21 This page explainshow to usethe Auto/Manuat Tracking Adjustment YourVCRadjuststracking automaticallywhen you play a tape. If the tape was recordedon a different VCR,streaks (video noise) may appear.Whilethe tape is playing,press TRACKING (Y/A) to adjust the tracking manually. remoteto pLay tapes on your VCR. FWD FastForward) Rear-Time Tape Counter PressENTERtwice to keepthe tape counter ! on the TVscreen. PressENTERrepeatedlyto i removeall displays.
PAGE 22 I OPERATION f Recording what you are watching on TV. OpUons You Can Use White Recording Instant recording[etsyou recorduntil you reach the end of tape or you pressSTOPto stop recording. pow@r © 1. TurnTV and VCRon, Remote's ControLs 2. Place VCRin VCRmodeby pressing W/VCR on the remote repeatedlyuntil the VCRindicator appearsin the VCRfront paneL. 3. SeLect channel 3 or 4 at the "IV.
I OPERATION PAG E 2 3 Recording usingpreset time periods. Preset Time Periods for ITR Recording. Note: power Preset recordingtime counts down until the recording tim_ is over. Instant (attended) Remote's Controls Timer Recording (ITR) Lets you record where you record for a specific preset time period, instead of recording until the end of tape is reached. For example, you can record a 30-minute J show using the preset time period. Turn"INandVCRon.
PAGE 24 I OPERATION f Recording one show while watching another. Note: If you have a cable box connectedto yourVCR,you cannot record oneshowand watch another. Choosethe showyou wish to recordusingthe VCR's channelselector. Choosethe showyou wish to watch usingthe TV'schannelselector. _Turn power © Remote's ControLs lV and VCR on. PLaceVCRin VCRmodeby pressing TV/VCRon the remote repeatedlyuntil the VCRindicator appearsin the VCR front paneL. SeLectchannel 3 or 4 at the TV.
• SpeakEZ _ "riMER SETUP CLOCK ii I AUDIO Pressnumber keys QUIT = exit OPERATION 1 Press 2 PF_,_ _OGRAM [] D MONTH DAY START STOP CHANNEL : SPEED : REPEAT : (1-8) to select program ENTER MAIN MENU to adjust I MONTH: DAY I I I : START : STOP " CHANNEl. SPEED : : REPEAT : PAGE 25 This page explains how to use the timer so that you can record white you are away.
PAGE 26 Somequick and easy tips to fixing problems yourself. I TROUBLESHOOTING Before Calling for Service Pleaserefer to this chart beforecalling for service. First,turn on the TVand VCR.Select appropriate input for the TV to receivethe video signalfrom the VCR.You will probablyuse the Antenna In connect-ion to the TV. Select channel3 or 4 at the TV. Place the VCR in the VCRmodeby pressingTV/VCRon the remote repeatedlyuntil VCRindicator appearsin the VCRfront panel.
TROUBLESHOOTING I PAGE 27 Some quick and easy tips to fixing prob- Channel Tuning Problems lems yourse|f. Observed Condition Possible Cause Probable Solution Some channels are skipped over Thosechannels were deleted with the CH. ADD/DELoption. Use CH. ADD/DEL to restore channels. See SETUP Menu for when _sing Channel Up/Down. details. Picture and sound are weak or Antenna or cables are Loose. missing. Tighten connections or replace cable. L Wrong SOURCEoption is being used.
PAGE 28 I TROUBLESHOOTING f Somequick andeasy tips to fixing problems yoursetf. Moisture CondensaUon Moisture condensationcan occur: In tocations where moisture condensationmay Occur: • Whenthe video recorderis movedfrom a cord place to a warm place. • Under extremelyhumid conditions • Keepthe powercord ptuggedinto an ACoutlet and POWEROn. This wilt hetp preventcondensation. o,_/hen condensationhas occurred,wait a few hoursfor the VCRto dry before usingit.
INDEX I 29 AGE Find what you want quickly. FEATURE PAGE Audio'Menu...................................... Auto Channel Search .............................. 17 8, 16 Connections .................................. 4-5, 19 Ch. Add/De[.................................... 8, 16 CLockSet ..................................... 8, 14 Features Chart ..................................... Front Panel Diagram ................................ 3 10 Instant Recording ...............................
STEREO SURROUND SOUND SPEAKERS For u.se with any Surround Sound compatible TV. These sp_eakers create a sound so reaL, it's as if you were part of the action. The convenient, sp.ace-saving shelf design _make these speakers an ideal ad_lition to any Home rheat.er System. The contemporary black fimsh complements any room. cvsooo ONLY $224.95 SHIPPING J_ HANDL]N I'I._$17.95 REPLACEMENT REMOTE Broken or Lost remote? Perhaps you would just Like the convenience of having a second remote on hand.
NOTES I PA G E 3 1 Usethis page to makes notes.
VIDEOCASSETTE RECORDER OR PLAYER WeLcomeinto the Zenith family! We beUevethat you wit| be pleased with your newZenith EntertainmentMachine.PLeaseread this warranty carefully, it is a "LIMITEDWARRANTY" as defined underFederalLaw. This warranbjgives you specific [ega| rights, andyou may aLsohave other rightsthat vary from state to state within the U.S.A.