,acMne numbers I VRB210 I VRB410 I VRB420 _IERGY STAR® q operating guide / warranty
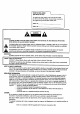
RECORD YOUR MODEL NUMBER (Now,whileyoucanseeit) l / The model and serial numberof yournew VCRare Located on the backof the VCRcabinet.Foryour future convenience, we suggestthat yourecord these numbershere: MODELNO. SERIALNO. WARNING: TO REDUCETHE RISKOF ELECTRIC SHOCK DO NOT REMOVE COVER (OR BACK).NO USERSERVICEABLEPARTSINSIDE.
SAFETY TIPS I PAGE Thesesimple precauUonswiLLhelp ensurethat you get many years of safe enjoyment from your new product. 1o Read Instructions 11. Power Sources Read all of the safety and operating instructionsbefore operating the product. 2. 3* 4* 5. 6. Operate product only from type of power source indicated on marking Retain Instructions Keepall safety and operaUnginstructionsfor future reference. Heed Warnings Followwarnings on the productand in the operating guide.
I SAFETY TIPS Thesesimpl,eprecautionsv_ll,help ensurethat you get manyyears of safe enjoyment from your new product. 15. Ughtn|ng For added protection for this productduring a Lightningstorm, or when productis l,effunattended and unused for Long periodsof time, unplugit from the watt outlet and disconnectantenna or cable system. Thiswil,l, prevent damageto product due to lightning and power l,foesurges. 2t.
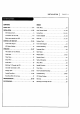
INSTALLATION CONTENTS I PAGE 5 INDEX SAFETYTIPS............................. 2-4 INSTALLATION .......................... 6-12 VCRFeaturesChart ........................ 6 Connections for YourVCR .................. Beforeyou operate your VCR............... CONTROLSAND DISPLAYS.................. 7-8 9-12 13-14 AudioMenu .............................. 19 Auto Channe[Search...................... Connections ...................... 11, 18 ..... 7-8, 21 Channel.Add/De{ ........................
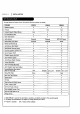
PAGE 6 I INSTALLATION This pageshowsthe features of your VCRand the differencesbetween the models. FEATURES VRB210 VRB410 VRB420 SpeakEZFunction X X X g-Heads X N/A N/A N/A X X Fu!,!, Load/QuickStart X X X Auto Head C!,eaner X X X Audio System Monaurat Monaurat MTS Hi-Fi Stereo Audio/Video (A/V) ,lacks Monaural. Monaura!, Stereo Remote Contro!, SC411Z X X X Auto/Manua!. Band Se[[ect X X X Auto/ManuaL Channel.
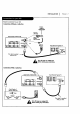
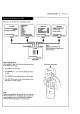
INSTALLATION ] PAGE Required connections for yourVCR. Connections Without a Cable Box Antenna Rat Wire (300 ohm) Back Pane[ of Stereo VCR S S ..... 300/75 ohm Adaptor S OR ., (Notprovi_ OR CableTV Watt3ack Back Pane[of Typical "IV %% VHF/UHF_TV This came is provided with your VCR. _k Turn offmalting power any or unplug VCR before connections. Connections With a Cable Box BackPane[of TypicaI.1_/ Back Pane[ of TypicaI, CabLeBox CabLe W WaU ,lack This cable is provided with your VCR.
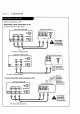
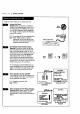
PAGE 8 I INSTALLATION OpUonaLconnectionsfor your VCR. Audio/Video (A/V) ConnecUons to TV Use A/V connectionsfor a better picture. Back PaneLof Stereo VCR Back Panetof TypicalTV (1 11÷VHF/UHFICA'r7 orumoffpower unplug VCR before making any connections. A A/_/ cableis not providedwith VCR. Back Panel of Monaural VCR BackPanetof TypicatMonauraL AUDIO VI IN Note:If the backpanel on yourTVis different, referto the 7_s operating guide. A/V cable is not provided with VCR.
INSTALLATION Things you must do beforeyou CLOCK MENU AUTO DAYUGHT SAVING:ON BON I_OFF MANUAL CLOCK SET:IJ] Pressnumberkeys QUff = exit I PA G E 9 can operate your VCR. • PROGRAM[] MONTH DAY START STOP CHANNEL : SPEED : REPEAT: (1-8) to select program ENTERto adjust program CLOCK AUD_MENU AUTOPROGRAM: CH.
PAGE I INSTALLATION 10 Thingsyou must do beforeyou can operate your VCR. Connect (Required) the Power Plug your VCR into an unswitched SW]TCH WALL 120 Vac, 60 Hz household power outtet. Turn on the VCR by pressing the POWER on the remote I D ! | | or on the VCR'sfront paneL. White ptugged into an AC outtet, the VCR consumes 3W of e|ectrical power in OFF condition. ]Do not plug the VCRinto a switchedpower outlet. Otherwise,whenthe power is switchedoff, the VCRturns off.
INSTALLATION I PAGE 11 Somethings you must do and others you may want to do beforeyou can operate your VCR. Set Date and Time for Clock (Required) Set the clockin the VCRto the currentdate and time. SeeCLOCKMenu on page 16 for details. [] Youmust set the clockbeforeyou any Timer-controUed VCRfeotures,conuse e.g. TIMERrecordings. Press 3.
PAGE 12 I INSTALLATION Thingsyou may want to do before you operate your VCR. SeLect Other Menu OpUons You may not want to havethe clock in your VCR adjusted automatically for DayLightSavings Time. Refer to CLOCKMenu for details. Press 1. CLOCK MENU AUTODAYUGHT SAVING:ON BONBOFF Sp_keZ MANUAL CLOCK SET.'El Pre. numbwke_ Gun":exit PressNUMBER(1 or 2) to choose Auto Dayt|ght Saving ON or OFF Promhumorkeys MAIN MENU Press4.
CONTROLS AND DISPLAYS I PAGE 13 Descriptionsof items you need to knowto operate your VCR. Front PaneLControLs Thesecontrolsperformbasic VCRoperations.The Remoteperformsbasicas weU.as advancedVCRoperations. POWEROn/Off Button Cassette Compartment Channel Up/Down SeLector \ Stop/Eject Selector zenith ooooo: / PLAY,REW(Rewind), F FWD(Fast Forward), PAUSESetector LEOFront _net LED FrontPanel Zndicators Recording Speed Setector RECiITR (Instant Timer Record)Se[ector Indicators power VCRis turn
PAGE 14 J CONTROLS AND DISPLAYS )n-Screen dispLaysteLLyou the status of the tape inserted and VCRfunctions. 1[ Currentmodeof operation (STOP,PAUSE,RECORD,PLAY,etc.
OPERATION I PAGE 15 A quick Est of all.the buttons on your remote control and what they do. CH (V/A) -- ChannelSeLectors.ALsoselects AUX A/V input channel CM SKIP -- Fastforwardspicture searchthrough 30 secondsof recording. E3ECT-- Ejectsthe tape from the VCR. ENTER-- Programsmenu options and showsVCR display. TurnsVCR Exits An ChoesesTa Recording Speed _Shows main menu AccessesTape Counter Enters F FWD (Fast Eonvard)--Advancestape rapidly.
PAGE 16 I OPERATION The Clock Menu sets the clockin VCRto the current time. HOW to Access Auto Daylight Savings Time This VCRcan adjust the clock automaticaUyfor Daylight Savings Time. CLOCKMENU 1. PressMENUto see Main Menu. 2. Press1 to see CLockMenu. 3. Press1 to chooseON on the Clock Menu. AUTODAYLIGHTSAVING.'ON lION EIOFF MANUALCLOCKSET:B Prw numuwby_ QUIT=exit Note: We recommendthat you set the clock usingthe MANUALmethod the first Ume you use yourVCR. See MANUALoption for details.
OPERATION J PAGE 17 The TIMERMenuteLLsthe VCRwhen to recorda programon a day and at a time you specify. You can specify eight different events to be recordedin a one-year period. Speak=-/ Press2 OLd*i| TIMER SEllJp AUDIO Prims nuraberlur/s _yiT =,_tt Month of Recording--.
PAGE !8 I OPERATION The SETUPMenu customizesthe VCR'soperaUonfor your particularneeds. r SETUPMENU ChooseSETUPMenu as describedin _How to AccessMenus"on page 9. CH. ADDIDEL: SOURCE: ON-SCREENDISPLAY: AUTOPROGRAM: LANGUAGESELECT: Press number keys QUIT : exN AUTOPROGRAM Findsall active channels and storesthem in the VCR'smemoryfor accessby CH (V/A). 1 to begin search. Press CH. ADD/DEL Editsthe channelsfound by AUTOPROGRAM,Usenumberkeys followed by ENTERto setect the channe[to be edited (e.
OPERATION I PAGE 19 TheAUDIO Menu specifiesthe audio format to be usedwhen recordingor playing a tape. (Audio menu's PLAYBACK and RECORD options are avaltabie only with stereo VCRs.) TheAUDIO Menu indicates the audio format used when recordingor playing a tape. ChooseAUDIOMenu as describedin "How to AccessMenus" on AUDIOMENU SpeakEZ:ON iliON FJOFF PLAYBACK:HI-FI RECORD:STEREO page 9. PressENTER(and repeat) to choose items in the menu (somemodeLs).
PAGE 20 I OPERATION This page showsa typical video systemand explains how to seLectchanneLs. AIL-Chamne|, Antenna ZenithW 7 CableW Zenith StereoVCR w_ • Or CHANNEL VHF-UHF sin34 TypicaL CableBox AUDIO VIDEC OUT OUT VHFJU HFF-AW _tem I _ _Ou_u_tx to VCR IN VCROut_t to W (Channel3 or 4 when VCRis on ind TV/V_R in Y_Epo=_don) .. kedio/_deo VIDEO _ AUDIO i_l Output to IV Selecting ChanneLs when the VCR is OFF 1. TurnTVon. SeLectingChanneLs at the VCR when VCR is ON !.
OPERATION I PAGE This page describeshow to connect a camcorderto your VCR. BackPaneLof StereoVCR A Tum beforemakingany off poweror unplugVCR connections. A/V cable is not providedwith VCR. SeLectAUX for Viewing an Audio/Video source Like a CamcoMer 1. With TV and VCRon, place VCRin VCRmode by pressingthe TV/VCRbutton on the remote (and repeat) until the VCR indicator Lightappearsin the VCR'sfront paneL. 2. SeLectchannel3 (or 4) on the TV.
PAGE 22 J OPERATZON This pageexplains the basicsof playing tapes in your VCR. Automatic Playback (No Safety Tab) 1. Tape playbackbegins automaticaLLy, if the safety tab has been removed from the cassettecase. For example,most rental movies have no safety tab. Simply insert the prerecordedVHScassetteinto the VCR.Power wilt turn on automaticaLLy and playbackwilt begin. VCR'sControLs 2.
OPERATION I PAGE 23 This page explainshow to usethe remote to pLaytapes on your VCR. Auto/ManuaL Tracking Adjustment YourVCRadjusts tracking automaticatLywhen you play a tape. If the tape was recordedon a different VCR,streaks(video noise) may appear.WhiLethe tape is pLaying,pressTRK(V/A) to adjustthe tracking manually. Real-Time Tape Counter PressENTERtwice to keepthe tape counter on the TV screen. PressENTERrepeatedlyto removeat[ displays.
PAGE 24 I OPERATION Recordingwhat you are watching on W. Options You Can Use While Recording Instant recording lets you recorduntil you reachthe end of tape or you pressSTOPto stop recording. _i_ power Turn TVand VCRon. Remote's Controls PlaceVCRin VCRmode by pressingthe TV/VCR button on the remote repeatedly until the VCR indicator tight appearsin the VCRfront panel. SeLectchannel3 or 4 at the TV.If you have connectedyour VCRto the W's A/V input jacks, sel.
OPERATION ] PAGE Recordingusing preset time periods. Preset Time Periods for [TR Recording. Note: Preset recordingtime countsdown until the recording time is over. powsr Q Instant (attended) Timer Recording(ITR) Letsyou recordfor a specificpreset time period, instead of recordinguntil the end of tape is reached. For example, you can recorda 30-minute showusingthe preset time period. B TurnTV and VCRon.
PAGE 26 I OPERATZON Recordingoneshow white watching another. Note: If you have a cable box connectedto your VCR,you cannot recordone showand watch another. powt_r Choose the show you wish to record using the VCR's channel selector. Choose the show you wish to watch using the TV's channel selector. Remote's ControLs TurnTVand VCRon. PLaceVCRin VCRmode by pressingthe TV/VCR button on the remote repeatedly until the VCR indicator tight appearsin the VCRfront paneL.
OPERATZON J PAGE 27 Thispage explains how to use the Timer sothat you can recordwhile you are away. $peakEZ Press 2 11UER SETUP CLOCK AUDIO ! Press number keys QUIT = exit MAIN MENU • PROGRAU[] MONTH: MONTH DAY START STOP CHAHNEL: SPEED : REPEAT: (14) toselectprogram ENTERto adjust program TIMER MENU DAY m u for Program 1 Timer-controLLed recordingLets you record shows unattended. Pick a day and time up to one year in advance. The showmay be recorded once or on muLtipLedays.
PAGE ?8 I TROUBLESHOOT]NG Some quickand easytips to fixing problemsyourself. Before Catting for Service PLeaserefer to this chart before caLUngfor service. First, turn on the IV and VCR.SeLectappropriate input for the IV to receivethe video signal from the VCR.You wiU probablyuse the Antenna In connectionto the TV. SeLectchannel3 or 4 at the TV. Placethe VCRin the VCRmode by pressingthe TV/VCRbutton on the remote repeatedlyunU[ VCRindicator Light appearsin the VCRfront paneL.
TROUBLESHOOTING I PAGE Some quick and easy tips to fixing problemsyourself. Channel.Tuning Probl.ems ObservedCondition Possible Cause Probable Sol.ution Somechannelsare skippedover when usingCH (V/A). Thosechannels were deleted with the CH. ADD/DELoption. Use CH. ADD/DELto restore channels. SeeSETUPMenu on page 18 for details. Picture and soundare weak or missing. Antenna or cablesare loose. WrongSOURCEoption is being used. Tighten connectionsor replace cable. Try all SOURCEopUons.
PAGE 30 I TROUBLESHOOTING Somequick and easy Lipsto fixing problemsyourself. MoistureCondensation Moisture condensation can occur: In Locationswhere moisturecondensationmay occur: • When the video recorder is moved from a cold place to a • Keepthe powercord pluggedinto an ACoutlet and POWEROn. This wilLheLpprevent condensation. warm place. • Under extremely • When condensationhas occurred,wait a few hoursfor the VCRto dry beforeusing it. humid conditions.
SPECIFICATIONS I PAGE 31 GENERAL HeadSystem Power Source PowerConsumption Dimensions OperatingTemperature OperatingHum|d_y Timer Weight Tape Speed (WxHxD) (sP) (LP) (EP) Tape width Maximum RecordingTime (SP) (EP) RewindTime TUNER Antenna VHF Output Signal ChannelCoverage (UHF) (VHF) 75 ohms 75 ohms Channe| 3 or 4 (VHF) (UHF) (CAW) 2-13 14-69 1-125 (4A,A-W,W+1~W+84, A-5~A-1) VIDEO Video S_JnalSystem EIA Standard (525 Unes, 60 fields) NTSCtype color signal 1.0 Vp-p 75 ohms unbalanced 1.
VHS TAPE REWINDER Most repair work on VCRs and Camcorders is due to excessive rewindinq. ProLong the Life of your video equipment with our rewinder r ZEN 901 ONLY $14.• 99 "_'" S.wm_ & .*.DLmi WIRELESSINTERCOMSET Kids watching movies in another room? Baby in another room as you watch TV? Keep tabs on them with our inexpenswe intercom set.
NOTES I PAGE 33
PAGE 34 I NOTES
NOTESt PAGE 35
V]OEOCASSETTE RECORDER O_PLAYER WeLcome into theZenithfamily! Webe_ that youwill be pleased w_h_r newZenithEntevrtainrnent Machine._easeread thiswamntycarefoL_, it is a "LIMITEDWARRANIY" asdefinedunderFederalLaw.Thiswarranty_ youspecificlegalrights, andyoumayaLsohaw otherdghtsthat vaq/fromstatetostatewithinthe U.S.A.