Installation and Operating Guide | Warranty Model Numbers | Z44SZ80/Z52SZ80 | DLP PROJECTION © Copyright 2005, LG Electronics USA, Inc.
Warning/Caution Warning/Caution WARNING/CAUTION RISK OF ELECTRIC SHOCK DO NOT OPEN WARNING/CAUTION: TO REDUCE THE RISK OF ELECTRIC SHOCK DO NOT REMOVE COVER (OR BACK). NO USER SERVICEABLE PARTS INSIDE. REFER TO QUALIFIED SERVICE PERSONNEL.
Safety Instructions Safety Instructions IMPORTANT SAFETY INSTRUCTIONS Important safety instructions shall be provided with each apparatus. This information shall be given in a separate booklet or sheet, or be located before any operating instructions in an instruction for installation for use and supplied with the apparatus. This information shall be given in a language acceptable to the country where the apparatus is intended to be used.
Safety Instructions 13. Unplug this apparatus during lightning storms or when unused for long periods of time. 14. Refer all servicing to qualified service personnel. Servicing is required when the apparatus has been damaged in any way, such as power-supply cord or plug is damaged, liquid has been spilled or objects have fallen into the apparatus, the apparatus has exposed to rain or moisture, does not operate normally, or has been dropped. 15.
Contents Contents Warnings/Caution . . . . . . . . . . . . . . . . . . . . . . . . . . . . . . .2 Safety Instructions . . . . . . . . . . . . . . . . . . . . . . . . . . . . .3~4 Introduction Controls . . . . . . . . . . . . . . . . . . . . . . . . . . . . . . .6 Connection Options . . . . . . . . . . . . . . . . . . . .7~8 Remote Control Key Functions . . . . . . . . . . .9~10 Installation External Equipment Connections . . . . . . . . . .11~16 Antenna or Cable Connection . . . . . . . . . . . . . .
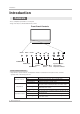
Introduction Introduction Controls - This is a simplified representation of a front panel. - Image shown may be somewhat different from your TV.
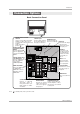
Introduction Connection Options Back Connection Panel DIGITAL AUDIO OPTICAL OUTPUT Used to connect either an external amplifier, or add a sub-woofer to your surround sound system if it has a digital audio optical input. (Refer to 1 ) DIGITAL AUDIO OPTICAL INPUT(COMPONENT2) Connect digital audio from the equipment connected to COMPONENT 2. CABLE Inputs ANTENNA Inputs Connect cable signals to Connect antenna sigthe TV, either directly or nals to the TV directly. through your cable box.
Introduction Front Connection Panel There are four jacks on the left side on your projection TV that make connecting Audio/Video devices like video games and camcorders very simple. The jacks are like those found on the back jack connection panel. This means that most equipment that connects to those types of jacks on the rear jackpack, may be connected to the front connection panel. To use the side jacks as the signal source, select them using Main Input menu as described on page 23.
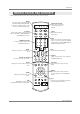
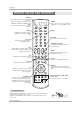
Introduction Remote Control Key Functions - When using the Remote Control, aim it at the remote control sensor on the TV. MODE Selects the remote operating mode: TV, VCR, Cable, DVD and Satellite. Select other operating modes, for the remote to control external devices. VCR CABLE DVD SAT TV MODE TV/VIDEO Selects: Analog, Video1, Video2, Front video, Component1-2, RGB, HDMI1/DVI and HDMI2 input sources. NUMBER KEYPAD For direct channel selection and programming functions.
Introduction Remote Control Key Functions TV INPUT • Rotates the input mode between Antenna and Cable. • Video 1-2, Front Video, Component 1-2, RGB-DTV (or RGB-PC), HDMI1/DVI and HDMI2 input sources, TV will return to the last TV channel. VCR CABLE DVD SAT TV MODE LIGHT POWER TV/VIDEO TV INPUT EZ Video Adjusts the factory preset picture depending on the viewing environment. EZ Sound Selects the sound appropriate for the program's character.
Installation Installation External Equipment Connections Antenna or Cable Connection 1. Analog and Digital TV signals provided on antenna - Wall Antenna Socket or Outdoor Antenna without a Cable Box Connections - For optimum picture quality, adjust antenna direction if needed. Multi-family Dwellings/Apartments (Connect to wall antenna socket) Wall Antenna Socket ANTENNA Copper Wire RF Coaxial Wire (75 ohm) VHF Antenna Turn clockwise to tighten.
Installation 3. Analog and Digital TV signals provided on cable and antenna Antenna Copper Wire RF Coaxial Wire (75 ohm) ANTENNA Cable TV Wall Jack Turn clockwise to tighten. RF Coaxial Wire (75 ohm) CABLE Copper Wire • To improve the picture quality in a poor signal area, please purchase a signal amplifier and install properly. • If the antenna needs to be split for two TV’s, install a “2Way Signal Splitter” in the connections.
Installation External A/V Source Setup How to connect Connect the audio and video cables from the external equipment's output jacks to the TV input jacks, as shown in the figure. When connecting the TV to external equipment, match the jack colors (Video = yellow, Audio Left = white, and Audio Right = red). RGB INPUT PC/DTV (XGA/ 480p/ 720p/ 1080i) S-VIDEO MONITOR INPUT2 OUT Camcorder INPUT1 RGB/DVI INPUT VIDEO VIDEO How to use (L) 1.
Installation HDSTB Setup - This TV can receive Digital Over-the-air/Cable signals without an external digital set-top box. However, if you do receive Digital signals from a digital set-top box or other digital external device, refer to the figure as shown below. - This TV supports HDCP (High-bandwidth Digital Contents Protection) protocol for Digital Contents (480p,720p,1080i).
Installation PC Setup - This TV provides Plug and Play capability, meaning that the PC adjusts automatically to the TV's settings. - The TV perceives 640x480, 60Hz as DTV 480p based on the PC graphic card, change the screen scanning rate for the graphic card accordingly. How to connect 1. Connect the PC to HDMI1/DVI port of this TV with an HDMI-to-DVI cable(not supplied with this product).
Installation Digital Audio Output ANTENNA Send the TV’s audio to external audio equipment (stereo system) via the Digital Audio Output (Optical) port. How to connect 1. Connect one end of an optical cable to the TV Digital Audio (Optical) Output port. 2. Connect the other end of the optical cable to the digital audio (optical) input on the audio equipment. 3. Set the “ TV Speaker option - Off” in the AUDIO menu. Refer to page 26. See the external audio equipment instruction manual for operation.
Installation HDMI - HDMITM, the HDMI logo and High-Definition Multimedia Interface is a trademark or registered trademark of HDMI Licensing. - This TV can receive the High-Definition Multimedia Interface(HDMI) or the Digital Visual Interface(DVI). - This TV supports HDCP(High-bandwidth Digital Contents Protection) Protocol for 720x480p, 1280x720p, and 1920x1080i resolutions.
Installation Reference Cable sample HDMI Cable (not supplied with the product) HDMI to DVI Cable (not supplied with the product) Fiber Optic Digital Audio Cable (not supplied with the product) Analog Audio Cable(RCA type) (not supplied with the product) Analog Audio Cable(Stereo to RCA type) (not supplied with the product) 18 DLP Projection TV
Installation How to use 1. Connect the HDMI1/DVI Source Devices(DVD Player or Set Top Box or PC) and the TV SET. 2. Turn on the display by pressing the POWER button on the TV SET and HDMI1/DVI Source Devices remote control. 3. Select HDMI1/DVI Input source in Main Input option on the SETUP menu.(Refer to P.23) 4. Check the image on your TV SET. There may be noise associated with the resolution, vertical pattern, contrast or brightness in HDMI1/DVI Source Devices.
Operation Operation Turning the TV On * In this manual, the OSD (On Screen Display) may be different from your TV’s because it is just an example to help you with the TV operation. Turning on the TV just after installation 1. Connect power cord correctly. At this moment, the TV is switched to standby mode. 2. Press the POWER or CH (D / E) buttons on the TV front panel or press the POWER, TV/VIDEO, TV INPUT, CH (D / E) or Number (0 ~ 9) buttons on the Remote Control to turn the TV on.
Operation TV Setup On-screen Menus Language Selection - The menus can be shown on the screen in the selected language. First select your language. 1. Press the MENU button and then use menu. 2. Press the G button and then use D / E D / E button to select the OPTION button to select Language. 3. Press the G button and then use D / E button to select your desired language. From this point on, the on-screen menus will be shown in the selected language. 4.
Operation Setup Menu Options EZ Scan (Channel Search) - Automatically finds all channels available through antenna and cable inputs, and stores them in a channel list in the memory. - Run EZ Scan again after any Antenna/Cable connection changes. 1. Press the MENU button and then use 2. Press the G button and then use D /E D /E button to select the SETUP menu. button to select EZ Scan. 3. Press the G button or ENTER button to begin the channel search.
Operation Channel Label Setup - Choose preset labels for your channels. - If a channel label is provided on the signal from the broadcasting station, the TV displays a short name for a DTV channel - even if you didn't preset a label for the channel. 1. Press the MENU button and then use 2. Press the G button and then use D /E D /E button to select the SETUP menu. button to select Channel Label. 3. Press the G button. You will now see a screen filled with Labels and a preview screen. 4.
Operation V ideo Menu Options EZ Picture - EZ Picture adjusts the TV for the best picture appearance. Select the preset value in the EZ Picture menu based on the program category. - When adjusting Video menu options (contrast, brightness, color, sharpness, tint, and color temperature) manually, EZ Picture automatically changes to Custom. - Daylight, Normal, Night Time, Movie, Video Game, and Sports settings are preset for optimum picture quality at the factory and are not adjustable. 1.
Operation Audio Menu Options Audio Language - Other languages may be available if a digital signal is provided by the broadcasting station. SETUP Audio Language EZ SoundRite VIDEO EZ Sound G English Spanish French Balance 1. Press the MENU button and then use D 2. Press the G button and then use /E button to select the AUDIO menu. AUDIO button to select Audio Language. D /E Bass TIME 3. Press the French.
Operation Audio Menu Options Front Surround - is a trademark of SRS Labs, Inc. - TruSurround XT technology is incorporated under license from SRS Labs, Inc. - Manufactured under license from Dolby Laboratories. “Dolby” and the double-D symbol are trademarks of Dolby Laboratories. 1. Press the MENU button and then use D 2. Press the G button and then use D /E 3. Press the G button and then use D Retrieval System) TruSurround XT. /E button to select the AUDIO menu. button to select Front Surround.
Operation T ime Menu Options Auto Clock Setup - The time is set automatically from a digital channel signal. - The digital channel signal includes information for the current time provided by the broadcasting station. - Set the clock manually, if the current time is set incorrectly by the auto clock function. 1. Press the MENU button and then use D /E button to select the TIME menu. 2. Press the G button and then use D /E button to select Auto Clock. 3.
Operation T ime Menu Options Sleep Timer - The Sleep Timer turns the TV off after a preset amount of time. Note that this setting is cleared when the TV is turned off. - You can also set up the Sleep Timer in the TIME menu. 1. Press the SLEEP button repeatedly to select the number of minutes. First the Off option appears on the screen, followed by the following sleep timer options: 10, 20, 30, 60, 90, 120, 180, and 240 minutes. 2.
Operation Option Menu Options Aspect Ratio Control - Lets you choose the way an analog picture with a 4:3 aspect ratio is displayed on your TV with a 16:9 ratio picture format. When you receive an analog picture with a 4:3 aspect ratio on your 16:9 TV, you need to specify how the picture is to be displayed. - Horizon aspect ratio is not available for Component 1-2 (720p/1080i)/RGB-DTV (720p/1080i)/HDMI1/DVI-DTV(720p/1080i), HDMI2DTV(720p/1080i)/ CADTV, DTV(720p/1080i) input source.
Operation Option Menu Options Caption 1. Press the MENU button and then use D 2. Press the G button and then use 3. Press the G button and then use D D /E button to select the OPTION menu. / E button to select Caption. / E button to select On or Off. 4. Press EXIT button to return to TV viewing or press MENU button to return to the previous menu. Caption/Text Caption/Text Analog Broadcasting System Captions - Select a caption mode for displaying captioning information if provided on a program.
Operation Caption Option - Customize the DTV/CADTV captions that appear on your screen. button to select the OPTION 1. Press the MENU button and then use menu. D /E 2. Press the G button and then use D /E button to select Caption Option. 3. Press the G button and then use F /G button to select Custom. 4. Use D / E button to customize the Style, Font, etc., to your preference. A preview icon is provided at the bottom of the screen, use it to see the caption language.
Operation Lock Menu Options Parental Control can be used to block specific channels, ratings and other viewing sources. The Parental Control Function (V-Chip) is used to block program viewing based on the ratings sent by the broadcasting station. The default setting is to allow all programs to be viewed. Viewing can be blocked by the type of program and by the categories chosen to be blocked. It is also possible to block all program viewing for a time period.
Operation Parental Lock Setup - Set up blocking schemes to block specific channels, ratings, and external viewing sources. - A password is required to gain access to this menu. 1. Press the MENU button and then use D Then, press the G button /E button to select the LOCK menu. • Enter the password as requested. • The TV is set up with the initial password “0-0-0-0”. 2. Use the D / E button to choose from the following Lock Menu options. Once the option is selected, change the settings to your preference.
Operation Remote Control PIP (Picture-In-Picture) / Twin Picture - PIP lets you view 2 different inputs (sources) on your TV screen at the same time. One source will be large, and the other source will show a smaller inset image. - Twin Picture mode splits the screen into 2, allowing 2 picture sources to be shown on the TV screen at the same time. Each source is given half the screen. - If you set the block/rating for Lock menu options in PIP/Twin Picture mode, “Rating Blocked” doesn’t display on screen.
Operation Moving the PIP sub picture In PIP mode, press the screen. D /E /F /G button to move the sub picture to a different location on the Adjusting Main and Sub Picture Sizes for Twin Picture Use the i.e) D /E /F /G button to change main and sub picture sizes in Twin Picture mode. If screen is adjusted to the maximal size, the large screen appears the black part at both the up and down sides.
Operation Brief Info. Operation: • Watching TV/DTV/CATV/CADTV • Watching Video1, Video2, Video3 • In Component1, Component2, RGB, HDMI1/DVI, HDMI2 modes, INFO button is not working. 4:3 16 : 9 Screen Ratio of Input Signal 4:3 Screen Ratio of Input Signal 16:9 Resolution Resolution Resolution 1080i Resolution 480i Function: • Show the present screen information. • On Watching with the upper Input signal, press the INFO button. • Press the INFO button or EXIT button to exit.
Operation EZ Mute - If you set the Caption on, nothing to do with the MUTE button, Caption function operates as Caption on or off. - When you repeatedly press the MUTE button, the screen is displayed in turn. (Refer to the lower picture) Mute EZ Mute EZ Mute : a special mute mode to activate the closed caption, automatically. Mute : Sound is muted. 24 Mute Off : Sound is enabled. Note: EZ Mute only operates in DTV/Analog/Video/Front Video.
Operation Screen Setup for PC mode Operation • When RGB connect to PC input and select the RGB-PC in Main Input, this function is used. • In RGB-DTV mode, SIZE is not available. Adjustment for screen Position, Size, Phase, Reset •After connecting RGB-PC to PC input and checking the screen quality. - Display PC Adjust Menu using ADJUST button. - Position : Adjust the screen position. After displaying the Adjust, select the screen position. - Size : Adjust the screen size.
Programming the Remote Programming the Remote The Remote Control for your HD receiver is a multi-brand or universal Remote Control that can be programmed to operate most remote-controllable devices of other manufacturers. Note: The Remote Control may not be able to control all models of other brands. 1. Test your Remote Control.
Programming Codes Programming Codes TVs Brand Codes Brand Codes Codes Brand A MARK 112 143 GOLDSTAR 004 102 106 019 024 040 Sharp ADMIRAL 072 081 161 110 112 113 056 130 132 022 028 029 AKAI 006 146 116 119 122 134 081 143 170 AMPRO 073 167 127 137 143 NIKEI 043 AMSTRAD 052 HALL MARK 004 116 ONKING 043 SIEMENS 088 043 054 056 HITACHI 072 ANAM AOC 004 006 009 ONWA 043 SIGNATURE 010 011 012 OPTONICA 019 081 SONY 112 115 118 023 041 075 PANASONIC 034 056 080
Programming Codes SAT SAT Brand ALPHASTAR DSR AMPLICA BIRDVIEW BSR CAPETRONICS CHANNEL MASTER CHAPARRAL CITOH CURTIS MATHES DRAKE DX ANTENNA ECHOSTAR ELECTRO HOME EUROPLUS FUJITSU Codes 123 050 051 126 053 053 013 014 018 036 008 009 077 054 050 145 005 006 010 011 112 116 024 046 076 038 040 058 093 095 096 098 099 122 089 114 017 021 027 133 129 015 055 012 007 052 141 056 057 094 097 100 Brand Codes GENERAL INSTRUMENT 003 004 029 031 101 HITACHI 139 140 HOUSTON TRACKER 033 037 051 057 HUGHES 068
Troubleshooting Checklist Programming Codes DVD Brand APEX DIGITAL DENON GE GOLDSTAR HARMAN KARDON JVC LG Codes Brand 022 020 014 MAGNAVOX 005 006 MARANTZ 010 016 025 MITSUBISHI 027 NAD 012 ONKYO 001 010 016 PANASONIC 42 DLP Projection TV Codes 025 013 024 002 023 008 017 003 009 Brand PHILIPS PIONEER PROCEED PROSCAN RCA SAMSUNG SONY Codes 013 004 026 021 005 006 005 006 011 015 007 Brand THOMPSON TOSHIBA YAMAHA ZENITH Codes 005 006 019 008 009 018 010 016 025
Troubleshooting Checklist Troubleshooting Checklist • Check whether the TV is turned on. No picture & No sound • Is the power cord inserted into wall power outlet? • Test the wall power outlet, plug another product’s power cord into the outlet where the TV’s power cord was plugged in. Picture OK & No sound • Press the VOLUME (G) button. • Sound muted? Press MUTE button. • Check to see if there is any object between the TV and the Remote Control causing obstruction.
Troubleshooting Checklist Troubleshooting Checklist No output from one of the speakers • Adjust Balance in the AUDIO menu. (Refer to p.25) Unusual sound from inside the TV • A change in ambient humidity or temperature may result in the unit turning off and does not indicate a fault with the TV. Poor TV input signal • Check ANTENNA and CABLE connection. Poor Video signal • Check ANTENNA and CABLE connection. No channel or a few channel Unsuitable Aspect Ratio 44 DLP Projection TV • Start EZ Scan.
Maintenance Maintenance - Early malfunctions can be prevented. Careful and regular cleaning can extend the amount of time you will have your new TV. Be sure to turn the power off and unplug the power cord before you begin any cleaning. Cleaning the Screen 1. Here’s a great way to keep the dust off your screen for a while. Wet a soft cloth in a mixture of lukewarm water and a little fabric softener or dish washing detergent. Wring the cloth until it’s almost dry, and then use it to wipe the screen. 2.
Product Specification Product Specifications MODEL Z52SZ80 Z44SZ80 Horizontal Size (inches) 39.9 47.5 Height (inches) 29.2 33.8 Depth (inches) 14.4 16.1 Weight (lbs.) 57.3 83.6 Power requirement AC120V ~ 60Hz Television System NTSC-M, ATSC, 64 & 256 QAM Program Coverage VHF 2 ~ 13, UHF 14 ~ 69, CATV 1 ~ 135, CADTV 1 ~ 135.
Notes Owner’s Manual 47
ZENITH ELECTRONICS CORPORATION DLP Projection TV Limited Warranty - USA Zenith will repair or replace your product, at Zenith’s option, if it proves to be defective in material or workmanship under normal use, during the warranty period ("Warranty Period") listed below, effective from the date ("Date of Purchase") of original consumer purchase of the product. This warranty is good only to the original purchaser of the product and effective only when used in the United States, excluding U.S. Territories.