ZN411 Front Cover Art
Table of Contents Introduction ...................................................... 3 Setup ............................................................... 4 Battery Installation ....................................... 4 Battery Saver ............................................... 4 Code Saver ................................................. 4 Power-On default ........................................ 5 TV Punch Through ....................................... 5 VCR Punch Through .........................
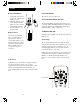
Setup Battery Installation Power-On Default 1. On the back of the remote, push down on the tab and lift the cover off. 2. Match the batteries to the + and - marks inside the battery case, then insert 2 AAA Alkaline batteries. 3. Press the battery cover back into place. The remote powers on in TV mode.
Button Functions, cont. Button Functions Some buttons on the remote might have functions that are referred to by different names on the device you are controlling. E.G. Prev. Ch. may be called RECALL, or ENTER may be called DISPLAY. These differences depend on the brand and model of your product. Also, this remote can only operate features that exist on your product. E.G., your product must be equipped with Prev. Ch. ability for the Prev. Ch. button to operate this feature.
Advanced Button Functions DVD TV/VCR Punch-Through Scan+ and Scan- buttons control the speed of Fast Forward and Reverse Playback respectively. Chapter+ and Chapter- buttons respectively locate the succeeding or preceding Chapters or Tracks on a disc. Repeat button performs DVD players “A-B Repeat” (or RPT A.B) function for repeat play of current Chapter or Track. Play button is used to start Disc playback and for Menu selection on some DVD players. Stop button stops Disc playback.
Code Entry Direct Code Entry Programming with Code Search 1. Press and hold the Code Search button until the red indicator stays on. Release the Code Search button. 2. Press and release the desired mode button (TV, VCR, etc.). The red indicator blinks, then stays lit. 3. Enter the 3 digit code from the code tables. Note: after a valid code entry, the red indicator turns off. For an invalid code, the red indicator flashes. 4. With your device on, press CHANNEL Up.
Code Identification Code Identification 1. Press and hold Code Search button until the red indicator stays on. Release the Code Search button. 2. Press and release the desired mode button (TV, VCR, etc.). The red indicator blinks, then stays lit. 3. Press and release the Code Search button. The indicator light blinks off. 4. To find the first digit for the code stored under the mode key pressed in step 2, press each numeric key from 0-9 in turn.
FISHER ....................... 506 522 ............................. 606 619 902 FUJITSU ..................... 206 321 FUNAI ................ 206 805 906 FUTURETEC ............ 805 906 GE ........ 002 006 007 018 107 ............. 114 310 312 502 601 ............. 704 719 803 806 810 ..................................... 901 911 GIBRALTER .............. 002 713 GOLDSTAR 002 102 117 207 ............. 217 307 502 818 914 GRUNDY .................... 206 906 HALLMARK ............. 002 502 HARVARD ..............
HYTEX ............................. 847 JASCO ................................ 748 JERROLD ........... 048 050 148 ............. 254 348 449 454 552 ............. 554 652 747 752 947 MAGNAVOX .................... 150 MEMOREX ....................... 250 MOVIE TIME ........... 350 847 NSC ............................. 350 847 OAK .................... 249 550 847 PACE ................................. 854 PANASONIC .............. 452 647 PARAGON ........................ 250 PHILIPS ..... 150 549 650 748 ......
Product Operation Troubleshooting After the batteries are installed and you have programmed the remote for the codes that operate your products, you can use your remote to operate a TV, VCR, Cable Box, etc. Remote does not operate your product. • • • • Press the mode button of the product you want to control. Program the remote with a new code. Install new batteries. (You might have to reprogram your remote after installing new batteries.) Remote may not be compatible with your product.
90 Day Warranty This product is manufactured to ZENITH specifications and is free from defects in material, workmanship and assembly. This warranty extends only to the original purchaser and is nontransferable. Should a defect occur under normal operating conditions within 90 days from the date of purchase, ZENITH will provide a comparable replacement free of charge within the warranty period, to the original purchaser.