
Operation Manual


ZENNiO AVANCE Y TECNOLOGÍA
4
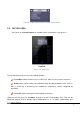
1.2. INSTALLATION
ZAS is connected to the KNX installation as any other KNX device, through the KNX
connector placed at the back.
For installing ZAS, first it is necessary to fix the metallic piece into the squared/rounded standard
box where it is going to be installed, with the corresponding screws.
Next, the KNX bus and the inputs terminal must be connected using the corresponding connectors;
both terminals are placed in the rear part of the device.
Once inputs and bus KNX are connected, the device is fitted in the metal platform thanks to the
included magnets.
Finally, it is necessary to check, from both sides, that nothing unless the ZAS outline can be seen
(the metal platform should be completely hidden by ZAS).
This device does not need any additional external power supply since it is powered through the
KNX bus.
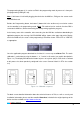
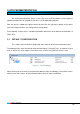
Figure 1.2. ZAS Elements scheme
1.- KNX connection
2.- Temperature sensor
3.- Programming button
4.- Programming LED
5.- Inputs (A/D)
6.- Magnet
7.- Tactile area
8.- Display
9.- IR receiver