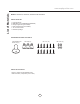
Use, Care, and Installation Guide www.zephyronline.com Spruce AK9834AS AK9840AS AK9846AS AK9858AS INTENDED FOR OUTDOOR COVERED PATIO OR LANAI AREA. Model number: Serial Number: Date of Purchase: Sales Dealer: JUL20.0401 © Zephyr Ventilation LLC.
www.zephyronline.
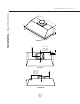
LIST OF MATERIALS.................................................................. 4 INSTALLATION Ducting Calculation Sheet........................................ Mounting Height & Clearance................................. Ducting Options............................................................ Specifications................................................................ Electrical.......................................................................... Installing the One Piece Insert...............
www.zephyronline.com Important Safety Notice READ AND SAVE THESE INSTRUCTIONS WARNING TO REDUCE THE RISK OF FIRE OR ELECTRIC SHOCK, DO NOT USE THIS FAN WITH ANY SOLID-STATE CONTROL DEVICE. WARNING TO REDUCE THE RISK OF FIRE ELECTRIC SHOCK, OR INJURY TO PERSONS, OBSERVE THE FOLLOWING: a. Use this unit only in the manner intended by the manufacturer, if you have questions, contact the manufacturer. b.
TO REDUCE THE RISK OF FIRE, USE ONLY METAL DUCTWORK. CAUTION To reduce risk of fire and to properly exhaust air outside - Do not vent exhaust air into spaces within walls, ceilings, attics, crawl spaces or garages. OPERATION Always leave safety grilles and filters in place. Without these components, operating blowers could catch onto hair, fingers and loose clothing.
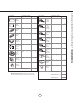
List of Materials www.zephyronline.
Duct pieces Total 1 Ft. x( ) = Ft. 6”, 7”, 8”, 10” 1 Ft. Round, straight x( ) = Ft. 3-1/ 4” x 10” Rect. 90 0 elbow 15 Ft. x( ) = Ft. 3-1/ 4” x 10” Rect. 45 0 elbow 9 Ft. x( ) = 3-1/ 4” x 10” Rect., straight Equivalent number length x used = Total 3-1/ 4” x 10” 5 Ft. Rect. to 6” round transition x( ) = Ft. 3-1/ 4” x 10” 20 Ft. Rect. to 6” round transition 90 0 elbow x( ) = Ft. 6” round to 1 Ft. 3-1/ 4” x 10” rect. transition x( ) = Ft. Ft. x( ) = Ft. 24 Ft. x( ) = Ft.
Installation – Mounting Height & Clearance www.zephyronline.com Minimum mount height between range top to hood bottom should be no less than 30”. Maximum mount height should be no higher than 36”. It is important to install the hood at the proper mounting height. Hoods mounted too low could result in heat damage and fire hazard; while hoods mounted too high will be hard to reach and will lose its performance and efficiency.
NEVER exhaust air or terminate duct work into spaces between walls, crawl spaces, ceiling, attics or garages. All exhaust must be ducted to the outside. Use single wall rigid metal ductwork only. Fasten all connections with sheet metal screws and tape all joints with certified Silver Tape or Duct Tape.
28 -3/ 8” , 34 - 3/ 8” ,4 03/ 8” ,5 3” 34 -3/ 8” ,4 0- 23/ 8” 12” 3/8 ”, 46 - 3/8 ” ,5 87/ 22 8” -1 /2” 5-5/8” (34”)12” (40”)15” (46“)18” (58”)27” elec. k/o Ø 10 ” C/L Top View elec. k/o 4-3/8” (34”)12” (40”)15” (46“)18” (58”)27” C/L Back View 8 2” 3/4 View 10-3/8” Installation – Specifications www.zephyronline.
WARNING All Electrical work must be performed by qualified electrician or person with similar technical know how and background. For personal safety, remove house fuse or open circuit breaker before beginning installation. Do not use extension cord or adapter plug with this appliance. Follow national electrical codes or prevailing local codes and ordinances.
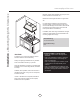
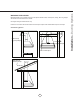
! CAUTION: At least two installers are required due to the weight and size of the hood. If possible, power up and test all functions prior to installation. 1. Remove all packing materials and protective film prior to installation. Use caution during installation to prevent scratches or damage to the stainless steel. 2. Cut out an opening in the bottom of the cabinet by following the dimensions in FIG. 1. 3. Prepare insert for installation into cabinet by following the steps on page 11. 4.
1 1 2 2 2. Remove grease tray by: 1) Pulling up on tray to release from bottom panel. 2) Lifting tray out of insert body. 1. Remove baffle filters by: 1) Pulling filter toward front of insert. 2) Pivoting rear of filter down. 1 Bottom Panel Screws 2 2 Locking Tabs 3. Remove left and right side spacer panels by removing (2) screws from behind each panel. 4. Remove bottom panel by: 1) Removing (2) screws from left and right sides of bottom panel.
Controls – Rotary Controls www.zephyronline.
Do not use corrosive detergents, abrasive detergents or oven cleaners. Do not use any product containing chlorine bleach or any product containing chloride. Do not use steel wool or abrasive scrubbing pads which will scratch and damage surface. Cleaning Stainless Steel Clean periodically with warm soapy water and clean cotton cloth or micro fiber cloth. Always rub in the direction of the stainless steel grain. To remove heavier grease build up use a liquid degreaser detergent.
Maintenance – Lights, Parts List www.zephyronline.com REPLACING LIGHT BULBS CAUTION: Light bulb becomes extremely hot when turned on. DO NOT touch bulb until switched off and cooled. Touching hot bulbs could cause serious burns. Make sure all power is turned off and bulbs are not hot. Remove by turning bulb counter clockwise. FIG 7. Note: Bulb does not unscrew; it turns 60 degrees, stops and falls out.
MAX. HALOGEN LIGHT BULBS. AK9834AS, AK9840AS AK9846AS, AK9858AS VOLTS HZ MAX AMPS 120 60 Dual Motor 9 CIRCUIT DIAGRAM B 34 2 A 15 B 34 2 A Wiring Diagram USE ONLY TYPE MR16, GU10, 35W.
Troubleshooting www.zephyronline.com TROUBLESHOOTING PROCEDURES FOR SPRUCE Issue Cause What to do After installation, the unit doesn’t work. 1. The power source is not turned ON. 1. Make sure the circuit breaker and the unit’s power is ON. 2. The power line and the cable locking connector is not connecting properly. 2. Check the power connection with the unit is connected properly. 3. The switch board and control board wirings are disconnected. 3.
Three Year Limited Warranty for Parts: For three years from the date of your original purchase of the Products, we will provide, free of charge, Products or parts (including LED light bulbs, if applicable) to replace those that failed due to manufacturing defects subject to the exclusions and limitations below. We may choose, in our sole discretion, to repair or replace parts before we elect to replace the Products.
www.zephyronline.com PRODUCT REGISTRATION Congratulations on your Zephyr range hood purchase! Please take a moment to register your new range hood at www.zephyronline.com/registration IT’S IMPORTANT Prompt registration helps in more ways than one. Ensures warranty coverage should you need service. Ownership verification for insurance purposes. Notification of product changes or recalls. Zephyr Ventilation | 2277 Harbor Bay Pkwy. 18 | Alameda, CA 94502 | 1.888.880.