
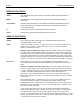
Troubleshooting guide
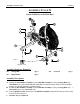
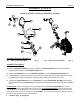
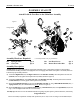

ASSEMBLY STAGE #3
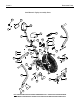
Attach Seat Slider and Seat to Main Base Assembly
Assembly Hardware Required:
#27 Button Head Allen Bolt Qty. 2 #28 Button Head Allen Bolt Qty. 2
Assembly Description:
A) Insert the Adjustable Seat Slider (#7) into the u-channel of the Seat Support Post (#8). Secure the seat slider
assembly in place using the 1-Seat Adjustment Knob (#10).
B) Attach the Seat Back Post (#11) to the Adjustable Seat Slider (#7) using 2-Button Head Allen Bolts (#27).
C) Assemble Seat (#9) onto the knurled post of the seat slider. Set the seat at the desired position and secure it in place
by tightening the u-clamp on the underside. Tighten the clamp until the seat no longer twists or tilts.
D) Assemble the Seat Back Bracket (#13) to the Back Pad (#14) using 2-Button Head Allen Bolts (#28). Slide the
back pad assembly over the Seat Back Post (#11) and lock into a desired position using Back Pad Adjustment Knob
(#12)
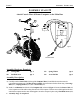
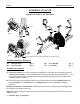
Seat Adjustments: Adjust the seat height by unscrewing and pulling out on the Seat Post Adjustment Knob (#12). Select a
desired seat post height and retighten the knob until seat post is secure. Proper Height Adjustment:
Adjust seat height so the user
is comfortable during use (pedaling motion). As a reference point, the users leg should be slightly bent at the bottom of the pedal
stroke. The horizontal seat position can be adjusted using the Seat Slider (#7) . Note: If the seat post wobbles during use, make sure
the u-clamp and all adjustment knobs are securely tightened.
Assembly Stage #3 completed.
ASSEMBLY INSTRUCTION
PAGE 6
7
10
8
27
12
9
14
13
12
28
11