
Use and Care Manual


www.zephyronline.com
3
I
ns ta ll
a
tion - E xterna l Bl
o
w
er
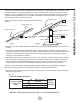
1. Remove and discard shipping brackets and wood support (attached to sides of motor and inlet collar). Fig. - 7
BEFORE INSTALLING, check to see if blower wheel turns freely and does not rub on motor brackets. Check damper door
to be sure it moves freely and spring returns door to closed position.
2. Provide 14” x 18” hole through the roof or wall as shown in Fig. - 2. For reference, location of 10” duct connection and
wiring connection is shown.
Fig-3
24"
30"
6"
2"
1 1/2"
Remove
Fig-7
Remove
Remove
Remove
3. Install blower on roof or wall, with discharge
(screened end) pointing down, according to
standard
procedures.
NOTE: Front discharge edge should be on top
of shingles and rear and side edges under shingles.
Unit must be sealed between roof or wall and under
side of
with mastic to prevent leaks.
For installation on a
roof, or roofs with pitch
of less than 1 1/2’ in 12”, install blower on curb
as shown in Fig. - 3. Position curb on sloping roof
with 2” dimension facing down slope. Position curb
on
roofs so that disc harge points away from
prevailing wind.
Fig-2
Top View
Down Slope
of
Roof or Wall
14"
18"
4 1/2"
7 3/4"
10 1/2"
1 1/2"