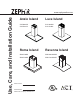
Use, Care, and Installation Guide www.zephyronline.com Anzio Island Luce Island ZAZ-M90CS ZLC-M90BS ZAZ-E42CS ZLC-E42BS Roma Island Ravenna Island ZRM-E36DS ZRE-M90ABSGG ZRM-E42DS ZRE-E42ABSGG Model number: + Serial Number: APR19.0301 © Zephyr Ventilation LLC.
www.zephyronline.
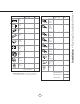
INSTALLATION Ducting Calculation Sheet ....................................... Mounting Height & Clearance................................ Ducting Options ........................................................... +RRG 6SHFL¿FDWLRQV ................................................... Mounting the Hood ..................................................... Ductless Recirculating .............................................. 5 6 7 8-11 12-13 14 FEATURES & CONTROLS ICON Touch Controls ......................
www.zephyronline.com Important Safety Notice READ AND SAVE THESE INSTRUCTIONS WARNING TO REDUCE THE RISK OF FIRE OR ELECTRIC SHOCK, DO NOT USE THIS FAN WITH ANY SOLID-STATE CONTROL DEVICE. WARNING TO REDUCE THE RISK OF FIRE ELECTRIC SHOCK, OR INJURY TO PERSONS, OBSERVE THE FOLLOWING: a. Use this unit only in the manner intended by the manufacturer, if you have questions, contact the manufacturer.
TO REDUCE THE RISK OF FIRE, USE ONLY METAL DUCTWORK. CAUTION 7R UHGXFH ULVN RI ¿UH DQG WR SURSHUO\ H[KDXVW DLU RXWVLGH 'R QRW YHQW H[KDXVW DLU LQWR VSDFHV ZLWKLQ ZDOOV FHLOLQJV attics, crawl spaces or garages. Not for use over an outdoor grill. OPERATION $OZD\V OHDYH VDIHW\ JULOOHV DQG ¿OWHUV LQ SODFH :LWKRXW WKHVH FRPSRQHQWV RSHUDWLQJ EORZHUV FRXOG FDWFK RQWR KDLU ¿QJHUV and loose clothing.
List of Materials www.zephyronline.
Duct pieces Total 1 Ft. x( ) = Ft. 6”, 7”, 8”, 10” 1 Ft. Round, straight x( ) = Ft. 3-1/ 4” x 10” Rect. 90 0 elbow 15 Ft. x( ) = Ft. 3-1/ 4” x 10” Rect. 45 0 elbow 9 Ft. x( ) = 3-1/ 4” x 10” Rect., straight Equivalent number length x used = Total 3-1/ 4” x 10” 5 Ft. Rect. to 6” round transition x( ) = Ft. 3-1/ 4” x 10” 20 Ft. Rect. to 6” round transition 90 0 elbow x( ) = Ft. 6” round to 1 Ft. 3-1/ 4” x 10” rect. transition x( ) = Ft. Ft. x( ) = Ft. 24 Ft. x( ) = Ft.
Installation – Mounting Height & Clearance www.zephyronline.com DUCTING A minimum of 6” round duct is recommended to PDLQWDLQ PD[LPXP DLU ÀRZ HႈFLHQF\ Always use rigid type metal ducts only. Flexible GXFWV FRXOG UHVWULFW DLU ÀRZ E\ XS WR 8VH FDOFXODWLRQ ZRUNVKHHW WR FRPSXWH WRWDO GXFW ZRUN 3DJH A n. mi . B n mi . C x a m D n. mi . E n mi . F x a m ALWAYS, when possible, reduce the number of transitions and turns. If a long duct run is required, increase duct size from 6” to 7” or 8”. in.
1(9(5 H[KDXVW DLU RU WHUPLQDWH GXFW ZRUN LQWR VSDFHV EHWZHHQ ZDOOV FUDZO VSDFHV FHLOLQJ DWWLFV RU JDUDJHV All exhaust must be ducted to the outside, unless using the recirculating option. 8VH VLQJOH ZDOO ULJLG PHWDO GXFWZRUN RQO\ )DVWHQ DOO FRQQHFWLRQV ZLWK VKHHW PHWDO VFUHZV DQG WDSH DOO MRLQWV Z FHUWL¿HG 6LOYHU 7DSH RU 'XFW 7DSH Some Ducting Options Roof Pitch w/ Flashing & Cap (blower housing) Soffit or crawl space ductless recirculating 7 side wall cap w/ gravity damper Installation – Duc
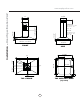
11” 10 5/8” 5 1/4” 25 9/16” FRONT SIDE 7 9/16” 3 9/16” C/L 5 15/ 16” C/L 8 1/8” 1 1/4” Z1C-00AZ min. ducted - 47” min. recirc. - 51” max. - 80” 1 3/16” 5 5/16” 16 9/16” 9 7/16” STANDARD min. ducted - 31 1/2” min. recirc. - 36” max. - 50” 35 7/16”, 41 15/16” 8 1/4” C/L AC In 13/16” 3 1/2” Installation – +RRG 6SHFL¿FDWLRQ =$= www.zephyronline.
10 5/8” Z1C-00LC min. ducted - 47” min. recirc. - 51” max. - 80” 2 1/16” 12 3/8” 9 7/16” STANDARD min. ducted - 29” min. recirc. - 32 1/2” max.
” 14” 9 11/16” STANDARD min. ducted - 28” min. recirc. - 31” max. - 39” Z1C-01RM EXTENSION min. ducted - 50 1/2” min. recirc. - 50 1/2” max. - 80” 3” 11 3/16” 26 7/8” 35 7/8”, 41 7/8” 6" 9 7/16" 12 7/16" 11" ø 4 3/16" Installation – +RRG 6SHFL¿FDWLRQ =50 www.zephyronline.
Installation – +RRG 6SHFL¿FDWLRQ =5( 10 7/8” Z1C-01REBS EXTENSION min. ducted - 48 1/2” min. recirc. - 48 1/2” max. - 78” 13 3/4” 5/16 ” 23 15/16” 3 9/16” 24 1/2” STANDARD min. ducted - 28 1/2” min. recirc. - 28 1/2” max. - 38” (top of electrical box) 10 3/8” 35 3/16” 25 9/16” FRONT SIDE 8” 8 3/4” 6” 11 5/8” 3 3/4” 4 3/16” C/L TOP of HOOD 5/8” 2 3/4” 4 3/8” elec.
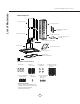
Installation – Mounting the Hood www.zephyronline.com ! CAUTION: At least two installers are required due to the weight and size of the hood. Bottom Support Frame (secures to top of blower housing) Front Ceiling Joists back Sid e Key Holes 1 Wood Blocking 2 Top Support Frame front - facing controls FIG. C 3 Support Frame Arm FIG. B FRONT Bottom Support Frame B BLOWER HOUSING 4 Mounting Screws (pre-installed) Hood Body Cut-Out Shaded Area A XP022220 FIG. L FIG. A FIG.
$ FDEOH ORFNLQJ FRQQHFWRU QRW VXSSOLHG PLJKW EH UHTXLUHG E\ ORFDO FRGHV &KHFN ZLWK local requirements and codes, purchase and install appropriate connector if necessary. Top Duct Covers Cable Lock FIG. E Bottom Duct Covers Bottom Support Frame FIG. D FIG. F ! WARNING: Electrical wiring must be done by a qualified person(s) in accordance with all applicable codes and standards. This range hood must be properly grounded. Turn off electrical power at service entrance before wiring.
Installation – Ductless Recirculating www.zephyronline.com 'XFWOHVV UHFLUFXODWLRQ LV LQWHQGHG IRU DSSOLFDWLRQV ZKHUH DQ H[KDXVW GXFW ZRUN LV QRW SRVVLEOH WR EH LQVWDOOHG When converted, the hood functions as a recirculating hood rather than an exhaust hood. Fumes and exhaust IURP FRRNLQJ DUH GUDZQ DQG ¿OWHUHG E\ D VHW RI RSWLRQDO FKDUFRDO ¿OWHUV 7KH DLU LV WKHQ SXUL¿HG DQG UH FLUFXODWHG EDFN ZLWKLQ WKH KRPH We recommend to ALWAYS exhaust air outside of the home by employing existing or installing new
Lights On/Dim/Off Adjust 5 Speed Levels 5 Lighted Glass Button Display (speed level, delay off, filter clean/change) 1 POWER / DELAY OFF BUTTON Power Button Function - Button will turn power on and off for entire hood (fan and lights). MODEL ZLC ONLY - Hood will remember the last speed and light level it was turned off at. (Example: Press Button to turn off hood when on fan speed 4 and high lights. Press Button again and the hood will turn back on at speed 4 and high lights level.
Features & Controls - ICON Touch Controls www.zephyronline.com 3 LIGHTS BUTTON - Lights are two levels, High and Low. - From off, press one time for High. Press again for Low. Press again to power lights off. 4 DISPLAY INDICATORS Mesh Filter Clean Reminder (always enabled) - After 30 hours of fan usage, the button indicator will begin to slowly blink indicating it is time to clean the mesh filters. - To reset: With hood off: hold the button for three seconds.
Do not use corrosive detergents, abrasive detergents or oven cleaners. Do not use any product containing chlorine bleach or any product containing chloride. Do not use steel wool or abrasive scrubbing pads which will scratch and damage surface. Cleaning Stainless Steel &OHDQ SHULRGLFDOO\ ZLWK ZDUP VRDS\ ZDWHU DQG FOHDQ FRWWRQ FORWK RU PLFUR ¿EHU FORWK $OZD\V UXE LQ WKH direction of the stainless steel grain. To remove heavier grease build up use a liquid degreaser detergent.
Maintenance – Lights www.zephyronline.com LED LIGHT STRIPS ,Q WKH XQOLNHO\ HYHQW WKDW \RXU /(' VWULS IDLOV SOHDVH FRQWDFW =HSK\U WR RUGHU UHSODFHPHQW SDUWV See list of parts and accessories page for part #’s and contact information. To replace LED light strip 5HPRYH DOXPLQXP PHVK ¿OWHUV 2. Remove light panel by two screws. 'LVFRQQHFW /(' OLJKW VWULS TXLFN FRQQHFWRU 4. Push in the two side clips on the ends of the LED strip. 5. Push LED light strip through the light panel opening.
Issue Cause What to do After installation, the unit doesn’t ZRUN 1. The power source is not turned ON. 0DNH VXUH WKH FLUFXLW EUHDNHU DQG WKH XQLW¶V power is ON. 7KH SRZHU OLQH DQG WKH FDEOH ORFNLQJ FRQQHFWRU is not connecting properly. &KHFN WKH SRZHU FRQQHFWLRQ ZLWK WKH XQLW LV connected properly. 3. The switch board or control board wirings are disconnected. 0DNH VXUH WKH ZLULQJV DW WKH VZLWFK ERDUG DQG control board are connected properly. 4.
ACT Conversion www.zephyronline.com ALUÀRZ &RQWURO 7HFKQRORJ\ $&7 Some local codes limit the maximum amount of CFM a range hood can move. ACT allows you to control the PD[LPXP EORZHU &)0 RI VHOHFW =HSK\U 9HQWLODWLRQ UDQJH KRRGV ZLWKRXW WKH QHHG IRU H[SHQVLYH PDNH XS DLU NLWV $&7 HQDEOHV WKH LQVWDOOHU WR HDVLO\ VHW WKH PD[LPXP EORZHU VSHHG WR RQH RI WZR PRVW FRPPRQO\ VSHFL¿HG &)0 OHYHOV RU &)0 7KH XVDJH RI $&7 PD\ QRW EH QHFHVVDU\ IRU \RXU LQVWDOODWLRQ 3OHDVH FKHFN \RXU ORFDO FRGHV for CFM
21 Fan Curve Diagrams
Fan Curve Diagrams www.zephyronline.
CIRCUIT DIAGRAM Power consumption shown for default 600 CFM blower FRQ¿JXUDWLRQ ACT 390 CFM - Fan Max. @ 2.3A ACT 290 CFM - Fan Max. @ 1.9A VOLTS HZ MAX. AMPS 120 60 4 CIRCUIT DIAGRAM 5A 250VAC ZLC A C 120V ZLC -E42BX-P 23 Power consumption shown for default 600 CFM blower FRQ¿JXUDWLRQ ACT 390 CFM - Fan Max. @ 2.3A ACT 290 CFM - Fan Max. @ 1.9A Wiring Diagram ZAZ, ZRM, ZRE VOLTS HZ MAX.
List of Parts & Accessories www.zephyronline.com DESCRIPTION PART# ZAZ Parts & Optional Accessories LED Light Strip $OXPLQXP 0HVK )LOWHU HDFK Recirculating Kit &KDUFRDO )LOWHU 5HSODFHPHQW HDFK Extension Duct Cover +\EULG %DႉH )LOWHU .
Three Year Limited Warranty for Parts: For three years from the date of your original purchase of the Products, we will provide, free of charge, Products or parWV LQFOXGLQJ /(' OLJKW EXOEV LI DSSOLFDEOH WR UHSODFH WKRVH WKDW IDLOHG GXH WR manufacturing defects subject to the exclusions and limitations below. We may choose, in our sole discretion, to repair or replace parts before we elect to replace the Products.
www.zephyronline.com PRODUCT REGISTRATION Congratulations on your Zephyr range hood purchase! Please take a moment to register your new range hood at www.zephyronline.com/registration IT’S IMPORTANT Prompt registration helps in more ways than one. Ensures warranty coverage should you need service. Ownership verification for insurance purposes. Notification of product changes or recalls. Zephyr Ventilation | 2277 Harbor Bay Pkwy. | 26 Alameda, CA 94502 | 1.888.880.
Guide d’utilisation, d’entretien et d’installation www.zephyronline.com Anzio Island Luce Island ZAZ-M90CS ZLC-M90BS ZAZ-E42CS ZLC-E42BS Roma Island Ravenna Island ZRM-E36DS ZRE-M90ABSGG ZRM-E42DS ZRE-E42ABSGG Numéro de modèle : _________________ Numéro de série : _________________ APR19.0301 © Zephyr Ventilation LLC.
www.zephyronline.
INSTALLATION Feuille de calcul pour le conduit ........................... Espace libre et hauteur de montage ................... Options d’installation pour le conduit .................. 6SpFL¿FDWLRQV GH OD KRWWH......................................... Montage de la hotte ................................................... Reprise d’air sans conduit ....................................... 5 6 7 8-10 11-13 14 COMMANDES ICON Commandes ....................................................
www.zephyronline.com Mise en garde de sécurité LISEZ ET CONSERVEZ CES INSTRUCTIONS AVERTISSEMENT POUR RÉDUIRE LES RISQUES D’INCENDIE OU DE DÉCHARGE ÉLECTRIQUE, N’UTILISEZ PAS CET APPAREIL AVEC UN TABLEAU DE COMMANDE À SEMI-CONDUCTEURS. AVERTISSEMENT POUR RÉDUIRE LES RISQUES D’INCENDIE, DE DÉCHARGE ÉLECTRIQUE OU DE BLESSURE, RESPECTEZ CES CONSIGNES : a. N’utilisez cet appareil que de la manière prévue par le fabricant. Si vous avez des questions, communiquez avec le fabricant. b.
POUR RÉDUIRE LES RISQUES D’INCENDIE, N’UTILISEZ QUE DES CONDUITS D’AÉRATION EN MÉTAL. ATTENTION Pour réduire les risques d’incendie et pour évacuer l’air convenablement, assurez-vous de canaliser l’air à l’extérieur de la maison. N’installez pas l’échappement du conduit dans les espaces entre les murs, le plafond, le grenier, les vides sanitaires ou le garage. Cet appareil n’est pas conçu pour être utilisé au-dessus d’un gril extérieur.
Liste du matériel www.zephyronline.
= Longueur x Nombre utilisé Pièces de conduit Total 1 pi x( ) = pi 6”, 7”, 8”, 10” 1 pi circ., droit x( ) = pi 3-1/ 4” x 10” rect., coude à 90º 15 pi x( ) = pi 3-1/ 4” x 10” rect., coude à 45º 9 pi x( ) = pi 6” circ. à rect. de 3-1/4" x 10" 3-1/ 4” x 10” rect., droit ) = pi x( ) = pi x( ) = pi x( ) = pi x( ) = pi 23 pi 7” circ. à rect. de 3-1/4" x 10", coude à 90º x( ) = pi 3-1/ 4” x 10” 30 pi embout mural rect.
Installation – Espace libre et hauteur de montage www.zephyronline.com CONDUIT D’AÉRATION Un conduit circulaire de 6” doit être utilisé pour assurer une circulation d’air maximale. N’utilisez que des conduits en métal rigide. Les conduits souples pourraient réduire la circulation d’air jusqu’à 50 %. A n. mi . B n mi . C x ma D n. mi . E n mi . F x ma in. ” max. 6 2 ”m 34 Utilisez la feuille de calcul pour obtenir la longueur totale du conduit (page 5).
N’évacuez ou ne terminez JAMAIS l’échappement du conduit dans les espaces entre les murs, les vides sanitaires, le plafond, le grenier, ou le garage. Tous les échappements doivent être dirigés à l’extérieur de la maison, à moins que l’option de reprise d’air ne soit utilisée. N’utilisez que des conduits en métal pour cloison simple.
11” 10 5/8” 5 1/4” 25 9/16” DEVANT CÔTÉ 7 9/16” 3 9/16” C/L 5 15/ 16” C/L 8 1/8” 1 1/4” Z1C-00AZ min. ducted - 47” min. recirc. - 51” max. - 80” 1 3/16” 5 5/16” 16 9/16” 9 7/16” STANDARD min. ducted - 31 1/2” min. recirc. - 36” max. - 50” 35 7/16”, 41 15/16” 8 1/4” C/L AC In 13/16” 3 1/2” Installation – 6SpFL¿FDWLRQV GH OD KRWWH =$= www.zephyronline.
10 5/8” 9 7/16” STANDARD min. ducted - 29” min. recirc. - 32 1/2” max. - 46 1/2” 12 3/8” Z1C-00LC min. ducted - 47” min. recirc. - 51” max.
9 11/16” STANDARD min. ducted - 28” min. recirc. - 31” max. - 39” Z1C-01RM EXTENSION min. ducted - 50 1/2” min. recirc. - 50 1/2” max.
Installation – 6SpFL¿FDWLRQV GH OD KRWWH =5( 10 7/8” 10 3/8” 13 3/4” 5/16 ” 23 15/16” 3 9/16” Z1C-01REBS EXTENSION min. ducted - 48 1/2” min. recirc. - 48 1/2” max. - 78” 24 1/2” STANDARD min. ducted - 28 1/2” min. recirc. - 28 1/2” max. - 38” 35 3/16” 25 9/16” DEVANT CÔTÉ 8” 8 3/4” 6” 11 5/8” 3 3/4” 4 3/16” C/L DESSUS de la HOTTE 5/8” 2 3/4” 8 1/4” 4 3/8” elec.
Installation – 0RQWDJH GH OD KRWWH ! ATTENTION : Compte tenu du poids et des dimensions de la hotte, au moins deux installateurs sont nécessaires. Cadre de fixation inférieur (est fixé à la partie supérieure du boîtier du ventilateur) Front Dos Encoches en trou Solives de plafond Sid e 1 Bloc de bois 2 Cadre de fixation supérieur Devant – commandes à l’avant FIG. C 3 Bras du cadre de fixation FIG.
Cadre de fixation supérieur Un raccord de câble (non inclus) pourrait également être exigé par les normes et réglementations locales. Informez-vous des exigences et des normes locales. Achetez et installez le connecteur approprié si nécessaire. Pièces de recouvrement supérieures Raccord de câble FIG. E Pièces de recouvrement inférieures Cadre de fixation inférieur FIG.
Installation – Reprise d’air sans conduit www.zephyronline.com /D FRQ¿JXUDWLRQ GH UHSULVH VDQV FRQGXLW D pWp FRQoXH SRXU OHV DSSOLFDWLRQV R LO HVW LPSRVVLEOH G¶LQVWDOOHU XQ FRQGXLW d’aération.
Lumières : Allumer/Veilleuse/Éteindre Choix de 5 vitesses ZLC seulement 5 Touche d’illumination du verre Afficheur (vitesse, arrêt à retardement, nettoyage/changement des filtres) 1 MISE EN MARCHE/ARRÊT À RETARDEMENT Fonction de la touche de mise en marche - La touche permet d’allumer et d’éteindre toutes les fonctions de la hotte (ventilateurs et lumières). - La hotte se rappelle la dernière vitesse et le dernier niveau d’éclairage utilisés.
Commandes - ICON Commandes www.zephyronline.com 3 TOUCHE DE CONTRÔLE DES LUMIÈRES - Il existe deux intensités : haute et basse. - Lorsque les lumières sont éteintes, appuyez une fois pour les allumer à haute intensité. Appuyez de nouveau pour les mettre en veilleuse. Appuyez encore une fois pour les éteindre.
1HWWR\H] UpJXOLqUHPHQW OHV VXUIDFHV GH OD KRWWH DYHF GH O¶HDX VDYRQQHXVH FKDXGH HW XQ FKLႇRQ GH FRWRQ SURSUH N’utilisez pas de détergent abrasif ou corrosif, de laines d’acier ou de tampons à récurer; ils égratigneront et endommageront les surfaces. Pour les taches plus tenaces, utilisez du produit dégraissant liquide.
Maintenance - Lumières Bandes de lumière LED Dans l’éventualité peu probable d’une défaillance de votre bande de LED, veuillez contacter Zephyr pour commander des pièces de rechange. Voir la liste des pièces et accessoires à la page pour les références et les coordonnées. Pour remplacer la bande lumineuse à LED 5HWLUH] OHV ¿OWUHV j PDLOOHV HQ DOXPLQLXP 2. Retirez le panneau d’éclairage à l’aide de deux vis. 3. Débranchez le connecteur rapide du bandeau lumineux à LED. 4.
Problème Cause Solution Après l’installation, l’appareil ne fonctionne pas. 1. Le bloc d’alimentation n’est pas allumé 1. 2. La ligne électrique et le raccord de câble ne sont pas correctement branchés 9pUL¿H] TXH OH EUDQFKHPHQW GH O¶DSSDUHLO D pWp IDLW correctement Les lumières fonctionnent, mais le ventilateur ne tourne pas. L’appareil vibre. Le moteur fonctionne, mais pas les lumières.
Conversion De La ACT www.zephyronline.com 7HFKQRORJLH GH FRQWU{OH GX GpELW G¶DLU $&7 Certains codes et règlements limitent la quantité maximale de pi3/min qu’une hotte peut extraire. La ACT permet de contrôler la quantité maximale de pi3/min qu’évacuent un éventail de hottes Zephyr, éliminant la nécessité d’acheter un dispositif d’air d’appoint dispendieux.
21 Tableau De Rendement Du Ventilateur
Tableau De Rendement Du Ventilateur www.zephyronline.
Schéma De Câblage Consommation montré pour défaut de FRQ¿JXUDWLRQ GX YHQWLODWHXU &)0 ACT 390 CFM - Ventilateur Max. @ 2.3A ACT 290 CFM - Ventilateur Max. @ 1.9A BLANC NOIR GRIS BRUN JAUNE JAUNE JAUNE BLANC BLEU BLANC CORPS VERTE NOIR/BLANC VERTE CORPS ROUGE ROUGE JAUNE GRIS BRUN BLEU VOLTS HZ MAX. AMPS 120 60 4 ZLC ACT 390 CFM - Ventilateur Max. @ 2.3A Schéma De Câblage ROUGE JAUNE JAUNE JAUNE ACT 290 CFM - Ventilateur Max. @ 1.
Listes des pièces et des accessoires www.zephyronline.com DESCRIPTION NO DE PIÈCE =$= 3LqFHV HW GHV DFFHVVRLUHV Bandes de lumière LED )LOWUH j GHÀHFWXHU FKDTXH Ensemble de reprise d’air Filtre à charbon de remplacement (chaque) Ensemble de prolongement de recouvrement de conduit )LOWUH GH GpÀHFWHXU K\EULGH )LOWUHV Z0B0042 ZRC-02AZ Z0F-C091 Z1C-00AZ = ) % =/& 3LqFHV HW GHV DFFHVVRLUHV Bandes de lumière LED )LOWUH j GHÀHFWXHU FKDTXH Ensemble de reprise d’ai
Une preuve de la date d’achat originale est nécessaire pour obtenir du service lorsque le produit est sous garantie Garantie limitée POUR OBTENIR DU SERVICE SOUS GARANTIE OU POUR TOUTE QUESTION LIÉE À L’ENTRETIEN, veuillez communiquer avec nous au 1-888-880-8368 Zephyr Ventilation, LLC (désigné aux présentes sous le nom de « nous ») garantit au premier acheteur (désigné aux présentes sous le nom de « vous » ou « votre ») de produits Zephyr (les « Produits ») que lesdits produits sont exempts de défauts de
www.zephyronline.com ENREGISTRMENT DU PRODUIT Nous vous félicitons d’avoir acheté une hotte Zephyr. Veuillez prendre un moment pour enregistrer votre nouvelle hotte au www.zephyronline.com/registration C’EST IMPORTANT Cet enregistrement rapide est utile à bien des égards. Il assure la couverture de votre garantie si vous avez besoin de service après-vente. À des fins d’assurance, il permet de confirmer que vous êtes le propriétaire.