
Use and Care Manual
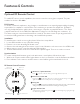

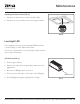
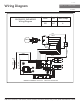
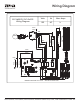
Table Of Contents

22
Anzio Island, Luce Island, Roma Island, Ravenna Island Use, Care, and Installation Guide
ZAZ, ZLC, ZRM, ZRE
ISLAND
CORE
Features & Controls
Optional RF Remote Control
To enable RF remote control capabilities, the remote control accessory kit is required. The part
number for the kit is RC-0002.
FCC Caution
To assure continued compliance, any changes or modifications not expressly approved by the party
responsible for compliance could void the user’s authority to operate this equipment. (Example -
use only shielded interface cables when connecting to computer or peripheral device. This device
complies with Part 15 of the FCC Rules. Operation is subject to the following two conditions. (1)
This device may not cause harmful interference, and (2) This device must accept any interference
received, including interference that may cause undesired operation.
Installation
To install remote control accessory kit, please follow these steps below.
1. Locate PC board box on top of blower housing.
2. Remove 2-4 screws attaching PC board cover.
3. Connect the red wiring from the remote control control board to red connector in hood PC board.
4. Adhere remote control control board near PC board box.
5. The blue antenna wire needs to be extended for optimal signal. There is no need to secure it.
Synchronization
To create a unique link between your hood and remote control please follow these steps.
1. With hood o, press and hold the Lights button on the hood until the controls illuminate and flash.
2. Press a button on the remote, and the remote control will be synchronized with the hood.
RF Remote Control Functions
Blower On / Speed Selection
Press to power on blower and cycle through all blower speeds.
Blower On / Power O
By pressing , the blowers will power on at the last speed setting. Press
again and the entire hood will power o, including lights.
Delay O
Lights On/Dim/O
Switch between light levels by pressing . Turn o the lights by cycling through
the dierent light levels.
Blower On/
Speed Selection
1
1
2
3
4
Blower On/
Power O
2
5 Min Delay O
3
Lights On/Dim/O
4
By pressing , the blower and lights will enter Delay O mode. The blow
er will
change to speed 1 and a 5 minute timer will begin counting down.