Use, Care, and Installation Guide www.zephyronline.com Siena Pro Island ZSL-E42BS ZSL-E48BS Model number: Serial Number: JAN17.0101 © Zephyr Ventilation LLC.
www.zephyronline.
INSTALLATION Ducting Calculation Sheet ....................................... Mounting Height & Clearance................................ Ducting Options ........................................................... +RRG 6SHFL¿FDWLRQV ................................................... Mounting the Hood ..................................................... 5 6 7 8 9-10 FEATURES & CONTROLS ICON Touch Controls ..................................... 11 MAINTENANCE .............................................
www.zephyronline.com Important Safety Notice READ AND SAVE THESE INSTRUCTIONS WARNING TO REDUCE THE RISK OF FIRE OR ELECTRIC SHOCK, DO NOT USE THIS FAN WITH ANY SOLID-STATE CONTROL DEVICE. WARNING TO REDUCE THE RISK OF FIRE ELECTRIC SHOCK, OR INJURY TO PERSONS, OBSERVE THE FOLLOWING: a. Use this unit only in the manner intended by the manufacturer, if you have questions, contact the manufacturer. b.
TO REDUCE THE RISK OF FIRE, USE ONLY METAL DUCTWORK. CAUTION 7R UHGXFH ULVN RI ¿UH DQG WR SURSHUO\ H[KDXVW DLU RXWVLGH 'R QRW YHQW H[KDXVW DLU LQWR VSDFHV ZLWKLQ ZDOOV FHLOLQJV attics, crawl spaces or garages. Not for use over an outdoor grill. OPERATION $OZD\V OHDYH VDIHW\ JULOOHV DQG ¿OWHUV LQ SODFH :LWKRXW WKHVH FRPSRQHQWV RSHUDWLQJ EORZHUV FRXOG FDWFK RQWR KDLU ¿QJHUV and loose clothing.
List of Materials www.zephyronline.
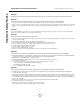
Duct pieces Total 1 Ft. x( ) = Ft. 6”, 7”, 8”, 10” 1 Ft. Round, straight x( ) = Ft. 3-1/ 4” x 10” Rect. 90 0 elbow x( ) = Ft. ) = 3-1/ 4” x 10” Rect., straight 3-1/ 4” x 10” Rect. 45 0 elbow 3-1/ 4” x 10” Rect. 90 0 flat elbow 15 Ft. 9 Ft. 24 Ft. x( x( 7” to 6” or 25 Ft. 8” to 7” Round tapered reducer x( 15 Ft. x( 6”, 7“, 8” Round in-line damper 6”, 7”, 8”, 10” 15 Ft. Round, 90 0 elbow x( 6”, 7”, 8”, 10” 9 Ft. Round, 45 0 elbow x( Total 3-1/ 4” x 10” 5 Ft. Rect.
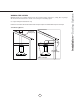
Installation – Mounting Height & Clearance www.zephyronline.com ALWAYS, when possible, reduce the number of transitions and turns. If a long duct run is required, increase duct size from 10” to 12”. If turns or transitions are required: Install as far away from duct opening and as far apart between the two transitions as possible. Minimum mount height between range top to hood bottom should be no less than 26”. A n. mi . B x ma Maximum mount height should be no higher than 34”. C n. mi . D x ma in.
NEVER exhaust air or terminate duct work into spaces between walls, crawl spaces, ceiling, attics or garages. All exhaust must be ducted to the outside, unless using the recirculating option. Use single wall rigid metal ductwork only.
Installation – +RRG 6SHFL¿FDWLRQ www.zephyronline.com 11 15/16” 15 11/16” STANDARD min. - 32 1/2” max. - 48 1/2” Z1C-01SL min. - 49” max.
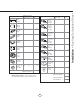
Bottom Support Frame Top Support Frame (secures to top of blower housing) back Key Holes Ceiling Joists Front Sid 1 Wood Blocking e 2 Top Support Frame front - facing controls FIG. C 3 Support Frame Arm FIG. B Junction Box FRONT Bottom Support Frame B 4 Mounting Screws (pre-installed) Hood Body Cut-Out Shaded Area FIG. A A FIG. G 'HWHUPLQH PRXQWLQJ ORFDWLRQ RQ FHLOLQJ DQG WHPSRUDULO\ WDSH SDSHU WHPSODWH LQFOXGHG ZLWK WKH KRRG WR the ceiling.
Installation – Mounting the Hood www.zephyronline.com 1 Top Support Frame Top Duct Covers Bottom Duct Covers Bottom Support Frame FIG. D FIG. E ! WARNING: Electrical wiring must be done by a qualified person(s) in accordance with all applicable codes and standards. This range hood must be properly grounded. Turn off electrical power at service entrance before wiring. FIG.
Adjust 5 Speed Levels Lights On/Dim/Off Display (speed level, delay off, filter clean/change) 1 POWER / DELAY OFF BUTTON Power Button Function - Button will turn power on and off for entire hood (fan and lights). - Hood will remember the last speed and light level it was turned off at. (Example: Press Button to turn off hood when on fan speed 4 and high lights. Press Button again and the hood will turn back on at speed 4 and high lights level.
Maintenance www.zephyronline.com SURFACE MAINTENANCE: Clean the hood surface periodically with hot soapy water and clean cotton cloth. Do not use corrosive or abrasive detergent or steel wool/scouring pads which will scratch and damage surface. For heavier soil use liquid degreaser. After cleaning it is recommended that you use non-abrasive stainless steel polish/cleaners, to polish and buff out the stainless luster and grain. Always scrub lightly, with clean cotton cloth, and with the grain.
ACT Conversion ALUÀRZ &RQWURO 7HFKQRORJ\ $&7 Some local codes limit the maximum amount of CFM a range hood can move. ACT allows you to control the maximum blower CFM of select Zephyr Ventilation range hoods without the need for expensive make up air kits. $&7 HQDEOHV WKH LQVWDOOHU WR HDVLO\ VHW WKH PD[LPXP EORZHU VSHHG WR RQH RI WZR PRVW FRPPRQO\ VSHFL¿HG &)0 OHYHOV RU &)0 7KH XVDJH RI $&7 PD\ QRW EH QHFHVVDU\ IRU \RXU LQVWDOODWLRQ 3OHDVH FKHFN \RXU ORFDO codes for CFM restrictions.
Blower Fan Curve Model: ZSL AC Input: 120V, 60Hz Outlet Diameter: 10in Pressure (inAq) Fan Curve Diagrams www.zephyronline.com 2.80 2.70 2.60 2.50 2.40 2.30 2.20 2.10 2.00 1.90 1.80 1.70 1.60 1.50 1.40 1.30 1.20 1.10 1.00 0.90 0.80 0.70 0.60 0.50 0.40 0.30 0.20 0.10 0.
15 Fan Curve Diagrams
W HIT E AC N AC L Y E LLOW Y E LLOW B R OW N G R AY B LUE F US E W HIT E GR E E N B ODY C OM W HIT E P UR P LE RED MOT O R GR EE N B ODY HI MID LO TR ANS F OR ME R R E MAR K S :C ONDE NS E R 11+11uF 250VAC 2 F IT AC 120V 60Hz 3RZHU FRQVXPSWLRQ VKRZQ IRU GHIDXOW &)0 EORZHU FRQ¿JXUDWLRQ ACT 590 CFM - Fan Max. 556W @ 4.6A ACT 390 CFM - Fan Max. 381W @ 3.
Issue Cause What to do After installation, the unit doesn’t work. 1. The power source is not turned ON. 1. Make sure the circuit breaker and the unit’s power is ON. 2. The power line and the cable locking connector is not connecting properly. 2. Check the power connection with the unit is connected properly. 3. The wires on the control board are loose. 3. Make sure the wires on the control board are connected properly. 4. The switch board and control board wirings are disconnected. 4.
List of Parts & Accessories www.zephyronline.com DESCRIPTION PART# Replacement Parts %DIÀH )LOWHU HDFK Optional Accessories Extension Duct Cover Universal Make-Up Air Damper Z1C-01SL MUA010A To order parts, visit us online at http://store.zephyronline.com or call us at 1.888.880.
Limited Warranty TO OBTAIN SERVICE UNDER WARRANTY OR FOR ANY SERVICE RELATED QUESTIONS, please call: 1-888-880-8368 Zephyr Ventilation, LLC (referred to herein as “we” or “us”) warrants to the original consumer purchaser (referred to herein as “you” or “your”) of Zephyr products (the “Products”) that such Products will be free from defects in materials or workmanship as follows: Three Year Limited Warranty for Parts: For three years from the date of your original purchase of the Products, we will provide,
www.zephyronline.com PRODUCT REGISTRATION Congratulations on your Zephyr range hood purchase! Please take a moment to register your new range hood at www.zephyronline.com/registration IT’S IMPORTANT Prompt registration helps in more ways than one. Ensures warranty coverage should you need service. Ownership verification for insurance purposes. Notification of product changes or recalls. Zephyr Ventilation | 2277 Harbor Bay Pkwy. | 20 Alameda, CA 94502 | 1.888.880.
Guide d’utilisation, d’entretien et d’installation www.zephyronline.com Siena Pro Island ZSL-E42BS ZSL-E48BS Numéro de modèle : _________________ Numéro de série : _________________ JAN17.0101 © Zephyr Ventilation LLC.
www.zephyronline.
INSTALLATION Feuille de calcul pour le conduit ........................... Espace libre et hauteur de montage ................... Options d’installation pour le conduit .................. 6SpFL¿FDWLRQV GH OD KRWWH......................................... Montage de la hotte ................................................... 5 6 7 8 9-10 COMMANDES &RPPDQGHV j HIÀHXUHPHQW .................................. 11 ENTRETIEN ....................................................................................
Mise en garde de sécurité LISEZ ET CONSERVEZ CES INSTRUCTIONS www.zephyronline.com AVERTISSEMENT POUR RÉDUIRE LES RISQUES D’INCENDIE OU DE DÉCHARGE ÉLECTRIQUE, N’UTILISEZ PAS CET APPAREIL AVEC UN TABLEAU DE COMMANDE À SEMI-CONDUCTEURS. AVERTISSEMENT POUR RÉDUIRE LES RISQUES D’INCENDIE, DE DÉCHARGE ÉLECTRIQUE OU DE BLESSURE, RESPECTEZ CES CONSIGNES : a. N’utilisez cet appareil que de la manière prévue par le fabricant. Si vous avez des questions, communiquez avec le fabricant. b.
POUR RÉDUIRE LES RISQUES D’INCENDIE, N’UTILISEZ QUE DES CONDUITS D’AÉRATION EN MÉTAL. ATTENTION Pour réduire les risques d’incendie et pour évacuer l’air convenablement, assurez-vous de canaliser l’air à l’extérieur de la maison. N’installez pas l’échappement du conduit dans les espaces entre les murs, le plafond, le grenier, les vides sanitaires ou le garage. Cet appareil n’est pas conçu pour être utilisé au-dessus d’un gril extérieur.
Liste du matériel www.zephyronline.
= 1 pi x( ) = pi 6”, 7”, 8”, 10” 1 pi circ., droit x( ) = pi 3-1/ 4” x 10” rect., coude à 90º x( ) = pi 3-1/ 4” x 10” rect., droit 3-1/ 4” x 10” rect., coude à 45º 3-1/ 4” x 10” rect., coude plat à 90º 7” to 6” or 8” to 7” circ. reducteur conique 15 pi 9 pi 24 pi 25 pi x( x( x( 15 pi 6”, 7“, 8” circ. bouchone de l’air x( 6”, 7”, 8”, 10” 15 pi circ.
Installation – Espace libre et hauteur de montage www.zephyronline.com La hauteur de montage minimale ne devrait pas être moins de 26”. La hauteur de montage maximale ne devrait pas outrepasser 34”. Il est important d’installer la hotte à la hauteur de montage adéquate.
N’évacuez ou ne terminez JAMAIS l’échappement du conduit dans les espaces entre les murs, les vides sanitaires, le plafond, le grenier, ou le garage. Tous les échappements doivent être dirigés à l’extérieur de la maison, à moins que l’option de reprise d’air ne soit utilisée. N’utilisez que des conduits en métal pour cloison simple.
15 11/16” 11 15/16” STANDARD min. - 32 1/2” max. - 48 1/2” Z1C-01SL min. - 49” max. - 81” 20 7/8” 6” 1 9/16” 11 3/8” 41 7/8” , 47 7/8” 28” CÔTÉ DEVANT 13 1/16” 6 3/4” 5/8” C/L O 9 15/16” C/L C/L 12 5/8” 6 5/8” 9 15/16” C/L 13/16” Installation – 6SpFL¿FDWLRQV GH OD KRWWH www.zephyronline.
Top Support Frame Cadre de fixation inférieur (est fixé à la partie supérieure du boîtier du ventilateur) Dos Encoches en trou Solives de plafond Front Sid 1 Bloc de bois e 2 Cadre de fixation supérieur Devant – commandes à l’avant FIG. C 3 Bras du cadre de fixation FIG. B Boîte de jonction Devant Cadre de fixation inférieur B 4 Vis de montage (préinstallées) Boîtier de la hotte Zone de découpage ombragée FIG.
Installation – 0RQWDJH GH OD KRWWH www.zephyronline.com 1 Cadre de fixation supérieur Pièces de recouvrement supérieures Pièces de recouvrement inférieures Cadre de fixation inférieur FIG. E FIG. D ! AVERTISSEMENT : Le câblage électrique doit être effectué par une ou des personnes qualifiées selon les stipulations de tous les normes et standards en vigueur. Éteignez l’alimentation électrique à l’entrée de service avant de procéder au câblage. FIG.
Choix de 5 vitesses Lumières : Allumer/Veilleuse/Éteindre Afficheur (vitesse, arrêt à retardement, nettoyage/changement des filtres) 1 MISE EN MARCHE/ARRÊT À RETARDEMENT Fonction de la touche de mise en marche - La touche permet d’allumer et d’éteindre toutes les fonctions de la hotte (ventilateurs et lumières). - La hotte se rappelle la dernière vitesse et le dernier niveau d’éclairage utilisés.
Entretien - 1HWWR\DJH GH OD KRWWH HW GHV ¿OWUHV ENTRETIEN DES SURFACES: Nettoyez régulièrement les surfaces de la hotte avec de l’eau savonneuse chaude et un chiffon de coton propre. N’utilisez pas de détergent abrasif ou corrosif, de laines d’acier ou de tampons à récurer; ils égratigneront et endommageront les surfaces. Pour les taches plus tenaces, utilisez du produit dégraissant liquide.
Certains codes et règlements limitent la quantité maximale de pi3/min qu’une hotte peut extraire. La ACT permet de contrôler la quantité maximale de pi3/min qu’évacuent un éventail de hottes Zephyr, éliminant la nécessité d’acheter un dispositif d’air d’appoint dispendieux. La ACT permet à l’installateur d’ajuster facilement la vitesse maximale du ventilateur à l’un des niveaux de pi3/min les plus fréquemment utilisés : 590 pi3/min ou 390 pi3/min.
Tableau De Rendement ZSL 14
15 Tableau De Rendement
SCHEMA DE CABLAGE GRIS BRUN BLEU JAUNE ROUGE VERTE CORPS MOT O R ROUGE ZSL-E42BS ZSL-E48BS Tension : 120V 60Hz Modèle : BLANC GRIS BRUN BLEU JAUNE ROUGE ROUGE BLANC VERTE CORPS MO TO R JAUNE JAUNE JAUNE JAUNE BRUN GRIS BLEU F US E C OM AC N AC L HI MID LO TR ANS F OR ME R C ONTR OL P C PROTÉGÉ THERMIQUEMENT CORPS BLANC Total: Max.818W 7A Lampe : Max.9WX2 Ventilateur : 800W BLANC VIOLET Consommation d’énergie VERTE NOIR 6FKpPD 'H &kEODJH www.zephyronline.
Problème Cause Solution Après l’installation, l’appareil ne fonctionne pas. 1. Le bloc d’alimentation n’est pas allumé 1. 2. La ligne électrique et le raccord de câble ne sont pas correctement branchés 9pUL¿H] TXH OH EUDQFKHPHQW GH O¶DSSDUHLO D pWp IDLW correctement Les lumières fonctionnent, mais le ventilateur ne tourne pas. L’appareil vibre. Assurez-vous que l’alimentation du disjoncteur et de l’appareil est allumée 3. Les câbles du tableau de commandes sont desserrés. 3.
Listes des pièces et des accessoires www.zephyronline.com NO DE PIÈCE DESCRIPTION Pièces de remplacement )LOWUH j GHÀHFWXHU FKDTXH Accessoires optionnels Ensemble de prolongement de recouvrement de conduit Universal maquillage volet d’air Z1C-01SL MUA010A Pour commander des pièces, visitez-nous en ligne au www.zephyronline.
Une preuve de la date d’achat originale est nécessaire pour obtenir du service lorsque le produit est sous garantie Garantie limitée POUR OBTENIR DU SERVICE SOUS GARANTIE OU POUR TOUTE QUESTION LIÉE À L’ENTRETIEN, veuillez communiquer avec nous au 1-888-880-8368 Zephyr Ventilation, LLC (désigné aux présentes sous le nom de « nous ») garantit au premier acheteur (désigné aux présentes sous le nom de « vous » ou « votre ») de produits Zephyr (les « Produits ») que lesdits produits sont exempts de défauts de
www.zephyronline.com ENREGISTRMENT DU PRODUIT Nous vous félicitons d’avoir acheté une hotte Zephyr. Veuillez prendre un moment pour enregistrer votre nouvelle hotte au www.zephyronline.com/registration C’EST IMPORTANT Cet enregistrement rapide est utile à bien des égards. Il assure la couverture de votre garantie si vous avez besoin de service après-vente. À des fins d’assurance, il permet de confirmer que vous êtes le propriétaire.