
Use and Care Manual


10
www.zephyronline.com
Installation – Mounting the Hood
FRONT
FRONT
FIG. C
1
2
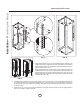
5. Lift support frame assembly up to the ceiling making sure the the word “front” on the top support frame faces the
front of the hood where the controls will be located (FIG. D). The key-holes on the top support frame should cover
the wood screws previously installed in the ceiling. Slide support frame towards narrow end of key-holes to lock
the frame in place.
6. Install the last (2) 1-1/2” wood screws with washers into the two remaining corners of the top support frame to
secure it to the ceiling. Tighten all screws.
FIG. D
FIG. E
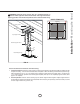
3. Hood heights between 40” to 50” require lateral support brackets to be
installed to the two top support frame cut off arms and their corresponding
bottom support frame arms. Install lateral support brackets by (12) M4 x
8 sheet metal screws. (FIG. C)
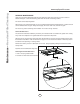
4. Hood heights between 45” to 50” require a square support bracket to be
installed inside the support frame. Install square support bracket to top
support frame arms by (8) M4 x 8 sheet metal screws. (FIG. E, #1) Top
support frame arms extend past lower support frame bracket with shorter
hood heights. (FIG. E, #2)