Wireless Panic Button User’s Manual ZHEJIANG DAHUA VISION TECHNOLOGY CO., LTD. V1.0.
User’s Manual Foreword General This manual introduces the installation, functions and operations of the Wireless Panic Button (hereinafter referred to as the "button"). Read carefully before using the device, and keep the manual safe for future reference. Model DHI-ARD822-W2 (868); DHI-ARD822-W2 Safety Instructions The following signal words might appear in the manual. Signal Words Meaning DANGER Indicates a high potential hazard which, if not avoided, will result in death or serious injury.
User’s Manual About the Manual ● The manual is for reference only. Slight differences might be found between the manual and the product. ● We are not liable for losses incurred due to operating the product in ways that are not in compliance with the manual. ● The manual will be updated according to the latest laws and regulations of related jurisdictions. For detailed information, see the paper user’s manual, use our CD-ROM, scan the QR code or visit our official website.
User’s Manual Important Safeguards and Warnings This section introduces content covering the proper handling of the device, hazard protection, and protection of property damage. Read carefully before using the device, and comply with the guidelines when using it. Operation Requirements ● Make sure that the power supply of the device works properly before use. ● Do not pull out the power cable of the device while it is powered on. ● Only use the device within the rated power range.
User’s Manual Table of Contents Foreword ............................................................................................................................................................................................ I Important Safeguards and Warnings ................................................................................................................................ III 1 Introduction .................................................................................................
User’s Manual 1 Introduction 1.1 Overview Wireless panic button is a wireless button transmitter that sends a panic alarm signal to the hub of the alarm security system. By just the press of the button, alarm signals and events are sent to the monitoring company to ensure a prompt response, and to keep you up to date via the DMSS app. It is suitable for use with security in homes, banks and more. It is also easy to carry around. 1.
User’s Manual Type Parameter Description Operating Humidity 10%–90% (RH) Battery Life 5 years (if used twice a week) Product Dimensions 55 mm × 36 mm × 14.2 mm (2.17" × 1.42" × 0.56") (L × W × H) Packaging Dimensions 95 mm × 59.5 mm × 30.5 mm (3.74" × 2.34" × 1.20") (L × W × H) Installation Wall mount; handheld Net Weight 18 g (0.04 lb) Gross Weight 48 g (0.
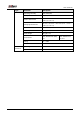
User’s Manual 2 Checklist Figure 2-1 Checklist Table 2-1 Checklist No. Item Name Quantit y No.
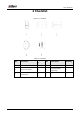
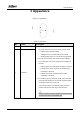
User’s Manual 3 Appearance Figure 3-1 Appearance Table 3-1 Structure No. Name Description 1 Button ● Press and hold both buttons at the same time for 8 seconds, and then the system enters pairing mode. Flashes green quickly: Pairing. ◇ Solid green for 2 seconds: Pairing successful. ◇ Slowly flashes green for 3 seconds: Pairing failed. ◇ ● On the normal status, press both buttons together once, and then the button sends alarm messages to the hub.
User’s Manual 4 Adding the Button to the Hub Before you connect it to the hub, install the DMSS app to your phone. This manual uses iOS as an example. ● Make sure that the version of the DMSS app is 1.98 or later, and the hub is V1.001.0000000.7.R.220106 or later. ● Make sure that the hub has a stable internet connection. ● Make sure that the hub is disarmed. Step 1 Go to the hub screen, and then tap Step 3 Tap Next after the button has been found. Step 2 Step 4 Step 5 Step 6 Tap to add the button.
User’s Manual 5 Installation Prior to installation, add the button to the hub and check the signal strength of the installation location. We recommend installing the button in a place with a signal strength of at least 2 bars. The button supports wall mount and can be handheld. This section uses wall mount as an example. You need to buy a bracket to install the button. Figure 5-1 Installation Step 1 Drill 2 holes in the wall according to the hole positions of the bracket.
User’s Manual 6 Configuration You can view and edit general information of the button. 6.1 Viewing Status On the hub screen, select a button from the accessory list, and then you can view the status of the button. Table 6-1 Status Parameter Value The status for whether the functions of the repeater are enabled or disabled. ● ● Temporary Deactivate ● : Enable. : Only disable tamper alarm. : Disable. The function is only available when the version of the DMSS app is 1.96 or later, the hub is V1.
User’s Manual 6.2 Configuring the Button On the hub screen, select a button from the accessory list, and then tap to configure the parameters of the button. Table 6-2 Panic button parameter description Parameter Device Configuration Area Description ● View device name, type, SN and device model. ● Edit device name, and then tap Save to save configuration. Select the area to which the button is assigned. Whether send sensor information to the alarm hub.
User’s Manual Appendix 1 Cybersecurity Recommendations Cybersecurity is more than just a buzzword: it’s something that pertains to every device that is connected to the internet. IP video surveillance is not immune to cyber risks, but taking basic steps toward protecting and strengthening networks and networked appliances will make them less susceptible to attacks. Below are some tips and recommendations from Dahua on how to create a more secured security system.
User’s Manual The account lock feature is enabled by default, and we recommend you to keep it on to guarantee the account security. If an attacker attempts to log in with the wrong password several times, the corresponding account and the source IP address will be locked. 5. Change Default HTTP and Other Service Ports We suggest you to change default HTTP and other service ports into any set of numbers between 1024–65535, reducing the risk of outsiders being able to guess which ports you are using. 6.
User’s Manual In order to better ensure the safety of device and reduce potential cyber risks, we recommend: ● Disable the port mapping function of the router to avoid direct access to the intranet devices from external network. ● The network should be partitioned and isolated according to the actual network needs.
User’s Manual
Legal and Regulatory I nformation 1 .2.51 .32. 1 52 1 0-001 V2.0.0 Legal Considerations Video s u rve, l lance can be repulated by l aws that vary from cou ntry to ccuntry Check the l aws ,n you r loca region before us,ng th,s prod u ct for s u rve, l lance p u rposes Disclaimer , Restrictions of Haza rdous Substances (Ro HS) Directi ve 2011 /65/EU and its amending Directive (EU) 201 5/863 A copy of the original declaration of oonfonnity may be obtained from Dah u a Technology.