Access Controller User's Manual V1.0.
Foreword General This manual introduces the installation and basic operations of the access controller (hereinafter referred to as the "device"). Safety Instructions The following categorized signal words with defined meaning might appear in the manual. Signal Words Meaning DANGER Indicates a high potential hazard which, if not avoided, will result in death or serious injury. WARNING Indicates a medium or low potential hazard which, if not avoided, could result in slight or moderate injury.
Upgrade the reader software or try other mainstream reader software if the manual (in PDF format) cannot be opened. All trademarks, registered trademarks and the company names in the manual are the properties of their respective owners. Please visit our website, contact the supplier or customer service if there is any problem occurring when using the device. If there is any uncertainty or controversy, we reserve the right of final explanation.
Important Safeguards and Warnings This section introduces the proper way of using the device, and danger and property damage preventions. Before using the device, read this manual carefully. Follow the instructions and keep this manual properly for future reference. Operating Requirements Do not place the device in a place exposed to sunlight or near the heat source. Keep the device away from dampness, dust, or soot. Keep the device on a stable place to prevent it from falling.
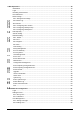
Table of Contents Foreword .................................................................................................................................................... I Important Safeguards and Warnings .................................................................................................... III 1 Product Overview .................................................................................................................................. 1 Introduction ..............................
3 Web Operations ................................................................................................................................... 19 Initialization ................................................................................................................................. 19 Login............................................................................................................................................ 21 Resetting the Password ........................................
Assigning Permissions ................................................................................................................ 58 Fingerprint Registration Instructions .............................................................................. 60 Cybersecurity Recommendations ...................................................................................
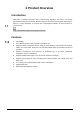
1 Product Overview Introduction Fitted with a powerful processor and a deep-learning algorithm, the device can identify fingerprints instantly and accurately. Besides fingerprint, the device also supports unlocking the door by a card or password. It can work with a management software to more functions for various needs. Only certain models support the fingerprint function. Features LCD display. PC + ABS/acrylic panel that is suitable for outdoor use.
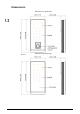
Dimensions Dimensions (1) (mm[inch]) Dimensions (2) (mm[inch]) 2
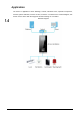
Application The device is applicable to office buildings, schools, industrial zones, apartment complexes, factories, public stadiums, business centers, and more. To introduce the network diagram, this section uses a device with the fingerprint function working as a controller.
2 Device Operation Configuration Process The device can be used for access control purpose after you finish the following process. Configuration process Keypad Function Table 2-1 Function description Item Number or letter Description Used to enter information or password. ∧ Navigate the interface. ∨ Navigate the interface. Esc Cancel an operation or go back to the previous interface. OK Go to the selected interface or confirm your change. Go to the administrator login interface.
Initialize the device The administrator password can be reset through the e-mail address you entered if you forget it. The password should consist of 8 to 32 non-blank characters and contain at least two types of characters among upper case, lower case, number, and special characters (excluding ' " ; : &, space and non-printing characters). Enter the password again to confirm the password. Set a password of high security level according to the password strength prompt.
Table 2-2 Standby interface description No. Item Description 1 Status Displays the status of Wi-Fi, wired network (if any), and USB flash drive. 2 Date & Time Time and date. Unlock the 3 door with password 4 Unlocking methods Enter the user ID and password, or the administrator password (see "2.6.4 Administrator Password" for details) to unlock the door. Displays the unlocking methods you configured. Tap the icon, and then you can enter the main menu.
Unlocking Methods 2.6.1 Card Swipe your card on the card-reading area to unlock the door. 2.6.2 Fingerprint Press your registered fingerprint on the fingerprint scanner to unlock the door. 2.6.3 User Password Enter the user ID and password of a user to unlock the door. Select on the standby interface. Select PWD, and then tap OK. Enter the user ID and password of a user. To enter the user ID, you need to select the input box of user ID and tap OK. You can directly enter the password on the keypad.
User Management You can add new users, view the user list, admin list, and modify the super password on the User interface. 2.7.1 Adding a New User Select on the standby interface, and then tap OK. Log in as the administrator, and then select User Management > New User. This section uses a device with the fingerprint function. Differences on the interfaces might be found on the actual interfaces. Add a new user Configure the parameters. Table 2-3 Parameter description Paramete r No.
Paramete r Description You can select a user level for the new user. There are two options: User level User: Users only have door unlock authority. Administrators can configure parameters of the device and unlock the door. A user can only unlock the door within the defined period. For how to set up a Period period, see the user's manual. The default value is 255, meaning the user can unlock the door at any time. Holiday Plan A user can only unlock the door within the defined period.
Admin list Unlocking method If any of the following icons is displayed, it means that the user has set up the corresponding unlocking method. : Fingerprint. : Card. : Password. Editing User Information Select the user you want to edit, and then tap OK. Edit the information as needed. Tap Esc. The system will ask you to save the settings or not. Tap OK. Searching for User Select , and then enter the user ID, swipe a card, or press a finger print to search for the user you want.
Enter the administrator password, and then tap OK. Administrator password Select Enable, and then tap OK to enable the function. Access Control Management Configure the unlocking mode and how long the lock will be unlocked each time. On the main menu, select Access. Access control management 2.8.1 Unlocking Mode Configure the unlocking combination as needed. The unlocking methods vary with the type of device. Use card, fingerprint, password, or any of their combinations to unlock the door.
Or: For example, you only need to verify your card or fingerprint to unlock the door. Element (Multiple Choice) Tap Esc. The system will ask you to save the settings or not. Tap OK. 2.8.2 Lock Holding Time The door will be unlocked during the defined duration, and will be locked after the duration. On the main menu, select Access > Lock Holding. Tap OK, and then enter the value you need. Tap to change the input method.
Set up network parameters Table 2-4 Parameter description Parameter IP address, subnet mask and gateway Description The IP address, subnet mask, and gateway IP address should be on the same network segment. After configuration, tap to save the configurations. It stands for Dynamic Host Configuration Protocol. DHCP When it is enabled, the device will automatically obtain an IP address. IP address, subnet mask, and gateway cannot be configured.
The device will search for and display available wireless networks. Tap or to go to the previous or next page. Select a wireless network, tap OK, and enter the password. The device will go back to the previous interface, and the information of the wireless network you connected to is displayed. 2.9.3 Wiegand Select Wiegand input or output as needed. On the main menu, select Comm > Wiegand, and then tap OK. Select Wiegand Input when you need to connect a card reader to the device.
On the main menu, select Comm > Serial Port, and then tap OK. Serial port settings Select Serial Input when the device connects to a card reader. The card reader will send the card number to the device or SmartPSS AC. Select Serial Output when the device works as a card reader. The device will the card number to the controller, which will determine whether to unlock the door. UserID: Outputs the ID of the user who swipes a card. Card No.: Outputs the card number that is used.
If set to card reader, you cannot configure the serial port. Baud rate setting Tap OK to select 9600 or 115200. Select the one suitable for the controller or card reader you need to connect the device to. The device can only communicate with another device when their baud rates are the same. System 2.10.1 Time Configure time-related parameters, such as date, time, and date format. On the main menu, select System > Time, and then tap OK. Select a parameter, and then tap OK.
Adjust the volume 2.10.3 Restoring to Default Settings Data will be lost if you restore the device to default settings. Select whether you want to keep the user information and logs after restore the device to default settings. On the main menu, select System > Restore Factory, and then tap OK. Select an option, and then tap OK. Default: All configurations will be restored to default settings, and all data will be lost, including users, device information, and logs.
USB Make sure that a USB flash drive is inserted to the device before exporting user information or updating. Do not pull out the USB flash drive or perform any operation of the device during the process. Otherwise, it will fail. Export information from another device to a USB flash drive, and then import it to this device. You can use a USB flash drive to update the device, or export or import user information, 2.11.1 USB Export You can export data from the device to a USB flash drive.
Import data from the USB flash drive Tap OK. The selected data is imported to the device. 2.11.3 USB Update You can use a USB flash drive to update the device. Rename the update file to "update.bin", put it in the root directory of the USB flash drive, and then insert the USB flash drive to the device. On the main menu, select USB > USB Update, and then tap OK. "Confirm to Update" is displayed. Tap Esc to cancel the update. Tap OK. The device will restart when update is completed. 2.11.
Select USB Export, and then tap OK. The unlocking records are exported to the USB flash drive. 2.11.5 One-click Operation You can use one-click operation to import or export user information, including cards and fingerprints. One-tap, select USB > One-click Operation, and then tap OK. Import: Import user information, including cards and fingerprints. Export: Export user information, including cards and fingerprints. Tap OK.
3 Web Operations On the web interface of the device, you can configure its parameters, restart it regularly, and update its software. When the device is in the same network as your smartphone, you can also log in to the web interface of the device on your smartphone. Only certain parameters can be configured on the web interface if you log in to it using your smartphone. Initialization You need to set a password and an email address before logging in to the web for the first time.
When you need to reset the administrator password by scanning the QR code, you need the linked email address to receive the security code. Click Next. Auto check You can decide whether to select Auto Check or not. It is recommended that Auto Check be selected to get the latest program in time. Click Next. Finished configuration Click Complete, and the initialization is completed.
Login Open IE web browser, enter the IP address of the device in the address bar, and press Enter. Use browser newer than IE 8, otherwise you might not log in to the web. Make sure that the computer used to log in to the web is in the same LAN with the device. The default IP address is 192.168.1.108. Login Enter the user name and password. The default administrator name is admin, and the password is the one you set during initialization. Change the administrator password regularly and keep it well.
Tips Read the tips. Click OK. Reset Password Scan the QR code on the interface, and you will get the security code. At most two security codes will be generated by scanning the same QR code. If security codes become invalid, to get more security codes, refresh the QR code. You need to send the content you get after you scanned the QR code to the designated email address, and then you will get the security code.
Please use the security code within 24 hours after you receive it. Otherwise, it will become invalid. If wrong security codes are entered for consecutive five times, the administrator will be frozen for five minutes. Enter the security code you have received. Click Next. Reset and confirm the new password. The password should consist of 8 to 32 non-blank characters and contain at least two types of characters among upper case, lower case, number, and special character (excluding ' " ; : &).
2) 3) 4) 1) 2) 3) Configure the time and opening method for a time section. You can configure up to four time sections for each day. (Optional) Select Apply to the whole week to copy the configuration to other days. Click OK Multi-person Click , and then click Add. Multi-person parameter Select an opening method, and enter a number for valid user. In the User List section, enter the ID of the users as needed. For user ID, see "2.7.1 Adding a New User".
Table 3-1 Parameter description Parameter Description Name Enter a name for the door that this device controls. Select NC for normally closed, or NO for normally open. If either is selected, State the defined opening method will not be effective. Opening Method See Step 3 above. Hold Time Unlock duration. If expired, the door will be locked. It ranges from 0.2 to 600 (Sec.) seconds. Normally Open Time The door will be always open or closed. Normally Close Time Timeout (Sec.
Alarm linkage Click to modify the alarm linkage parameters. Change alarm linkage parameters Table 3-2 Alarm linkage parameter description Parameter Description Alarm Input You cannot modify the value. Keep it default. Name Enter a zone name. Alarm Input Type Select the type according to the alarm input type of the alarm device you have purchased. NO: The circuit of the alarm device is normally open, and it closes when an alarm is triggered.
Parameter Description Channel Type There are two options: NO and NC. Click OK, and then the configuration is completed. The configuration on the web will be synchronized with the configuration in the client if the device is added to a client. 3.5.2 Alarm Log You can view the alarm type and time range in the Alarm Log interface. Log in to the web interface. Select Alarm Linkage > Alarm Log. Alarm log Select a time range and alarm type, and then click Query.
3.6.1 Configuring Time Section You can configure 128 time sections (0–127), and 4 time sections at most for each day. A user can only unlock doors in the configured time sections. Log in to the web interface. Select Time Section > Time Section. Click Add. Time section parameters Enter a number and name for the time section. No.: Enter a section number. It ranges from 0 through 127. Time Section Name: Enter a name for each time section.
Add a holiday group Enter a number and a name for the holiday group. No.: Enter a section number. It ranges from 0 through 127. Time Section Name: Enter a name for each time section. You can enter 10 Chinese characters or 32 characters (contain numbers, special characters and English characters). Click Add. Add a holiday Enter a name for the holiday, select the start and end date, and then click OK. You can add multiple holidays for one holiday group. Click OK. 3.6.
Select Time Section > Holiday Plan Config. Click Add. Add a holiday plan Enter a number and name for the holiday plan. No.: Enter a section number. It ranges from 0 through 127. Time Section Name: Enter a name for each time section. You can enter 10 Chinese characters or 32 characters (contain numbers, special characters and English characters). Select the number of a holiday group that you have configured. Select 255 if you do not want to select a holiday group.
Volume setting Click OK. Network Setting 3.9.1 TCP/IP You need to configure IP address and DNS server so that the device can communicate with other devices. Prerequisite Make sure that the device is connected to the network and you can log in to its web interface. Log in to the web interface. Select Network Setting > TCP/IP. TCP/IP Configure parameters.
Table 3-3 TCP/IP Parameter Description IP Version IPv4. MAC Address MAC address of the device. Static: Set IP address, subnet mask, and gateway address manually. DHCP After DHCP is enabled, IP address, subnet mask, and gateway Mode address cannot be configured. If DHCP is effective, IP address, subnet mask, and gateway address will be displayed automatically. If you want to see the default IP when DHCP is effective, you need to disable DHCP.
Parameter Description RTSP Port Default value is 554. Click OK to complete the setting. 3.9.3 Register When connected to external network, the device will report its address to the server that is designated by the user so that clients can get access to the device. Log in to the web interface. Select Network Setting > Auto Register. Select Enable, and enter host IP, port, and sub device ID. Table 3-5 Auto register description Parameter Description Host IP Server IP address or server domain name.
Log in to the web interface. Select Network Setting > P2P. Select Enable to enable the P2P function. Click OK. Scan the QR code on your web interface to get the serial number of the device. Date Setting You can configure time zone, system time, DST (Daylight Saving Time) or NTP server. Log in to the web interface. Click Date Setting. Date setting Table 3-6 Data setting description Parameter Description Time Zone Configure the time zone as needed. System Time Configure system time.
Parameter NTP Setting Description 1. 2. Select the NTP Setting check box. Configure parameters. Server: Enter the domain of a NTP server, and the device syncs time with the server in real time. Port: Enter the prot of the NTP server. Update Cycle: The interval of to use NTP. Click OK. Safety Management 3.11.1 IP Authority Log in to the web interface. Click Safety Mgmt. > IP Authority. IP authority Select a cybersecurity mode as needed.
Network access Select Allow List or Block List. Click Add. Add IP Configure parameters.
Table 3-7 Description of adding IP parameters Parameter Description Type Select IP address, IP segment, MAC address or all IP addresses. IP address: Select IP version and enter the IP address of the host to be added. IP segment: Select IP version and enter the start address and end address of the segment to be added. MAC address: Enter MAC address of the host to be added. All IP addresses: Set all IP addresses in allowlist or restricted list. Al Ports Set access ports.
Select the Enable check box. Network access Click OK. 3.11.2 Systems 3.11.2.1 System Service Log in to the web interface. Select Safety Mgmt. > System Service. Enable or disable the system services as needed. The system service configuration on the web interface is synchronized to the Features interface of the device.
Table 3-8 Parameter description Parameter Description Secure Shell (SSH) is a cryptographic network protocol for operating network services securely over an unsecured network. SSH When SSH is enabled, SSH provides cryptographic service for the data transmission. PWD Reset Enable If enabled, you can reset the password. This function is enabled by default.
Figure 4-115 File download Click Open. Figure 4-116 Certificate information Click Install Certificate.
Figure 4-117 Certificate import wizard (1) Select Current User or Local Machine, and then click Next. Current User: Applies to the user that has logged in to the PC. Local Machine: Applies to all users that have logged in to the PC Figure 4-118 Certificate store Step 10 Select the storage location, and then click Next.
Figure 4-119 Certificate import wizard (2) Step 11 Click Finish. Figure 4-120 Imported successfully User Management You can add and delete users that can log in to the web interface, modify users’ passwords, and enter an email address for resetting the password when you forget your password. User refers to the use who logging in to the web interface. 3.12.1 User 3.12.1.1 Adding Users Log in to the web interface. Select User Mgmt. > User Mgmt.
User management Click Add. Add user Enter username, password, confirm password, and remark. Click OK. 3.12.1.2 Changing Password Log in to the web interface. Select User Mgmt. > User Mgmt. Click to change the password.
Modify user information Select the Bind Email check box and then enter the linked email address. Select the Modify Password check box, and then enter the old password, new password and confirm password. Click OK. 3.12.2 ONVIF User Open Network Video Interface Forum (ONVIF), a global and open industry forum with the goal of facilitating the development and use of a global open standard for the interface of physical IPbased security products.
Onvif user Click Add. Add ONVIF user Enter username, password, and confirm password. Select the group. Click OK. 3.12.2.2 Changing Password Log in to the web interface. Select User Mgmt. > Onvif User. Click to change the password.
Select the Modify Password check box, and then enter the old password, new password and confirm password. Click OK. Maintenance You can regularly restart the device to improve the device performance. Log in to the web interface. Select Maintenance. Maintenance Set the time, and then click OK. It is Never by default. (Optional) Click Reboot Device, the device will restart immediately.
3.14.2 Importing Configuration File You can import the configuration file that is exported from an access controller to another access controller with the same model. Log in to the web interface. Select Config Mgmt. on the navigation bar. On the configuration management interface, click Browse to select the configuration file that you want to import, and then click Import configuration. The device will restart after importing configuration file. 3.14.3 Default Be careful when doing this operation.
Upgrade Select upgrading method according to the actual needs. File Upgrade 1) Click Browse, and then upload upgrade file. 2) The upgrade file should be a .bin file. 3) Click Upgrade. The upgrade starts. Online Upgrade 1) Select the Auto-check check box, and then click OK. The system checks for upgrade once a day automatically, and there will be system notice if any upgrade is available.
Select Online User on the navigation bar. Online user System Log View and back up system logs, admin logs, and unlock records. 3.18.1 System Logs View and search for system logs. Log in to the web interface. Select System Log > System Log. Select a time range and a type, and then click Query. Click Backup to download the results.
3.18.2 Admin Log Search for admin logs by admin ID. Log in to the web interface. Select System Log > Admin Log. Enter the admin ID, and then click Query. Admin log 3.18.3 Unlock Records Search for unlock records and export them. Log in to the web interface. Select System Log > Search Records. Select a time range and a type, and then click Query. Click Export Data to download the results. Exit Click at the upper-left corner, and then click OK to log out of the web interface.
4 SmartPSS AC Configuration You can remotely manage the device through SmartPSS AC. This chapter mainly introduces quick configuration. For detailed operations, see the user's manual of SmartPSS AC. The interfaces of Smart PSS AC are for reference only, and might differ from the actual ones. Login Install SmartPSS AC. Double-click , and then follow the instructions to finish the initialization and log in. Adding Devices You need to add the device to SmartPSS AC.
Manual add Enter detailed information of the device. Table 4-1 Parameters Parameter Description Device Name Enter a name of the device. We recommend naming the device with installation area for easy identification. Method to add Select IP to add the device through IP address. IP Enter IP address of the device. It is 192.168.1.108 by default. Port Enter the port number of the device. The port number is 37777 by default. Enter the username and password of the added device.
4.2.2 In Batches We recommend adding devices by auto search when you need to add devices in batches within the same network segment, or when the network segment is clear but the device IP address is unclear. Log in to SmartPSS AC. Click Device Manager on the lower-left corner. Devices Click Auto Search. Auto search Enter the network segment, and then click Search. A search result list will be displayed. Click Search to refresh the device list.
After adding, SmartPSS AC logs in to the device automatically. If succeeded, the status of the device will be Online. Otherwise, it is Offline. Other Operation : Edit the information of the device, including device name, IP address, port number, username, and password. You can also double-click the device to edit its information. : Goes to the device configuration interface.
Setting card type Click OK. 4.3.2 Adding User 4.3.2.1 One by One You can add users one by one manually. Log in to SmartPSS AC. Click Personnel Manger > User > Add. Add basic information of the user. 1) Click the Basic Info tab on the Add User interface, and then add basic information of the user.
Add basic information Click the Certification tab to add certification information of the user. Configure password. The password must consist of 6–8 digits. Configure card. The card number can be read automatically or entered manually. To read the card number automatically, select a card reader, and then place the card on the card reader. 1) Click , set Card Reader to Device, and then select the device you add from Device.
2) Click Add Fingerprint and press your finger on the scanner three times continuously. Add password, card, and fingerprint Configure permissions for the user. For details, see "4.4 Assigning Permissions". Permission configuration Click Finish. 4.3.2.2 In Batches You can add users in batches. Log in to SmartPSS AC. Click Personnel Manger > User > Batch Add. Select Device from Device, and then select the device that you add on the right. Configure the following parameters. Start No.
Quantity: The number of users you want to add. Department: Select the department you want to add the users to. Effective Time and Expired Time: The users will only have unlocking permissions within the defined time frame. Click Issue to start issuing cards. The card number will be read automatically. Click Stop when you finish issuing cards. Click OK. Add users in batches In the user list, click to edit the information of the users added.
Create a permission group Click of the permission group you added. Select the users you want to add to the permission group. Click OK. Users in the permission group can now swipe their cards, or use other unlock methods to unlock the door.
Fingerprint Registration Instructions Before register your fingerprints, pay attention to the following: Make sure that your fingers are clean and dry. Press your finger on the center of the fingerprint scanner. Do not put the fingerprint sensor in a place with intense light, high temperature, and high humidity. If your fingerprints are unclear, use other unlocking methods. Fingers Recommended Forefingers, middle fingers, and ring fingers are recommended.
Appendix Figure 1-3 Wrong 61
62
Cybersecurity Recommendations Mandatory actions to be taken for cybersecurity 1. Use a strong password Refer to the following recommendations for setting up the password: The length should not be less than 8 characters A strong password is comprised of at least two of these three character types: letters in upper and lower cases, numbers, and special characters. Do not contain the username in its forward or reverse sequence. Do not use continuous characters, such as 123 and abc.
9. 10. 11. 12. 13. Add users properly according to business and management needs, and allocate minimum sets of permissions to them. Turn off Unnecessary Services and Use Safe Modes If not needed, SNMP, SMTP and UPnP can be turned off to reduce the risks for the device. If necessary, it is strongly recommended to use safe modes, including but not limited to: SNMP: Select SNMP v3 and set a stronger encryption password and authentication password. SMTP: Select TLS to access to the email server.
Legal and Regulatory Information Legal Considerations Video surveillance can be regulated by laws that vary from country to country. Check the laws in your local region before using this product for surveillance purposes. Disclaimer Every care has been taken in the preparation of this document. Please inform your nearest Dahua office of any inaccuracies or omissions.
Technology. The most up to date copy of the signed EU Declaration of Conformity (DoC) can be downloaded from: www.dahuasecurity.com/support/notice/ CE-Electromagnetic Compatibility (EMC) This digital equipment is compliant with Class A according to EN 55032. Warning: This is a Class A product. In a domestic environment this product may cause radio interference, in which case the user may be required to take adequate measures.
instructions and the antenna(s) used for this transmitter must be installed to provide a separation distance of at least 20 cm from all persons and must not be co-located or operating in conjunction with any other antenna or transmitter. End-users and installers must be provided with antenna installation instructions and transmitter operating conditions for satisfying RF exposure compliance. This equipment should be installed and operated with a minimum distance 20cm between the radiator and your body.
Technology Equipment. CAUTION This is a Class A equipment. Operation of this equipment in a residential environment could cause radio interference. In such a case, the user may be required to take corrective actions. Batteries Correct disposal of batteries in this product This marking on the battery indicates that the batteries in this product should not be disposed of with other household waste at the end of their working life.
to local laws and regulations. For information about your nearest designated collection point, contact your local authority responsible for waste disposal. In accordance with local legislation, penalties may be applicable for incorrect disposal of this waste. This symbol means that the product shall not be disposed of together with household or commercial waste. Directive 2012/19/EU on waste electrical and electronic equipment (WEEE) is applicable in the European Union member states.
response. If you are connected to the Internet, you can: Download user documentation and software updates. Search by product, category, or phrase. Report problems to Dahua support staff by logging in to your private support area. Chat with Dahua support staff. Visit Dahua Support at www.dahuasecurity.com/support Contact Information ZHEJIANG DAHUA VISION TECHNOLOGY CO., LTD. Address: No.1199, Bin'an Road, Binjiang District, Hangzhou, P.R.
device for specific working temperature and humidity. Do not place the device in a location exposed to dampness, dust, extreme hot or cold, strong electronic radiation, or unstable lighting condtions. Do not install the device in a place near the heat source, such as radiator, heater, furnace, or other heat generating device to avoid fire. Prevent liquid from flowing into the device to avoid damge to internal components.
Symbol WSKAZÓWKI UWAGA Znaczenie Oznacza wskazówki pozwalające na rozwiązanie problemu lub oszczędność czasu. Oznacza informacje uzupełniające tekst główny. Wymogi dot. Bezpieczeństwa Przestrzegaj lokalnych standardów bezpieczeństwa elektrycznego celem upewnienia się, że źródło napięcia jest stabilne i zgodne z wymogami określonymi dla urządzenia. Urządzenie należy transportować, używać i przechowywać w warunkach o dozwolonym poziomie wilgotności i temperatury.
Sikkerhedsanvisninger Følgende signalord med beskrivelse kan forekomme i vejledningen. Signalord Beskrivelse FARE Angiver høj risiko, som, hvis den ikke undgås, kan medføre død eller alvorlig personskade. ADVARSEL Angiver middel eller lav risiko, som, hvis den ikke undgås, kan medføre lettere til moderat personskade. FORSIGTIG Angiver mulig risiko, som hvis den ikke undgås, kan resultere i skade på ejendom, tab af data, reduceret ydelse eller uforudsigelige resultater.
Bortskaf brugte batterier i overensstemmelse med lokale bestemmelser eller batteriproducentens anvisninger. Suomi Tärkeitä varotoimenpiteitä ja varoituksia Tässä luvussa kuvataan laitteen asianmukainen käsittely, vaarojen torjunta ja omaisuusvahinkojen estäminen. Lue tämä sisältö huolellisesti ennen laitteen käyttämistä ja noudata näitä ohjeita, kun käytät laitetta. Säilytä ohjeet tulevia tarpeita varten.
Paristo Alhainen pariston varaustaso vaikuttaa tosiaikakellon (RTC:n) toimintaan nollaten sen jokaisella käynnistyskerralla. Lokiviesti ilmestyy tuotteen palvelinraporttiin, kun paristo on vaihdettava. Lisätietoa palvelinraportista saat tuotteen asetussivuilta tai ottamalla yhteyttä Dahuan tukeen. VAROITUS Räjähdysvaara, jos paristo asetetaan väärin paikalleen. Vaihda vain samanlaiseen paristoon tai Dahuan suosittelemaan paristoon.
A tűz elkerülése érdekében ne telepítse az eszközt hőforrás, mint például radiátor, hősugárzó, kemence, vagy más hőtermelő eszköz közelében lévő helyre. A belső alkatrészek károsodásának elkerülése érdekében akadályozza meg, hogy folyadék folyjon az eszközbe. A leesésének megakadályozása érdekében az eszközt vízszintesen telepítse, vagy stabil helyre telepítse. Az eszközt jól szellőző helyre telepítse, és ne blokkolja az eszköz szellőzését. Önkényesen ne szerelje szét az eszközt.
Сигнални думи Значение СЪВЕТИ Обозначава начини, които да ви помогнат да разрешите проблем или да спестите време. ЗАБЕЛЕЖКА Предоставя допълнителна информация като акцент и допълнение към основния текст. Изисквания за безопасност Спазвайте местните стандарти за електрическа безопасност, за да осигурите стабилно напрежение, отговарящо на изискването за захранване на устройството.
Dispozitivului Instructiuni de siguranta Urmatoarele semne categorizate pot aparea in Ghid. Signal Words PERICOL AVERTIZARE ATENTIE SFATURI NOTA Meaning Indică un risc potențial ridicat care, dacă nu este evitat, va duce la deces sau vătămări grave. Indică un pericol potențial mediu sau scăzut care, dacă nu este evitat, poate duce la răni ușoare sau moderate.
AVERTIZARE Risc de explozie dacă bateria este înlocuită incorect. Înlocuiți numai cu o baterie identică sau cu o baterie recomandată de Dahua. Aruncați bateriile uzate în conformitate cu reglementările locale sau cu instrucțiunile producătorului bateriei. Čeština Důležitá bezpečnostní opatření a varování Tato kapitola popisuje obsah vztahujícíse na správnou manipulaci se zařízením, prevenci nebezpečí a prevenci škod na majetku.
Zařízení instalujte na dobře větraném místě a neblokujte odvětrávání zařízení. Zařízení svévolně nedemontujte. Během přepravy, skladování a instalace zamezte silnému tlaku, prudkým vibracím a namočení. Při přepravě je nezbytné úplné zabalení. Při přepravě použijte obal z výroby nebo obdobnýobal. Baterie Nízké nabití baterie ovlivňuje fungování hodin ve skutečném čase a způsobuje, že se při každém spuštění resetují.
Σήματα με λέξεις ΣΥΜΒΟΥΛΕΣ ΣΗΜΕΙΩΣΗ Σημασία Παρέχει μεθόδους που θα σας βοηθήσουν να επιλύσετε ένα πρόβλημα ή να εξοικονομήσετε χρόνο. Παρέχει πρόσθετες πληροφορίες δίνοντας έμφαση και συμπληρώνοντας το κείμενο. Απαιτήσεις ασφαλείας Τηρήστε τα τοπικά πρότυπα ηλεκτρικής ασφάλειας για να βεβαιωθείτε ότι η τάση είναι σταθερή και συμμορφώνεται με την απαίτηση τροφοδοσίας της συσκευής.
hrvatski Važne zaštitne mjere i upozorenja Ovo poglavlje opisuje sadržaj koji obuhvaća pravilno rukovanje uređajem, sprječavanje opasnosti i sprečavanje oštećenja imovine. Pažljivo pročitajte ove sadržaje prije korištenja Uređaja, pridržavajte ih se pri upotrebi i sačuvajte ih za buduću uporabu. Sigurnosne upute U vodiču se mogu pojaviti sljedeće kategorizirane signalne riječi s definiranim značenjem.
zaštitno pakiranje. Koristite tvorničko pakiranje ili ekvivalent za transport. Baterija Niska baterija utječe na rad RTC, uzrokujući da se resetira pri svakom uključivanju. Kad bateriju treba zamijeniti, pojaviti će se poruka u izvješću poslužitelja (server). Dodatne informacije o izvješću poslužitelja (server) potražite na stranicama priručnika proizvoda ili se obratite Dahua podršci. UPOZORENJE Rizik od eksplozije ako se baterija nepravilno zamijeni.
vlhkosti a teploty. Prečítajte si príslušné technické špecifikácie zariadenia pre špecifickú pracovnú teplotu a vlhkosť. Zariadenie neumiestňujte na miesto vystavené vlhkosti, prachu, extrémnemu teplu alebo chladu, silnému elektronickému žiareniu alebo nestabilným podmienkam osvetlenia. Zariadenie neinštalujte na miesto, ktoré sa nachádza blízko zdroja tepla, ako je napríklad radiátor, ohrievač, pec alebo iné zariadenie na tvorbu tepla. Predídete tak vzniku požiaru.
Oznaka UPOZORENJE OPREZ PREPORUKE BELEŠKA Značenje Označava opasnost srednje ili niske potencijale koja bi, ukoliko se ne izbegne, mogla dovesti do blagih ili umerenih povreda. Označava potencijalni rizik koji bi, ukoliko se to ne izbegne, mogao dovesti do oštećenja imovine, gubitka podataka, niže performanse ili nepredvidivog rezultata. Pruža metode za pomoć u rešavanju problema ili uštede vremena. Pruža dodatne informacije kao naglasak i dodatak tekstu.
Türkçe Önemli Kurallar ve Uyarılar Bu Bölüm, Cihazın doğru kullanımını, tehlike önlemeyi ve mal zararının önlenmesini kapsayan içerikleri anlatmaktadır. Cihazı kullanmadan önce bu içerikleri dikkatli şekilde okuyun, kullanırken bunlara uyun ve ileride başvurmak üzere saklayın. Güvenlik Talimatları Aşağıda, belirtilen açıklamaya sahip kategorize edilmiş uyarı sözcüklerini Kılavuzda görebilirsiniz.
Cihazı iyi havalandırılan bir yere monte edin ve cihazın hava sirkülasyonunu engellemeyin. Cihazın parçalarını gelişigüzel sökmeyin. Cihazın nakliyesi, saklanması ve montajı esnasında ağır baskılardan, şiddetli sarsıntılardan ve sıvıya batmalardan kaçının. Cihazın nakliyesi esnasında ambalajın tamamı gereklidir. Nakliye için fabrikasyon ambalajı ya da eş değerini kullanın. Pil Düşük pil gücü, her güç açma esnasında sıfırlanmasına neden olarak RTC’nin çalışmasını etkiler.
סִמון מִלוע התְה משמתוע .ולהשלמתו לטקסט להדגשה נוסף מידע מספקת ִטִחוע דְִשע ותואם יציב שהמתח להבטיח מנת על בחשמל לבטיחות המקומיים התקנים לכל לציית יש .המכשיר של החשמל אספקת לדרישות .המותרים והלחות הטמפרטורה לתנאי בהתאם יעשו המוצר של ואחסון שימוש ,הובלה המוגדרים וללחות לטמפרטורה המכשיר של המקבילים הטכניים למפרטים להתייחס יש .
Précautions d’emploi Les mentions d’avertissement catégorisées suivantes ayant un sens défini sont susceptibles d’apparaître dans le manuel. Mentions d’avertissement DANGER AVERTISSEMENT AVERTISSEMENT Signification Indique un danger à risque élevé qui entraînera la mort ou des blessures graves si les instructions données ne sont pas respectées. Indique une situation moyennement ou faiblement dangereuse qui entraînera des blessures faibles ou modérées si les instructions données ne sont pas respectées.
Batterie Un niveau de batterie faible affecte le fonctionnement du RTC, qui se réinitialisera à chaque redémarrage. Lorsque la batterie doit être remplacée, un message de journal apparaît dans le rapport du serveur du produit. Pour plus d’informations sur le rapport du serveur, consultez les pages de configuration du produit ou contactez l’assistance Dahua. AVERTISSEMENT Risque d’explosion si la batterie est remplacée de façon incorrecte.
correspondientes del dispositivo para la temperatura y humedad operativas específicas. No coloque el dispositivo en un lugar expuesto a humedad, polvo, calor o frío extremos, radiaciones electrónicas fuertes o condiciones de iluminación inestables. No instale el dispositivo en un lugar cerca de fuentes de calor, como radiadores, calentadores, hornos u otros dispositivos generadores de calor, para evitar un incendio.
Signalwörter Bedeutung WARNUNG VORSICHT Weist auf eine mittlere oder geringe potentielle Gefahr hin, die, wenn sie nicht vermieden wird, zu leichten oder mittelschweren Verletzungen führen kann. Weist auf ein potenzielles Risiko hin, das, wenn es nicht vermieden wird, zu Sachschäden, Datenverlust, geringerer Leistung oder unvorhersehbaren Ergebnis führen kann. TIPPS Stellt Methoden bereit, mit denen Sie ein Problem lösen oder Zeit sparen können.
Explosionsgefahr. Ersetzen Sie die Batterie nur durch eine identische Batterie oder eine Batterie, die von Dahua empfohlen wird. Entsorgen Sie leere Batterien entsprechend den örtlichen Vorschriften oder den Anweisungen des Batterieherstellers. Italiano Norme di sicurezza e avvertenze importanti Il presente capitolo descrive le procedure per una corretta manipolazione del dispositivo, per la prevenzione dei rischi e per la prevenzione di danni materiali.
Installare il dispositivo in un ambiente adeguatamente ventilato e non ostruire la circolazione dell'aria. Non smontare il dispositivo in modo casuale. Evitare forte sollecitazioni, violente vibrazioni e non bagnare il prodotto durante il trasporto, lo stoccaggio e l’installazione. Trasportare il prodotto utilizzando un imballaggio adeguato. Utilizzare l'imballaggio standard previsto o un imballaggio equivalente.
Veiligheidsvereiste Houdt u aan plaatselijke veiligheidsstandaarden om ervoor te zorgen dat het voltage stabiel is en voldoet aan de vereiste stroomvoorziening van het apparaat. Transporteer, gebruik en bewaar het apparaat onder de toegestane relatieve luchtvochtigheid en temperatuuromstandigheden. Zie de overeenkomstige technische specificaties van het apparaat voor specifieke werktemperatuur en relatieve luchtvochtigheid.
Palavras-sinal Significado ATENÇÃO Indica um risco potencial elevado que, se não for evitado, resultará em morte ou ferimentos graves. Indica um risco potencial médio ou baixo que, se não for evitado, poderá resultar em ferimentos ligeiros ou moderados. Indica um risco potencial que, se não for evitado, pode resultar em danos materiais, perda de dados, desempenho inferior ou resultados imprevisíveis. SUGESTÕES Disponibiliza métodos para o ajudar a resolver um problema ou a poupar o seu tempo.