Dahua K Series Cube Network Camera Quick Start Guide V 1.0.0 Dahua Technology CO.
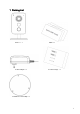
1 Packing List Device × 1 Power Adapter ×1 QSG ×1 Screw Package ×1 Installation Position Map ×1 1
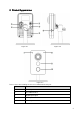
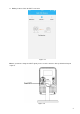
2 Product Appearance Figure 2-1 Figure 2-2 Figure 2-3 Please refer to the following sheet for more details about each port.
6 Micro SD card slot 7 Indicator light 8 Built-in MIC 9 IR LED 10 PIR Sheet 2-1 Note: For reset, long press for 8 seconds and then the light off; For WPS, one quick press. Please refer to the following sheet for more details about status of indicator light. Indicator light status Device status Red light normally on Booting Green light slow flashing Booting completed, await wifi config, enter smart config status; Wifi smart config in progress, including WPS, management frame and etc.
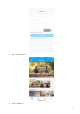
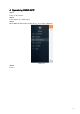
3 Operate by Easy4ip APP 1. Power on the device with power adapter. 2. Connect your smart phone to your WiFi network. Scan the “Easy4ip APP” QR on the packing box, download and install the Easy4ip APP. APP 3. Open Easy4ip APP (take IOS as an example), tap login to login the APP,, see Figure 3-1. Figure 3-1 4. Tap “register” for first use.
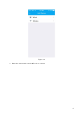
Figure 3-2 5. Tap “+” to add devices. Figure 3-3 6. Choose “Wireless”.
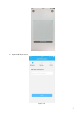
Figure 3-4 7. Name the camera and scan the QR code on camera.
Figure 3-5 8. Input the Wi-Fi password.
. Waiting for 60s to finish the Wi-Fi connection.
4 Operate by DMSS APP Step 1 Power on the camera. Step 2 Connect iphone to a WiFi signal. Step 3 Open DMSS (downloaded from APP Store), choose Device Manager. Figure 4-1 Step 4 Click “+”.
Figure 4-2 Step 5 Choose “WiFi configuration”. Figure 4-3 Step 6 Input a device name and scan the QR code on camera, then “next”.
Figure 4-4 Step 7 Input the WiFi password, then “next”. Figure 4-5 Step 8 Connection succeeds.
Figure 4-6 6 Figure 4-7 47 Figure 4-8 4 Note: Please try again or check the WiFi password if it failed. The WiFi configuration will be closed if activating activat WPS function, Please reset the device if you still need to configure WiFi via DMSS App.
5 Device Installation4 Installation4 Network Configuration The IP address of all the cameras is the same when leaving factory (default IP 192.168.1.108). To make the camera access to the network smoothly, please plan the available IP segment reasonably according to the actual network environment. NOTE: The camera can be configured only when the IP addresses of the camera and the computer are in the same network segment. Step 1 Power on the device with power adapter,Connect the device to computer.
Step 4 Click the main interface. ,and double click the default IP, See Error! Reference source not found. for Error! Reference source not found.
6 Important Please make sure the installation surface can min support the 3X weight of the camera and the bracket. Figure 5-1 Step 1 Paste the installation map on the installation surface such as wall, ceiling or the wood. Step 2 Dig holes in the installation surface according to the installation map. Step 3 Insert the expansion bolts from the accessories bag to the holes you just dug. If it is the wood surface you can skip to the next step. Step 4 Fix the device with screw in the accessories bag.
7 This device complies with Part 15 of the FCC Rules. Operation is subject to the following two conditions: (1) This device may not cause harmful interference, and (2) This device must accept any interference received, including interference that may cause undesired operation. Attention that changes or modification not expressly approved by the party responsible for compliance could void the user’s authority to operate the equipment.