
User's Manual

15
6
66
6
Important
Please make sure the installation surface can min support the 3X weight of the camera and the
bracket.
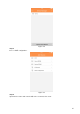
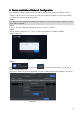
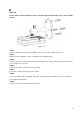
Figure 5-1
Step 1
Paste the installation map on the installation surface such as wall, ceiling or the wood.
Step 2
Dig holes in the installation surface according to the installation map.
Step 3
Insert the expansion bolts from the accessories bag to the holes you just dug. If it is the wood surface
you can skip to the next step.
Step 4
Fix the device with screw in the accessories bag.
Step 5
Connect the cable and then boot up the device.
Step 6
Loosen the adjust knob for a little bit, adjust the camera to proper surveillance position according to
your practical requirements.
Step 7
Secure the knob of the bracket to fix the camera.