IP Indoor Monitor Quick Start Guide V1.0.
Foreword General This document mainly introduces structure, installation process, and basic configuration of the IP Indoor Monitor (hereinafter referred to as the "indoor monitor"). Safety Instructions The following categorized signal words with defined meaning might appear in the manual. Signal Words CAUTION NOTE Meaning Indicates a potential risk which, if not avoided, could result in property damage, data loss, lower performance, or unpredictable result.
Important Safeguards and Warnings The following description is the correct application method of the device. Read the manual carefully before use to prevent danger and property loss. Strictly conform to the manual during application and keep it properly after reading. Operating Requirement Do not place and install the device in an area exposed to direct sunlight or near heat generating device. Do not install the device in a humid, dusty or fuliginous area.
Table of Contents Foreword ............................................................................................................................................................ I Important Safeguards and Warnings .............................................................................................................. II 1 Introduction................................................................................................................................................... 1 Overview .....
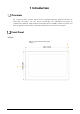
1 Introduction Overview The 10-inch IP indoor monitor, widely used in intelligent buildings, integrates functions of monitoring, voice/video call, and unlock. Technologies like embedded technology, IP communication methods, simple network management protocol (SNMP), network encryption, and more are applied to make the whole system more stable, safer, and easier to be managed.
7 Inch Front panel [mm (inch)] Table 1-1 Components No. Name 1 On/off button. Press the button, and then you can turn on/off the screen; press and hold the button, you can turn on/off or restart the indoor monitor. 2 MIC, inputs audio.
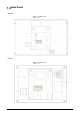
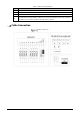
Rear Panel 10 Inch Rear panel 7 Inch Rear panel 3
Table 1-2 Rear panel description No. Description 1 USB port, used by project personnel. 2 SD card slot. 3 Alarm ports, power cables, RS-485 port, and network ports are under the cover. 4 On/off button. Press the button, and then you can turn on/off the screen; press and hold the button, you can turn on/off or restart the indoor monitor.
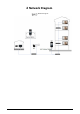
2 Network Diagram Network diagram 5
3 Configuration This chapter introduces initialization, cable connection, and parameter configuration to realize basic functions, including device management, calling, and monitoring. Configuration Process Before configuration, make sure that there is no short circuit or open circuit. Plan IP address for every device, and also plan the unit number and room number you need. Configure door stations (VTO). For details, see the IP Indoor Monitor_User’s Manual. 1) Initialize VTO. 2) Configure VTO number.
Select a language Select a language that you prefer. Tap OK. Select apartment or villa Apartment: Select Apartment when the door stations and indoor monitors are installed in apartments. Quick configuration is not available when you select apartment. Villa: Select Villa when the door stations and indoor monitors are installed in villas. Quick configuration is available when you select villa. Select Villa. Tap OK.
Set local password Enter password, confirm password, and email for the VTH you are to initialize. Tap OK. Set another device password Tap Refresh, and then tap Next.
Tap Edit behind each device to do configurations. Configure indoor monitor (VTH). 1) Select an indoor monitor (VTH). VTH config 2) 3) 1) Enter local IP, Network, and gateway. Tap OK. The indoor monitor (VTH) configuration is completed. Configure Main VTO and Sub VTO. There must be only one main VTO and one or more sub VTOs. If there are no sub door stations (VTO), then you do not need to do sub door station (VTO) configurations. Select a door station (VTO).
VTO config (2) 2) 3) 4) Select Main or Sub. Enter local IP, Network, gateway; select video standard, date format, time format; set date and time. Tap OK. Tap One-key Config. The VTO configuration will be completed in a few seconds. 3.3.1.2 Normal Configuration for VTH (For Apartment) Tap Apartment on Figure 3-2. Connect the indoor monitor to power source. Enter the password, confirm password, and email. Password: The password is used when administrators need to go to the project mode.
Main menu Table 3-1 Description of the main menu No. Name Description 1 Room number Number of the room where the indoor monitor Is installed. 2 Date and time Current time and date are displayed here. Arm and disarm Shortcut icons to arm or disarm are displayed here. The four icons represent at home mode, away from home mode, sleep mode, and customizable mode. Select Arm Mode or Disarm Mode first, and then tap the icons to arm or disarm. 3 : The wired network is not connected.
No. Name Description 5 SOS Tap the SOS icon, the indoor monitor will call the management center. Tap the icon, and then you can set do not disturb period. You need to enable DND Period first, and then you can do do-not-disturb settings. For details, see DND after tapping 6 Do not disturb and entering the password (123456 by default; for password changing, see the IP Indoor Monitor_User’s Manual). It is recommended that the password be changed during the first use.
Tap the Settings icon. Enter the password (123456 by default; for password changing, see the IP Indoor Monitor_User’s Manual). Network settings Configure parameters. Table 3-2 Parameter description Parameter Description You can choose to enable Wi-Fi or not by tapping Network Internet . & Tap , and then available Wi-Fi networks will be displayed. You can select Ethernet IP mode. There are two options: Static and DHCP.
Parameter Description information, model, android version, Android security patch level, baseband version, Kernel version, build number, and more) about the indoor monitor. Tap Network & Internet. Tap Ethernet. Network setting Tap Ethernet Ip mode. Select static: Enter IP address, gateway, netmask, and then tap CONNECT. Select dhcp: Tap dhcp, the IP information will be automatically acquired. Wireless Network Tap the Settings icon. Tap Network & Internet. Tap , the Wi-Fi is enabled.
Wi-Fi Select a wireless network. Enter the password. Tap CONNECT. The network is connected. 3.3.3 Project Settings Tap and hold , enter the password (the password set during initialization), and then the Project Settings interface will be displayed.
3.3.3.1 VTH Config Room No.: Number of the room where the indoor monitor is installed. Device Type: There are two options: Master and Extension. Master: If the indoor monitor that you are operating works as the master station, you need to select Master. Extension: If the indoor monitor works as an extension, you need to select Extension. Master IP: When the indoor monitor works as an extension, you need to enter IP address of the master station. Master Name: Keep the default value.
Parameter Description Password Domain Login Name Login Pwd Status Registration domain of SIP server, which can be null. When VTO works as SIP server, registration domain of SIP server shall be VDP. Username and password to log in to web of the SIP server. Enable the SIP server status, and then the SIP server can start to work. 3.3.3.3 VTO Config You need to add door stations to the indoor monitor, and then calls can be made among door stations and indoor monitors.
VTO IP Tap the default IP. Enter the door station (VTO) IP, user name, and password (used to log in to the door station web interface). Tap You can add 20 door stations (one main door station and 19 sub door stations) to the indoor monitor. Make sure that user name and password that you entered here are the same as the user name and password used when logging in to the door station web interface. to enable the door station. 3.3.3.
Searching device (1) Searching device (2) 3.3.3.5 Resetting Password You can change the email address that you use to reset your password. You need to enable the Resst Password first if you want to reset the password. Tap and hold . Tap Forgot password?. Tap OK.
Scan the QR code with any app with scanning function. Send the string to the email address displayed on your device interface with the email address you set on the Reset MSG interface. A safe number will be sent to your email address. Tap Next and then enter the new password, confirm password, and safe number. The password is reset. Reset password 3.3.3.6 Security Settings You need to enable the trusted list, and then trusted devices can communicate with the indoor monitor.
Enable trusted list Add network trusted list You need to tap on the enable trusted list interface, and then the Add Network Trusted List will be displayed. Unlocking You can unlock doors connected to the door stations through the indoor monitor when watching monitoring videos, when someone is calling you from the door station, or when talking to the people at the door station over the indoor monitor.
Commissioning 3.5.1 Watching Monitoring Videos Tap , and the Monitor interface is displayed. On the indoor monitor, you can watch videos captured by door stations and IP cameras. You can also put door stations and IP cameras that you like into the Favorite folder by tapping at the lower right corner of each device. During the call with a door station, you can watch the real-time videos capture by door stations or IP cameras.
IPC information : Turn down the volume. : Go to the previous page. : Go to the main menu. : All thumbnails of interfaces you have opened will be displayed. Select an interface and slide it to the left or right to close the interface. : Turn up the volume. 3.5.2 Making Calls Tap , and then you can call other indoor monitors and the management center; and you can also view call logs and your contacts on this interface. You can also call the indoor monitor from door stations.
Making calls Calling If SD card is not inserted, the video recording icon You can tap the unlock icon / and snapshot icon cannot be used. to unlock doors. If the icons turn grey, the unlock function cannot be used.
Tap Call User. Enter room number (room number you entered in the indoor monitor), and then tap . If door station (VTO) works as SIP server, enter a room number. If management platform like DSS Pro or DSS Express works as SIP server. Call residents in your apartment or your building, enter a room number. Call residents in other apartments and buildings, enter 1#1#101 for apartment 1 building 1 room 101. If you call the extensions (101#1) from the main indoor monitor (101#0), just enter -1.
Cybersecurity Recommendations Cybersecurity is more than just a buzzword: it’s something that pertains to every device that is connected to the internet. IP video surveillance is not immune to cyber risks, but taking basic steps toward protecting and strengthening networks and networked appliances will make them less susceptible to attacks. Below are some tips and recommendations on how to create a more secured security system. Mandatory actions to be taken for basic device network security: 1.
6. 7. 8. 9. 10. 11. 12. 13. Enable HTTPS We suggest you to enable HTTPS, so that you visit Web service through a secure communication channel. MAC Address Binding We recommend you to bind the IP and MAC address of the gateway to the device, thus reducing the risk of ARP spoofing. Assign Accounts and Privileges Reasonably According to business and management requirements, reasonably add users and assign a minimum set of permissions to them.