
User's Manual


GB-9
Get started
* Do not use any batteries other than those
specied.
* Do not heat or disassemble batteries. Never
throw them in re or water.
* Do not carry or store batteries with other
metallic objects. The batteries could short
circuit, leak or explose.
Remote control operation range
1. Point the remote control towards the remote
sensor IR of the front of the unit.
2. Make sure that there is no obstacle between
the infrared remote sensor of the unit and
remote control.
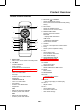
Set time and date
1. In standby mode, press and hold SET TIME
button for 2 seconds, [12H] begins to blink.
2. Press
I
/
J
button on the top panel (or
remote control) to select 12/24 hour format.
3. Press OK
button to conrm, 00:00 will
display, and the hour digits begin to blink.
4. Press
I
/
J
button on the top panel (or
remote control) to select.
5. Repeat steps 3-4 to set the hour, minute,
day, month and year.
Note:
1. In 12 hour format, [MONTH-DAY] is displayed.
2. In 24 hour format, [DAY-MONTH] is displayed.
Turn on
Press STANDBY, the unit switches to the last
selected source.
Switch to standby mode
Press STANDBY to switch the unit to standby
mode, the clock (if set) appears on the display
panel.
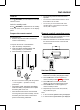
Prepare the remote control
For rst-time use:
1. Remove the protective tab to activate the
remote control battery.
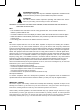
To replace the remote control batteries:
1. Open the battery compartment.
2. Insert one lithium CR2025 battery with
correct polarity (+/-) as indicated.
3. Close the battery compartment.
*
Be sure to insert the battery with the positive
“+” and negative “-” polarities correctly
positioned.
* If the battery leaks, wipe away the leakage
inside the battery compartment and replace
the battery with a new one.
* If the remote control unit is not to be used
for a long time (more than a month), remove
the battery from the remote control unit to
prevent it from being exhausted.
CR2025
3V