User Guide Pantum P2200/P2500 Series Pantum P2600 Series Monochrome Laser Printer It is recommended to carefully read this Guide before using the printer
Preface Welcome to the Pantum series products! We heartily appreciate your using of Pantum series products! To protect your vital interests, please carefully read the following statements. Legal Notice Trademark Pantum and Pantum logos are registered trademarks of Zhuhai Pantum Electronics Co.,Ltd. Microsoft®, Windows®, Windows Server® and Windows Vista® are trademarks registered by Microsoft Corporation in the United States or other countries/regions.
Safety Precautions Disconnect the power supply The product should be placed close to or easily accessible to power sockets, so as to allow easy disconnection of power supply! Laser Safety The laser radiation is harmful to the human body. Since laser components are completely sealed in the printer, laser radiation will not leak. To avoid laser radiation, please do not randomly disassemble the printer! The printer follows the provisions of Class 1 laser products under CFR standard.
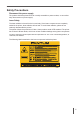
Safety Warning Please note the following safety warnings before using the printer: Warning There is high-voltage electrode inside the printer. Before cleaning the printer, make sure the power is turned off! Plugging and unplugging the power cord plug with a wet hand can result in an electric shock. The fuser unit is hot when and after printing. Touching the fuser unit (the shaded area as shown) may cause burns! The fuser unit is attached with a high temperature warning label.
Precautions Precautions before Using the Printer: 1. 2. 3. Read and understand all instructions; Familiarize yourself with the basic principles associated with operating electrical appliances; Comply with all warnings and instructions marked on the equipment or specified in the manual supplied with the equipment; 4. If the operating instructions conflict with the safety information, please refer back to the safety information, as you may have misunderstood the operating instructions.
(1) this device may not cause interference, and (2) this device must accept any interference, including interference that may cause undesired operation of the device. 27. Radiation Exposure Statement: This equipment complies with Canada and FCC radiation exposure limits set forth for uncontrolled environments. This equipment should be installed and operated with a minimum distance of 20cm between the radiator and your body.
Table of Contents 1. Before Using the Printer ................................................................................................................1-2 1.1. Packing List .............................................................................................................................1-2 1.2. Components of the Printer .......................................................................................................1-3 1.3. Laser Toner Cartridge ......................................
. Control Panel ..................................................................................................................................8-2 8.1. Control Panel Overview ...........................................................................................................8-2 8.1.1. Functions of Buttons on the Control Panel .......................................................................8-2 8.1.2. Function of LED Indicators on the Control Panel ...........................................
Before Using the Printer 1 Chapter 1. Before Using the Printer ..................................................................................................................1-2 1.1. Packing List ..............................................................................................................................1-2 1.2. Components of the Printer ........................................................................................................1-3 1.3. Laser Toner Cartridge ..............
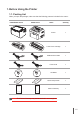
1. Before Using the Printer 1.1. Packing List When you open the package, make sure that the following parts are included in the carton: P2200/P2500 Series P2600 Series Name Quantity Printer 1 Laser Toner Cartridge 1 USB Interface Cable 1 Power Cord 1 CD-ROM 1 Quick Setup Guide 1 Pantum Warranty 1 Note: • The Pantum Warranty may not be attached in some regions.
1.2. Components of the Printer | Front View Serial No. P2200/P2500 Series P2600 Series 1 Output Bin Output Bin 2 Control Panel Control Panel 3 Output Tray Output Tray 4 Automatic Feed Guide Manual Feed Guide 5 Paper Stop Automatic Feed Guide 6 Feeder Tray Paper Stop 7 Automatic Feeder Tray Manual Feeder Tray 8 Automatic Feeder Tray 9 Feeder Tray | Rear View Note: • The rear view of the printer may vary depending on the models and functions. Serial No.
1.3.
Paper and Print Media 2 Chapter 2. Paper and Print Media .....................................................................................................................2-2 2.1. Paper Specification ...................................................................................................................2-2 2.2. Special Paper ...........................................................................................................................2-3 2.3. Loading Paper ......................
2. Paper and Print Media 2.1. Paper Specification P2200/P2500 Series P2600 Series P2600 Series Media Type Plain, thin, special paper (transparency, cardstock, label, envelope, thick, etc.). Media Size A4, A5, JIS B5, IS0 B5, A6, Letter, Legal, Executive, Folio, Oficio, Statement, Japanese Postcard, Monarch Env, DL Env, C5 Env, C6, Env, No.10 Env, ZL, Big 16K, Big 32K, 16K, 32K, B6, Yougata4, Postcard, Younaga3, Nagagata3, Yougata2, custom, etc.
2.2. Special Paper This printer supports using the special paper for printing. Special paper includes: label, envelope, transparency, thick, cardstock, etc. Note: • When using special paper or print media, be sure to select matched print type and size in the print settings so as to get the best print effect. • When using special media to print, it is recommended to load one piece of paper at one time. For P2200/P2500 series, load one piece of special paper into the automatic feeder tray at one time.
2.3. Loading Paper 2.3.1. Loading into the Automatic Feeder Tray a) Open the feeder tray. P2500 Series P2600 Series b) Slide the automatic feed guides to match both sides of the paper. P2500 Series P2600 Series c) Raise the output tray to avoid the paper from slipping and falling. P2500 Series P2600 Series d) Load the paper into the automatic feeder tray with the print-side up.
Note: • Before loading paper, please unfold the stacked paper to avoid a paper jam or feed error,and then load the paper into the tray print-side up. e) Adjust the paper stop to keep the paper in position. To ensure normal paper feeding, adjust the bottom paper stop ① into the slot to keep it from slipping out, and then adjust the blue stop② to match the paper size.
b) Slide the manual feed guides to match both sides of the paper. c) Raise the output tray to avoid the paper from slipping and falling. d) Put the print media like an envelope or transparency into the manual feeder tray with two hands until the front end of the envelope or transparency contacts the correction roller. Note: • When loading paper into the manual feeder tray, the printer will automatically enable the manual feed mode. • Load the paper into the manual feeder tray with the print-side up.
2.4. Nonprinting Area The shaded section indicates the nonprinting area. Usage Printing Paper Size Top and Bottom Margins (A) Left and Right Margins (B) A4 5 mm (0.197 inch) 5 mm (0.197 inch) Letter 5 mm (0.197 inch) 5 mm (0.197 inch) 2.5. Guidelines for Paper Use • Paper or manuscript with rough texture, concave and convex, oil stain and good smoothness has poor printing performance. • Please make sure that there is no dust, fluff, etc. on the paper.
Driver installation and uninstallation 3 Chapter 3.Driver installation and uninstallation ...............................................................................................3-2 3.1.Driver installation based on Windows system ..........................................................................3-2 3.1.1.Installation via USB connection .........................................................................................3-2 3.1.2.One-key wireless network installation ...................
3. Driver installation and uninstallation 3.1. How to install Windows printer driver Windows driver installation software provides two installing methods: one-click installation and manual installation.We recommend one-click installation, which can help to install driver automatically in a faster and more convenient way.If you have any difficulty in using one-click installation, please try manual installation.
3-1 5. After the installation, click “Print &Test Page” button. If your printer prints the test page successfully, it means that you have installed the driver correctly. 3.1.1.2. Method II: Connect the printer via wired network 1. Turn the power of printer and computer on. 2. Connect the computer to wired network. 3. Connect network cable to the network interface of printer, to make sure the printer is connected to computer network (please refer to Chapter 4 for network setup). 4.
• Windows 10 system: When the “DVD RW driver” window pops up from the right top corner of computer desktop, click anywhere in the window, then click “Autorun.exe” to run the installation procedure. Note: • Some computers may be unable to auto play the CD beacase of system configuration. Please double click "Computer" icon, find "DVD RW driver", then double click "DVD RW driver" to run the installation procedure. 5.
• If your software has searched several printers, click on the”One-click intallation” button, and the printer list interface will pop up. Please select the printer that you need according to your printer wired network IP address or host ID.
Note:• If the printer you need is not shown in the list, please click “Refresh” button to search again. If it is not found, please check if the printer and computer are in the same network. (Please see Chapter 5.3 for how to check). • When the printer IP address changes under printer driver installed with host ID , you can also directly print without re-installing the driver. If you need to install the printer driver with the host ID, please check the option “Install the printer in the list with host ID”.
4. Click on the “I agree” button on the right buttom corner after reading the license agreement and enter into driver installation interface. 5. Click the “One-click installation” button in Method III to install driver software. Note: • You can put your mouse cursor in the “One-click installation” button to check the popup information in order to confirm if the current printer is the one you need to install through IP address before you click the button.
• If your software has searched several printers, click “One-click intallation” button, and the printer list interface will pop up. Please select “Configure printer with Wi-Fi via USB and install” and select USB printer, click “Confirm” button and enter into installation process to complete automatic network configuration and driver installation. Note: • When the printer IP address changes under printer driver installed with host ID , you can also directly print without re-installing the driver.
II. Connect computer to router via network cable 1. Connect computer to router via network cable. 2. Connect the printer to computer via USB cable, then power the printer on. 3. Place the attached installation CD in the computer CD-ROM: • Windows XP system: automatically run the installation procedure. • Windows 7/Vista/Server 2008 system: Pop up “Autoplay” interface, click “Autorun.exe” to run the installation procedure.
• Click on the “One-click installation” button if your software has only searched only one printe, and the wireless network configuration interface will pop up, input the SSID and password that you need, then click “Confirm” button, and enter into installation process. The process may need some time, and the duration is related to your computer configuration, please wait patiently. • If your software has searched more than one printers, the printer list interface will pop up.
Note:• When the printer IP address changes under printer driver installed with host ID , you can also directly print without re-installing the driver. If you need to install the printer driver with the host ID, please check the option "Install the printer in the list with host ID". 6. After the installation, click “Print &Test Page” button. If your printer prints the test page successfully, it means that you have installed the driver correctly. 3.1.1.3.1.2.
2. Connect computer to the Wi-Fi Direct network of the printer (please refer to Chapter 5.2.2 for setup method). 3. Place the attached installation CD in the computer CD-ROM: • Windows XP system: automatically run the installation procedure. • Windows 7/Vista/Server 2008 system: Pop up “Autoplay” interface, click “Autorun.exe” to run the installation procedure.
6. After the installation, click “Print &Test Page” button. If your printer prints the test page successfully, it means that you have installed the driver correctly. 3.1.1.3.2. The printer is already connected to wireless network 1. The printer is already connected to wireless network, you can print the “Network configuration page” to check.( see Chapter 8.1.1.3 for how to print). 2. Connect the computer to printer network. 3.
Note:• You can put your mouse cursor in the “One-click installation” button to check the popup information in order to confirm if the current printer is the one you need to install through IP address before you click the button. • You can check the printer IP address through “Network configuration page” (Please see Chapter 8.1.1.3 for how to print) • Click on the “One-click installation” button to enter installation process if your software has searched only one printer.
• If the software has searched several printers, the printer list interface will pop up. Please select the printer you need according to your printer wired network IP address or host ID . Note:• If the printer you need is not shown in the list, please click “Refresh” button to search again. If it is not found, please check if the printer and computer are in the same network. (Please see Chapter 5.3 for how to check).
6. After the installation, click “Print &Test Page” button. If your printer prints the test page successfully, it means that you have installed the driver correctly. 3.1.2. Manual installation • Before installing the drive, you need to learn about printer model by printing printer information page out and check the product name (please refer to Chapter 8.1.1.3 for printing methods). 3.1.2.1. Installation via USB connection 1.
7. The software installs the driver automatically and the installation process may need some time. The duration is related to your computer configuration, please wait patiently. 8. After the installation, click “Print &Test Page” button. If your printer prints the test page successfully, it means that you have installed the driver correctly. 3.1.2.2. Installation via wired network connection 1. Turn the power of printer and computer on. 2. Connect the computer to wired network. 3.
9. The installation software will search the printer automatically and the searching process may need some time. 10. After finishing searching, select the printer that needs to be connected and click “Next”. Note: • If the printer you need to connect is not in the list of printers searched, please click “Refresh” to search again. • When the printer IP address changes under printer driver installed with host ID , you can also directly print without re-installing the driver.
3.1.2.3.1. Installation in basic structure mode 1. Connect computer to access point (wireless router). 2. Connect the printer to computer via USB cable, then power the printer on. 3. Place the attached installation CD in the computer CD-ROM: • Windows XP system: automatically run the installation procedure. • Windows 7/Vista/Server 2008 system: Pop up “Autoplay” interface, click “Autorun.exe” to run the installation procedure.
8. 8. Select “Yes, I want to configurate the printer’s wireless network” on the wireless setup window popped out, and operate according to the prompts to set up the printer to wireless network (please refer to Chapter 5.1.1 for setup method). 9. The installation software will search the printer automatically after wireless network is configured successfully. The search process may need some time. 10. Select the printer needs to be connected and click “Next”.
11. The software installs the driver automatically and the installation process may need some time. The duration is related to your computer configuration, please wait patiently. 12. After the installation, click “Print &Test Page” button. If your printer prints the test page successfully, it means that you have installed the driver correctly. 3.1.2.3.2. Installation in Wi-Fi Direct mode 1. Turn the power of printer and computer on. 2.
8. Select “No, the printer has been connected to wireless network” on the wireless setup window popping out, and then click “Next”. 9. The installation software will search the printer automatically and the searching process may need some time. 10. Select the printer needs to be connected and click “Next”. Note: • If the printer you need to connect is not in the list of printers searched, please click “Refresh” to search again.
11. The software installs the driver automatically and the installation process may need some time. The duration is related to your computer configuration, please wait patiently. 12. After the installation, click "Print &Test Page" button. If your printer prints the test page successfully, it means that you have installed the driver correctly. 3.1.3. Method of driver unistallation Windows 7 is taken as the example in the following operation.
3.2. Mac system driver installation • Driver installation under Mac system is divided into 2 steps, driver installation and adding a printer. If you are going to print in AirPrint mode, there is no need to install a driver and you just need to add a printer directly. • When you are installing a driver with wired or wireless network, you may need to know the Bonjour name of printer. Please print the “Network setup page” to view it. (Please refer to Chapter 8.1.1.3). 3.2.1.Driver installation Mac 10.
5. Click “Agree” on the prompt window popping out to accept the licensing agreement. 6. Click “Install”. 7. Input computer password and click “Install Software”. 8. Click “Continue Installation” on the prompt window popping out. 9. The system will finish driver installation automaticall . • If using a USB cable to connect a computer with a Wi-Fi model printer, a wireless network configuration prompt window will pop up during driver installation, as shown in following picture.
3.3.Add printer to Mac system 3.3.1.Add up the printer via USB 1. Connect the printer to computer with USB cable and then turn power on. 2. Enter the “System Preferences” – “Printers & Scanners” of computer. 3. Click button to select “Add Printer or Scanner”. 4. Select printer and then select the corresponding printer mode from the “Use” menu popping out. 5. Click “Add”. 3.3.2.Add up the printer via wireline connection 1. Turn the power of printer and computer on. 2.
Wired Network Settings (For wired network printer models) 4 Chapter 4. Wired Network Settings (For wired network printer models) ............................................................4-2 4.1. Set IP Address ..........................................................................................................................4-2 4.2. Install the Printer to Network.....................................................................................................4-3 4.3.
4. Wired Network Settings (For wired network printer models) You may need to set some network parameters on the printer. These parameters can be set from the embedded Web server. 4.1. Set IP Address The IP address of the printer may be automatically obtained through DHCP function or set manually. | Automatic Setting DHCP automatic setting function is enabled by default on the printer. 1. Connect the printer to the network through a network cable and complete the startup preparation work. 2.
4.2. Install the Printer to Network In this setting, the printer is directly connected to the network and can be set to allow all computers on the network to print directly on the printer. 1. Before starting the printer, first connect the network cable to the network port of the printer to establish direct connection to the network. 2. Start the printer and wait until the status indicator on the control panel displays Ready status, as shown below. 3. Insert the printer CD into the computer.
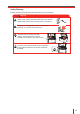
4.3. Setting Network Products 4.3.1. View or Change Network Settings You can use the embedded Web server to view or change IP settings. 1. Long press the "Cancel/Continue" button on the control panel to print Demo information page, and view the IP address of the printer. Demo page can be printed by long pressing the button on the control panel (as shown in the figure below) in the idle status. 2. Type the IP address in the Web browser's address bar to access the embedded Web server. 3.
Wireless network setup (applicable to Wi-Fi models) 5 Chapter 5.Wireless network setup (applicable to Wi-Fi models) ......................................................................5-2 5.1.Basic structure mode ................................................................................................................5-2 5.1.1.Wireless network setup tools .............................................................................................5-2 5.1.2.Wi-Fi Protected Setup (WPS) setup.......
5.Wireless network setup (applicable to Wi-Fi models) Depending on model, the printer with Wi-Fi printing function supports the two types of wireless network connection of both infrastructure connection mode and Soft-AP, while there is usually only one connection between computer and printer at a time. If you have problems during wireless network setup, please refer to Chapter 5.3 Wireless Network Setup Frequently Asked Questions. Basic structure mode: connecting to a wireless device via router 1.
5.1.1.2.Setup methods of wireless network setup tools 1. Take the wireless network setup tool in computer. 1) Windows system: Click the “Start menu” – “All programs” - “Pantum”- Product name – “Wireless network setup tool”. 2) Mac system: click “Go” - “Applications” - “Pantum” - “Utilities” - “Wireless Network Configuration Tool” on the computer Finder menu bar. 2. Use USB cable to connect and configure. Select “Yes, I have an USB cable that can be used for installation” in the following interface.
Note: • The SSID you selected should be consistent with the SSID of access point (wireless router) connected to your computer. 2) Please tick “No” to configure other wireless network needed to connect to. Complete configuration according to interface prompt. Note: • At present, the printer supports 3 types of safe modes: none, WEP and WPA/WPA2. 1) None: There is no encryption method used. 2) WEP: Send and receive data via security key by using WEP (Wired Equivalent Privacy).
2.2 The computer is not connected to wireless network Input the SSID (case sensitive) and password of access point (wireless router) in the interface below. Complete configuration according to interface prompt. Note: • If you do not know the SSID of access point (wireless router), please click “Print Wireless Network Information Page” to view the SSID of the needed access point (wireless router).
1) Use WPS method to perform steps below to start wireless network on printer. (Please refer to Chapter 5.1.2 for detailed WPS configuration) 2) Judge if the printer is successfully connected according to the status of Wi-Fi indicator on printer. If configuration failed, please click “Previous” to configure again; if configuration succeeded, please click “Done” to complete configuration.
5.1.2.Wi-Fi Protected Setup (WPS) setup If the access point (wireless router) supports Wi-Fi Protected Setup (WPS), the Wi-Fi key on the control panel of printer and WPS key on access point (wireless router) can be pressed in order to connect the printer to wireless network. 5.1.2.1.Preliminary preparations 1. The access point (wireless router) supports Wi-Fi Protected Setup (WPS). 2. A printer that has wireless network function. 5.1.2.2.Wi-Fi Protected Setup (WPS) method 1.
5.2.Wi-Fi hotspot mode You can establish a connection between a wireless network-enabled computer and a wireless network-enabled printer without using an access point (wireless route). 5.2.1.Preliminary preparations 1.Printer with Wi-Fi hotspot function. 2.Computer with wireless network function. 5.2.2.Wi-Fi Hot Connection Enable Wi-Fi-Hot of the printer before connecting the printer hot.
4. The following aspects should be inspected if the printer has problems while they are used in network: • Inspect if the firewall software blocks communication. If the computer and printer ar connected in the same network but they cannot be searched, the communication might be blocked by firewall software. Please refer to the user guide of firewall software to turn firewall off and then try to search the printer again. • Inspect if the I address assignment of printer is correct.
Pantum Mobile Print 6 Chapter 6. Pantum Mobile Print........................................................................................................................6-2 6.1. What's Pantum Mobile Print.....................................................................................................6-2 6.2. Download Pantum Mobile Print................................................................................................6-2 6.3. Supported Mobile Operating System..........................
6. Pantum Mobile Print 6.1. What's Pantum Mobile Print Pantum Mobile Print is a free application, which allows users to directly print photos, documents and WebPages from the mobile terminal.Mobile Print of Pantum is applicable to Android 4.0-8.0 mobile operating system with a resolution of 480*800dpi or above and 3.5” screen.It connects your mobile device with the printer through Wi-Fi access points.