3. Click “Add printer” button at the top of interface, then select the way according to your habit to add the printer. 4. Select the function you want and then do relevant settings to meet your functional demands. Note: • If failure of operation, please check if your Android mobile device has access to the wireless network into which your printer is connected. • If the Android device cannot detect any printer, please inspect if power of the printer is turned on and if the printer is turned on.
Print 7 Chapter 7. Print . ...............................................................................................................................................7-2 7.1. Print Function............................................................................................................................7-2 7.2. Opening Help Document ..........................................................................................................7-3 7.3. Manual Duplex ................................
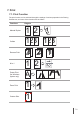
7. Print 7.1. Print Function The print function can be achieved through the settings of various properties in the Printing Preferences, and some of the functions are as follows.
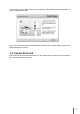
Note: • You can select the 2 x 2 Poster Print in N-in-1 to enable the poster printing function. • You can open the Printing Preferences and click Help button to view the specific function explanation. For information about how to open the help document, see Section 7.2. You can open the Printing Preferences and click Help button (for Windows system only). The help document contains the user guide where you can find the information on print settings.
7.3. Manual Duplex 1. The printer driver supports manual duplex. Note: •If the paper is thin, it may wrinkle. • If the paper is curled, make it flat and put it back into the manual feeder tray or automatic feeder tray. • If the manual duplex function causes a paper jam, see Section 10.1 for handling it. 2. Ensure that certain amount of paper is loaded into the automatic feeder tray before printing. Note: • For loading paper, see Section 2.2.
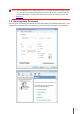
b) Select Pantum printer Click Preferences to set up for printing.
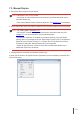
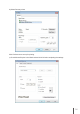
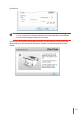
d) Click Print. Note: • It is recommended to raise the output tray to prevent the paper from sliding out of it. If you choose not to raise the output tray, we recommend that you immediately remove the printed paper output from the printer. e) Send the print job after choosing Manual Duplex, then the following prompt window will appear, telling you the next specific operations. Interfaces are different depending on the models.
f) After turning over the paper according to the prompt, press Continue button of the printer to go on printing the other side. g) You can click Close button to close this prompt window, and it will not appear until the next Manual Duplex job comes in. 7.4. Cancel Print Job Press and hold the Cancel/Continue button on the control panel to cancel the job you want to cancel during the printing process.
Control Panel 8 Chapter 8. Control Panel ...................................................................................................................................8-2 8.1. Control Panel Overview for P2500 Series ................................................................................8-2 8.1.1. Functions of Buttons on the Control Panel .......................................................................8-2 8.1.2. Function of LED Indicators on the Control Panel .........................
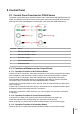
8. Control Panel 8.1. Control Panel Overview for P2500 Series The printer control panel layout includes 2 buttons and 2 multi-colored LED indicators as shown below. The diagram on the left shows the control panel of the printer with USB+Wi-Fi interface, while the one on the right displays the control panel of the printer with USB interface only: 5 Serial No. Name 1 Multi-colored LED1 indicator 2 Multi-colored LED2 indicator 3 Wi-Fi search button 4 Cancel/Continue button 5 Information button 8.
8.1.2. Function of LED Indicators on the Control Panel 8.1.2.1. LED1 Status Indication The meanings of the status indication of LED1 are as follows: Paper/Wi-Fi Serial Multi-colored No.
8.1.2.2. LED2 Status Indication The meanings of the status indication of LED2 are as follows: Serial No. Data/ Cartridge Multi-colored LED2 Status Indication Status Description (For printers with USB+ Wi-Fi interface and the ones with USB interface only) 1 Starting and warming up the printer, waking up and warming up the printer, and warming up the printer by opening and closing its cover.
8.1.2.3. Indication of LED1 and LED2 Combination Status You can refer to the indicator combination list for information on the working status of the printer. Some of the LED1 and LED2 combined indications are as follows: Serial No.
Routine Maintenance 9 Chapter 9. Routine Maintenance.......................................................................................................................9-2 9.1. Cleaning the Printer ..................................................................................................................9-2 9.2. Maintenance of Laser Toner Cartridge .....................................................................................9-4 9.2.1. Use and Maintenance of Laser Toner Cartridge .......
9. Routine Maintenance 9.1. Cleaning the Printer Note: • Please use mild detergents. Please clean the printer in accordance with the following steps: 1. Turn off the main power switch and unplug the power cord and USB cable. P2200/P2500 Series P2600 Series 2. Use a soft cloth to wipe the outside of the printer clean.
3. Open the upper cover and take out the laser toner cartridge. P2200/P2500 Series P2600 Series Note: • When removing the laser toner cartridge, put the cartridge in a protective bag or wrap it with thick paper to avoid direct light damaging the photosensitive drum. 4. Clean the inside of the printer by using a dry and lint-free cloth to gently wipe the shaded area as shown in the figure below.
9.2. Maintenance of Laser Toner Cartridge 9.2.1. Use and Maintenance of Laser Toner Cartridge For better print quality, please use the original Pantum laser toner cartridge. Note: when using the laser toner cartridge, please pay attention to the following: • Unless used immediately, otherwise, do not remove the laser toner cartridge from the package. Do not attempt to refill the laser toner cartridge without authorization. Otherwise, the resulting damage is not included in the printer warranty.
9.2.3. Replace Laser Toner Cartridge Note: before replacing the laser toner cartridge, please pay attention to the following: • The laser toner cartridge surface may contain toner. Please remove it carefully to avoid spilling. • Put the removed laser toner cartridge on a piece of paper to avoid the toner from accidently spilling.
3. Remove the protective cover, and put the laser toner cartridge into the printer along the guides P2200/P2500 Series P2600 Series Note: • Check whether there is any seal on it before installing the laser toner cartridge into the printer; if there is any, please tear off the seal and then install the cartridge. P2200/P2500 Series P2600 Series 4.
Troubleshooting 10 Chapter 10. Troubleshooting . ........................................................................................................................10-2 10.1. Clearing Jammed Paper ......................................................................................................10-2 10.1.1. Paper Jam in the Feed Port ...........................................................................................10-3 10.1.2. Paper Jam inside the Printer..................................
10. Troubleshooting Please read this section carefully. It can help you solve common trouble in the printing process. If the problems appeared cannot be solved, please contact Pantum Aftersales Service Center. Prior to handling common trouble, first check that: • The power cord is connected correctly and the printer is powered on. • All of the protective parts are removed. • The laser toner cartridge is correctly installed. • The output bin is fully closed. • The paper is correctly loaded into the tray.
10.1.1. Paper Jam in the Feed Port If the output bin is open, please close it first. Gently pull the jammed paper straight out. P2200/P2500 Series P2600 Series (automatic feeder tray and manual feeder tray) If the paper does not move while being pulled, or there is no paper in this area, please check the inside of the printer. 10.1.2. Paper Jam inside the Printer 1. Open the upper cover.
2. Open the upper fuser guide to decrease the pressure of compression spring. P2200/P2500 Series P2600 Series 3. Pull the jammed paper out of the fuser unit. P2200/P2500 Series P2600 Series If no jammed paper is found, please go to the next step. 4.
5. Slowly pull the jammed paper out along the paper output orientation. P2200/P2500 Series P2600 Series 6. After removing the jammed paper, insert the laser toner cartridge into the printer along the guides until you hear a click assuring you that the cartridge is fully inserted. P2200/P2500 Series P2600 Series 7. Put the paper in the tray neatly, and do not carry out the next print until the indicator resumes print-ready status.
10.2. Common Troubleshooting 10.2.1. Common Trouble Trouble Cause Solution The cable between the computer and the printer is not connected properly. Error in specifying the print port. The printer is offline, and Use Printer Offline is checked. The printer does not recover from an internal error, such as a paper jam, paper empty, etc. Disconnect and then reconnect the printer cable. Check the printer settings to ensure that the print job is sent to the correct port.
Trouble Cause Solution Problems in Handling Paper The vapor comes out around the paper discharge area The heat generated during the toner fusing causes the paper to vapor (This happens even more often when you use dampened paper under low ambient temperature) Vapor is not an abnormality in this case, but still you can use newly unpacked paper to avoid generation of vapor. Also, keep your paper from the damp. Power off the printer and unplug the power cord when there is a smell of burning.
10.2.2. Image Defects Trouble Cause Solution • Toner is low. • The print media does not meet usage specification, such as the media is damp or too rough. • The resolution in the print program is set too low. • The laser toner cartridge is damaged. • Please properly use the print media within the specification range. • Setup the print resolution in the program. • Please use the print media within the specification range. • Clean the feed channel.
Trouble Cause Solution • Please use the print media within the specification range. • Clean the feed channel inside the printer. Black background (gray background) • The print media that does not meet usage specification, such as the media is damp or too rough. • The laser toner cartridge is dirty. • The internal part of the laser toner cartridge is damaged. • The feed channel is dirty. • The transfer voltage inside the printer is abnormal. • The laser toner cartridge is dirty.
Trouble Cause Solution • The laser toner cartridge is installed incorrectly. • The internal part of the laser toner cartridge is damaged. • Abnormal charge inside the printer; the laser toner cartridge is not charged. • Ensure to install the cartridge correctly. • The print media that does not meet usage specification, such as the media is damp or too rough. • The inside of the printer is dirty. • The laser toner cartridge is damaged. • The internal part of the printer is damaged.
Product Specification 11 Chapter 11. Product Speci ication . .....................................................................................................................11-2 11.1. P2200/P2500 Series Speci ication ...........................................................................................11-2 11.1.1. Speci ication Overview ......................................................................................................11-2 11.1.2. Printing Speci ication .......................
11. Product Specification 11.1. P2200/P2500 Series Speci ication Note: • Specification values are slightly different for different models of printers with different functions. These values are based on the initial data. For more information about the latest specification, please visit: www.pantum.com 11.1.1. Speci ication Overview Processor 600MHZ Memory 64MB/128MB/258MB Power Supply 220V Model: AC 220-240V, 50/60Hz, 3.0A 100V Model: AC 100-127V, 50/60Hz, 6.0A 110V Model: AC 110-127V, 50/60Hz, 6.
11.1.2. Printing Specification Print Speed A4 20/22ppm Letter 21/23ppm First Page Print Time 7.8s Print Language GDI Maximum print size Legal (216mm*355.
11.2. P2600 Series Specification Note: • Specification values are slightly different for different models of printers with different functions. These values are based on the initial data. For more information about the latest specification, please visit: www.pantum.com 11.2.1. Speci ication Overview Processor 600MHz Memory 64MB/128MB Power Supply 220V Model: AC 220-240V, 50/60Hz, 3.0A 100V Model: AC 100-127V, 50/60Hz, 6.0A 110V Model: AC 110-127V, 50/60Hz, 6.
11.2.2. Printing Specification Print Speed A4 24ppm Letter 25ppm First Page Print Time < 8.5s Print Language GDI Maximum print size Legal (216mm*355.