
Quick Start Guide
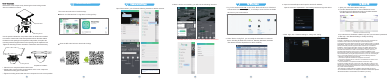

Open “RXCamView” you will see the following interface to add the cameras.,
3 Open the Internet Explorer and input the device's IP address;.
Input the username & password in the following interface to login the device.
4 After login click Remote Setting” to change the setting. ,.“
5
In Windows
6
In MAC OS
2. Under "Device Config Tool", you can modify the information of a selected
device. Including IP, Media Port, Web Port, Gateway, Net Mask, Net Mode.
(The default username & password is: admin & admin)
Please refer to “Help” section for more detailed instruction.
※
1. Open your router web interface and login.
2. Find the "Attached device" or "Connected device" menu.
Find the device's IP address according to it's MAC address.
The Mac address is labeled on the device.
3. Input the device's IP address in Safari, login with your username & password.
4. After login, click "Remote Setting" to modify the setting.
Picture for reference only
There are two methods to install the App.
Search for “RXCamView” in App Store or Google Play.
Install the APP
Scan the QR code below to download the App.
Camera Settings
1.Click menu
2.Click Device List
When choose Manual Add, input the
correct camera information and then
click Save.
If add the device successfully, you will see the following interface.
Click Help
log in the website and click “Device Search for Windows”www.al8.co
to download “Device Config Tool”, it will help to search all the available
devices on your local network.
1.
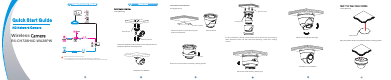
Use the position indicated on the position sticker to drill the holes needed
Tighten the
Remove the cover component by loosening the three locking screws
with the included hex wrench.
Expansion Bolt
Mounting Screw
to mount the camera base. Insert the expansion bolt into the holes. Match
the base's mount openings to the expansion bolts position, then place the
mounting screws through the base's mount opening into the expansion bolt.
Tighten the m to ensure the camera base mounted securely.ounting screws
Place the cover component back onto the base.
Cover ComponentCover Component
Completion of Installation
※
Locking Screws
Please make sure the locking screw position on the cover component
※
matches the locking post on the base.
※
07
08
09
10
11
12
13
For IOS
For Android
locking screws after the cover component is in the correct position.
FCC Statement
Changes or modifications not expressly approved by the party responsible for
compliance could void the user's authority to operate the equipment.
This equipment has been tested and found to comply with the limits for a Class B
digital device, pursuant to Part 15 of the FCC Rules. These limits are designed to
provide reasonable protection against harmful interference in a residential
installation. This equipment generates uses and can radiate radio frequency
energy and, if not installed and used in accordance with the instructions, may
cause harmful interference to radio communications. However, there is no
guarantee that interference will not occur in a particular installation. If this
equipment does cause harmful interference to radio or television reception, which
can be determined by turning the equipment off and on, the user is encouraged
to try to correct the interference by one or more of the following measures:
-- Reorient or relocate the receiving antenna.
-- Increase the separation between the equipment and receiver.
-- Connect the equipment into an outlet on a circuit different from that to which
the receiver is connected.
-- Consult the dealer or an experienced radio/TV technician for help
This device complies with part 15 of the FCC rules. Operation is subject to the
following two conditions (1)this device may not cause harmful interference, and
(2) this device must accept any interference received, including interference that
may cause undesired operation.
This equipment complies with FCC radiation exposure limits set forth for
an uncontrolled environment. This equipment should be installed and operated
with minimum distance 20cm between the radiator & your body